Table of Contents
Advertisement
Advertisement
Table of Contents

Related Manuals for UROVO i60XX Series

Summary of Contents for UROVO i60XX Series
- Page 1 User Manual for the i60XX Series...
- Page 2 UROVO Technology Co., Ltd. (hereinafter referred to as the Company) reserves the right to change the features, specifications, warranty information and document contents of related products at any time without prior notice.
-
Page 3: Table Of Contents
Content CONTENT ..................3 CHAPTER 1 PACKING CONFIRMATION .......... 5 Checking Articles Contained in the Package ....5 CHAPTER 2 INTRODUCTION ............6 Product Introduction.............. 6 Main Functions and Features ..........7 Detailed Parameters ............. 9 Function Introduction: Front View and Side View ..12 Master Keyboard Introduction........... - Page 4 CHAPTER 4 ADVANCED SETTINGS ..........32 Setting the Power Button Function ........32 Setting the GPRS Network ..........32 Setting the Wi-Fi Network ..........40 Setting the Options for Barcode Scanning ..... 45 CHAPTER 5 AFTER-SALES SERVICE..........48 Support and Service ............48 Warranty Period ..............
-
Page 5: Chapter 1 Packing Confirmation
Chapter 1 Packing Confirmation Checking Articles Contained in the Package Before using the product, please check whether the package contains the following articles: Power adapter Battery Connector adapter Data line... -
Page 6: Chapter 2 Introduction
The i60XX series adopt ergonomic design and is compact and flexible, shock-proof, and drop-proof. The i60XX series can work in the standby mode for a long time. In addition, the i60XX series adopt the dual power supply mode and support the conversation function. -
Page 7: Main Functions And Features
RS232 serial port, and Bluetooth communication. The i60XX series comply with the CISCO CCX2, 3 security standards and support the CISCO AP and security regulations. The i60XX series can be used to update data remotely. Windows CE Operating System... - Page 8 Dual power supply mode: When the master battery is used up and the slave battery is fully charged, the product can work in the standby mode for six hours to prevent data loss caused by unexpected power failure. Extensible hardware module A camera with 2 million/3 million pixels GPS positioning High frequency/ultrahigh frequency RFID read/write...
-
Page 9: Detailed Parameters
Detailed Parameters Model i60XX SAMSUNG S3C2451 (533 MHz) Operating Microsoft Windows CE 5.0 OS System (Multi-lingual) 128 MB Flash-ROM 128/256/512 MB (standard Memory configuration: 128 MB) Extension Micro SD/TF slot (a maximum of 16 GB) Scanning engine One-dimension laser scanner type Scanning speed 100±... - Page 10 English, Pinyin, and Chinese Soft keyboard handwriting Input Hard keyboard 28-key alphanumeric keyboard Scanning start the central key The i60XX product supports communication on the 802.11b/g Wi-Fi WLAN with a rate of Wi-Fi WLAN 54 Mbit/s, which meets the (standard requirements of the CISCO configuration) CCX2, 3 security standards and...
- Page 11 3.7 V 2800 mAh rechargeable Master battery lithium battery Power 8 or above (depending on the Working hours (Dual-Power actual environment) Mode) Charging time. 3.5 hours 150 mAh, providing power for Slave battery six hours Ingress IP54 protection Ergonomic 150 mm (length) x 70 mm (width) Dimensions design x 25 mm (thickness)
-
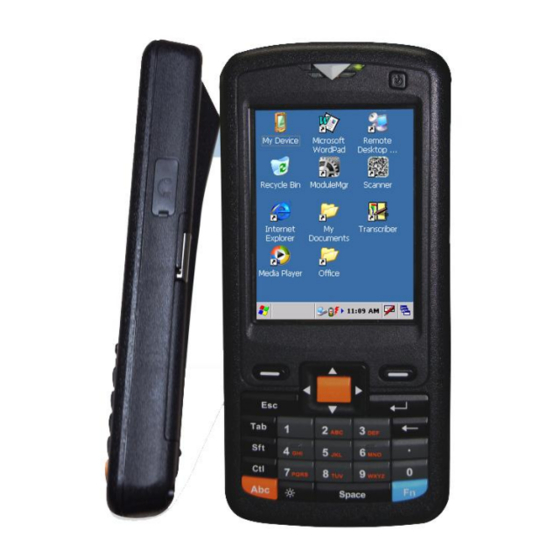
Page 12: Function Introduction: Front View And Side View
The i60XX series have successfully passed the CCC compulsory product certification, CE certification, and obtained the Certification CCC and CE type approval certificate for radio transmission equipment issued by the Ministry of Industry and Information Technology. *The preceding parameters are for reference only. Parameters of a specific model are subject to specific configurations. - Page 13 7 Reset hole 6 USB and charging interface 4 Headphone jack Charging and system indicator The indicator is displayed in red during charging and green when the charging is complete and the system runs properly. The indicator blinks in green when the power is insufficient. Scanning indicator The indicator is displayed in red when a barcode is scanned successfully.
-
Page 14: Master Keyboard Introduction
You can use a stylus to click the reset hole to reset the device. Master keyboard For details about the master keyboard, see “Master Keyboard Introduction”. Master Keyboard Introduction 1 Bar code 2 Arrow keys scanning key 4 S2 key 3 S1 key 5 ESC key 6 Enter key... - Page 15 key on a computer keyboard. ESC key: You can press the ESC key to perform operations such as cancel and exit. Enter key: You can press the Enter key for confirmation or to switch to next line. Backspace key: You can press to delete the previous character.
-
Page 16: Function Introduction: Back View
Function Introduction: Back View 2 Camera 1 Widow for scanning bar codes 3 Stylus slot 6 Master battery cover buckles 4 TF card slot 7 Battery cover detection switch 5 SIM card slot Widow for scanning barcodes Laser comes out from this window. Do not look into the window with naked eyes. - Page 17 Master battery cover buckles The master battery cover buckles are used to fix the battery cover. Battery cover detection switch The battery cover detection switch is used to check whether the batter cover is closed properly to ensure normal running of the device.
-
Page 18: Chapter 3 Using The Device
Chapter 3 Using the Device Installing the SIM Card, Memory Card and Battery Rotate the master battery cover buckles by 90 degree to remove the battery cover. Insert the SIM card or Micro SD/TF card into the combo deck in the battery compartment and fasten the buckle. -
Page 19: Changing Date And Time
If you press and hold down the power button for more than three seconds when the device is powered-on, the following dialog box is displayed: Select Yes to power off the device. During power-off, the power supply is cut off and data in the memory is lost. - Page 20 Click the Time Zone drop-down list to choose the required time zone. Click Apply on the lower right corner of the dialog box to save the configuration. Click the number indicating the year to enter a year directly or change the year by clicking the up and down arrows.
- Page 21 Click the characters indicating a month to change it in the displayed menu or click the up and down arrows to change the month. Click the mapping number in the date area to change the date. After the configuration is complete, click OK on the upper right corner of the dialog box to save the...
-
Page 22: Using The Stylus
Using the Stylus Clicking objects on the device screen is the basic operation and is similar to using the mouse to click objects on a computer screen. When the device is powered on, you can use the stylus to perform multiple operations, such as starting an application, choosing a menu, or selecting items in a dialog box. - Page 23 Use the stylus to click the keyboard icon on the taskbar. The list of available soft keyboards is displayed on the screen. You can choose the required soft keyboard from the list. Click Keyboard to display the keyboard input panel.
- Page 24 Use the stylus to click the soft keyboard to enter letters, numbers or symbols. Choose Hide Input Panel to hide the current soft keyboard.
-
Page 25: Managing Device Functions
Entering text by using the hard keyboard You can use alphanumeric keys on the master keyboard to enter text. The current input mode is displayed on the taskbar. You can press to switch the current input mode to other modes such as number mode, upper case mode, and lower case mode. -
Page 26: Scanning Barcodes
Click Enable or Disable to enable or disable the related functions. When you enable/disable a certain function, the system retains the configuration and enables/disables the function automatically after next power-on. Scanning Barcodes You can use the ModuleMgr or ScannerSetting program to start the scanner, and then press the orange barcode scanning key on the master keyboard to scan barcodes. -
Page 27: Connecting To A Pc
The bar code is displayed in this area. The bar code type is displayed in this area. Connecting to a PC You can connect the device to a PC by using a data line if Microsoft ActiveSync 4.5 (Window 2000/XP/2003) or Windows Mobile Device Center 6.1 (windows Vista/2008/7) is installed on the PC. -
Page 28: Restarting The Device
Windows Mobile Device Center 6.1 (windows Vista/2008/7) from www.Microsoft.com. Restarting the Device You may need to restart the device to recover normal running occasionally (when more applications are running than in normal cases or when certain software runs abnormally). The device can be restarted in the following two modes: Warm boot If you restart the device in warm boot mode, ongoing items are stopped... -
Page 29: Calibrating The Screen
Double-click the RestoreFactoryDefault icon. Calibrating the Screen After a period, the clicking point of the stylus may shift and you must re-calibrate the screen. Click the stylus icon in the control panel to display the Stylus Properties dialog box. Click the Calibrate tab in the dialog box, and then click Re-calibrate. -
Page 30: Checking The Remaining Electricity
Use the stylus to click the cross center on the screen. After each click, the cross is displayed in another position. After you click the cross center correctly for a consecutive five times, the cross disappears. At this point, you can press the Enter key to save the calibration. -
Page 31: Precautions For Using The Battery
Precautions for Using the Battery Certain files and information may be stored in the memory. If the battery runs out, these files and information are lost. Therefore, providing power to the device constantly is very important. In general cases, the device can work for more than eight hours after it is fully charged. -
Page 32: Chapter 4 Advanced Settings
Chapter 4 Advanced Settings Setting the Power Button Function You can click PowerButton icon on the control panel to set the power button function. Enable: You can press and hold down the power button to turn off the device. Disable: No function is provided when you press and hold down the power button. - Page 33 You can create the GPRS connection in the following two ways: Creating the connection manually. Double-click the Network and Dial-UP Connection icon on the control panel to enable the network and the dial-up connection manager. Click New Connections connection.
- Page 34 Enter the connection name, such as GPRS. Select Dial-up connection and click Next. Choose COM2: or COM3: and then click Configure.
- Page 35 On the Port Settings tab page, set Bits per second to 115200. On the Call Options tab page, enter the following command to initialize the modem: +CGDCONT=1,"IP","cmnet" Cmnet specifies the point to connect to the GPRS network of China Mobile. Click OK to switch back to the Modem dialog box.
- Page 36 Click Next. In the Phone Number area, enter the dial-up number such as *99***1#. You must query the mobile carrier to obtain this number. Click Finish. Double-click the created GPRS connection to display the Dial-Up Connection dialog box.
- Page 37 Click Dialing Properties to set the dialing location. Click Create to enter the new location name such as GPRS.
- Page 38 Click Edit to change the dialing mode. Change the texts in the three text boxes to G and then click OK to save the settings and exit.
- Page 39 Click OK to save the settings and exit. At this point, the GPRS connection is created successfully. Creating the connection automatically. To simplify the setting of GPRS connection, the device provides the GPRSSetting tool to set the connection quickly. Choose My Device > Windows and click the GPRSsetting icon to enable the GPRSsetting tool.
-
Page 40: Setting The Wi-Fi Network
Enter the entry name, such as GPRS. Enter the required APN, such as cmnet. Enter the dialing number. User name and password are not required. Setting the Wi-Fi Network Before using the Wi-Fi, you must ensure that the Wi-Fi function is enabled. - Page 41 Click the network icon to display the interface for setting the Wi-Fi function. On the Wireless Information tab page, available networks are displayed. You can view the SSIDs of APs for which the broadcast function is enabled. Double-click the SSID to be connected.
- Page 43 When you add a new network, you must specify the network information. Enter the network name. Select this check box to directly connect to another device or PC. The encryption type varies with the authentication mode. Select the correct authentication mode first. Click Advanced to display the interface for advanced settings.
- Page 44 This icon is displayed only when the Wi-Fi function is enabled. Use the stylus to click and hold down the icon and choose Properties in the displayed context menu. Enter the IP address, subnet mask, and default gateway.
-
Page 45: Setting The Options For Barcode Scanning
Setting the Options for Barcode Scanning You can modify the advanced settings of the scanner by using the ScannerSetting program. Click Advanced Options to display the interface for advanced setting. To enhance the decoding speed, the decoding function is disabled for certain types of barcodes by default. - Page 46 In the Barcode Type list box, choose bar code types for which the decoding function is enabled. You can set the scanner to a standard input device. At this point, the scanned barcodes are converted into keyboard messages. You can scan barcodes by using programs not supporting barcode scanning, including the Wordpad and remote desktop programs.
-
Page 48: Chapter 5 After-Sales Service
Chapter 5 After-Sales Service Support and Service Website: You can connect your PC to the Internet and visit www.urovo.com to obtain the product specifications, optional equipment, and related information. Customer support: If you have questions about this manual or you cannot solve any problem through the website, please contact our customer service staff. -
Page 49: Warranty Period
Get your device ready. Our customer service staff may ask you to operate the device. Prepare your questions. Detailed problem description can help the customer service staff to solve your problem quickly. Warranty Period A customer will enjoy a warranty of 12 months for the handheld terminal (subject to the sales contract) and a warranty of 3 months for accessories from the date of purchase. -
Page 50: Warranty Scope
In any case, the Company is not liable for direct, indirect, special, accidental, or ensuing damages (including lost profits) regardless of the warranty statement, contract, negligence, or any other legal theory. Contact Company: Shenzhen UROVO Technology Co., Ltd. Website: www.urovo.com Address: Area A, 7/F, Zondy Cyber Building, Keyuan South Road, High-tech Industrial Park, Nanshan District, Shenzhen, P.R.China... - Page 51 Content on the back of the manual: Shenzhen headquarters: Address: Area A, 7/F, Zondy Cyber Building, Keyuan South Road, High-tech Industrial Park, Nanshan District, Shenzhen, P.R.China Telephone: +86 755 86186300 Fax: +86 755 86186290 Shanghai Regional Office: Address: Room 606, Zhaoyi Science and Technology Park, No.18, Tianshan Road, Changning District, Shanghai Telephone: +86 21 62912706 Fax: +86 21 62912706...
Need help?
Do you have a question about the i60XX Series and is the answer not in the manual?
Questions and answers