Table of Contents
Advertisement
Advertisement
Table of Contents

Related Manuals for Motorola GP-688


Summary of Contents for Motorola GP-688
- Page 1 Инструкция для Motorola GP-688 Перейти в карточку товара 8 800 775 98 98...
- Page 2 GP688/GP688R 6866542D04-P...
- Page 3 MOTOROLA and the Stylized M Logo are registered in the U.S. Patent and Trademark Office. All other product or service names are the property of their respective owners.
-
Page 4: Table Of Contents
CONTENTS Attaching the Battery ... . . 19 Removing the Battery ... . .19 Computer Software Copyrights ..3 Attaching the Antenna . - Page 5 Receiving Short Data Messages..36 PERSONALITY ....45 Storing SDMs ....36 MPT .
-
Page 6: Computer Software Copyrights
Furthermore, the purchase of Motorola products shall not be deemed to grant either COPYRIGHTS directly or by implication, estoppel, or The Motorola products described in this otherwise, any license under the copyrights, manual may include copyrighted Motorola patents or patent applications of Motorola,... -
Page 7: Safety
FCC RF energy exposure requirements. Before using this product, read the RF energy awareness information and operating instructions in the Product Safety and RF Exposure booklet enclosed with your radio (Motorola Publication part number 6864117B25) to ensure compliance with RF energy exposure limits. English... -
Page 8: Radio Overview
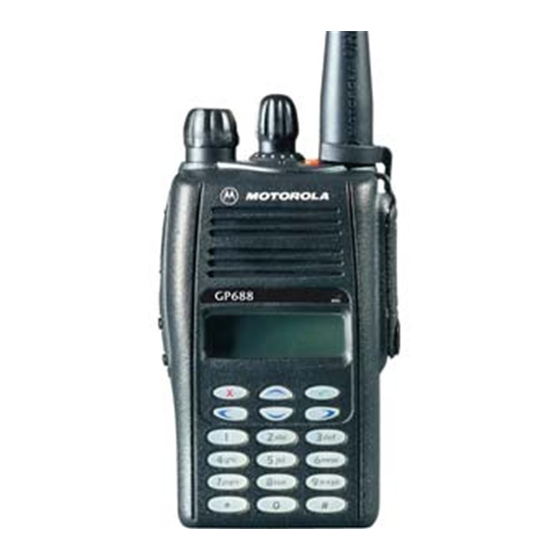
RADIO OVERVIEW This user guide covers the operation of the GP688/GP688R Portable Radio. Top Button Rotary Knob (programmable) LED Indicator On/Off/Volume Knob Microphone Push to Talk Button (PTT) LCD Display Clear Button (Side Button 1) Menu Keys Side Button 2 Keypad English... -
Page 9: Operation And Control Functions
OPERATION AND CONTROL FUNCTIONS Side Button 2 Personality button, otherwise programmable. Radio Controls Top Button (programmable) The numbers below refer to the illustrations on Recommended as Emergency button. the inside front cover. LED Indicator Green: Flashes to indicate NO SERVICE. Rotary Knob Red: On when radio is transmitting. -
Page 10: Programmable Buttons
The following table shows the features that can Programmable Buttons be assigned to the Top button and Side Button 2. Several of your radio buttons can be programmed (by Customer Programming Software CPS) to activate the radio features. Feature Description To make a call to a pre-determined number. -
Page 11: Menu Keys
Exit Key x Menu Keys Used to move up to the next higher Menu level. Menu/ Exit When the top level menu is selected this key is Select used to exit the Menu Mode. Also used to cancel/ end calls. Up Key + Used for scrolling when in Menu Mode. - Page 12 Menu Navigation Chart (Refer to Menu Navigation guidelines - lower, left-hand corner of this page) Delete Missed Contact Personality Status Contact Contact Calls List select/ select/ ID status select/ select/ enter ID enter ID 1,2..etc User Data Calls Absent search/ select/ edit entry enter ID...
-
Page 13: Keypad Keys
Keypad Keys Pressing will toggle between the upper 1 2 3 and lower case of the selected character. If the next character required is on the same 4 5 6 key, press to move the cursor forward one character. 7 8 9 If an error is made, press to delete the * 0 #... -
Page 14: The Keypad
Entering Characters using the Keypad Number of Times Key is Pressed > < ¿ & “ ‘ £ Ä Å À Æ ß Ç ¥ Á Æ É È Ê Ë Ê 4 G H Ì Í ³ 6 M N Ñ... -
Page 15: Lcd Display And Icons
LCD Display and Icons Symbol Name and Description Signal Quality Indicator Shows the radio signal quality. Five bars indicates the best signal. Contact List Edit Indicator Indicates user is editing the contact list. Displays channel, menu, and radio status information. The top two screen rows show radio Data Calls List Indicator On, indicates a data call in the list status indicator symbols, explained in the table... -
Page 16: Audio Signal Tones (Normal)
Audio Signal Tones (Normal) Tone Signal Description High pitched tone Low pitched tone Confidence tone when Key click any key pressed or Tone Signal Description Speech limitation alert. Self test Power up. Hardware error or Fail tone Call timed out Tone A Call clear indication. -
Page 17: Audio Signal Tones (Alternate)
Audio Signal Tones (Alternate) Tone Signal Description High to Low pitched tones Confidence tone when Key click any key pressed or Tone Signal Description Speech limitation alert. Self test Power up. Hardware error or Fail tone Call timed out Tone A Call clear indication. -
Page 18: Getting Started
For optimum battery life and operation use only • When charging a battery that is attached to the Motorola brand chargers. They were designed to radio, turn the radio off to ensure a full charge. operate as an integrated energy system. - Page 19 Battery chargers will charge only the Motorola authorized batteries listed below; other batteries will not charge Table 1: IP54 Radio Battery List Table 2: IP67 Radio Battery List Part No. Description Part No. Description Slim Li-Ion, 1000 mAh, Li-Ion FM IP67 Standard...
-
Page 20: Battery Label
Note: IP67 water submersible radios MUST be Battery Label fitted with Motorola authorized IP67 batteries to ensure proper functionality. IP67 Warning:When charging a IP67 battery, make sure that the IP67 battery (or IP67 battery with IP67 radio) is not wet prior to placing in the charger. -
Page 21: Recycling Or Disposal Of Batteries
Recycling or Disposal of Batteries Charger LED Status Motorola endorses and encourages the recycling Battery is charging of all re-chargeable batteries. Contact your local Green Battery is fully charged Motorola dealer for further information. Flashing Red * Battery is unchargeable... -
Page 22: Accessory Information
ACCESSORY INFORMATION Attaching the Battery Removing the Battery Turn off the radio, if it is turned on. Fit the extensions at the bottom of the battery into the slots at the bottom of the radio’s body. Slide the battery latches, on both sides of the battery, downwards. -
Page 23: Attaching The Antenna
Attaching the Antenna Removing the Antenna Align the threaded end of the antenna with the Turn the antenna counterclockwise until you radio’s antenna connector. can remove it. Turn the antenna clockwise to fasten it. English... -
Page 24: Draining Water From The Ip67 Gp688R Speaker
RADIO OPERATION DRAINING WATER FROM THE IP67 GP688R SPEAKER Turning The Radio On or Off • To turn the radio on, turn the On/Off//Volume Control knob clockwise. • To turn the radio off, turn the On/Off//Volume Note: If you accidentally drop your GP688R radio Control knob counterclockwise until you hear a into water, pick up the radio, and gently tap click. -
Page 25: Radio Registration
After this text has been displayed, the radio will scan Radio Registration for system access with the LED on the top of the When turned on, the radio enters a self test routine radio flashing GREEN and the scanning icon H lit. during which time the display is activated, the self When a system is acquired, the green LED will go test tone will sound and the LED will light green. -
Page 26: Radio Calls
RADIO CALLS The contact list can be entered directly by one click of the rotary knob (1) when the radio is in Making a Call the IDLE STATE. Use the rotary knob to scroll through the list and select the required name The radio is capable of making a variety of or number as indicated in step 4 below. - Page 27 To Add an Entry When finished with call. to enter Menu Mode. CLEAR BUTTON until: Add Contact x or to select: Add Contact Call Ended Tone A sounds You will see: Name? Use the keypad to enter the name (see If a contact list number is selected but no call pages 8 and 9).
- Page 28 To Delete an Entry To Edit an Entry to enter Menu Mode. to enter Menu Mode. until: until: Delete Contact Contact List to select: to select: Delete Contact Contact List You will see current until you see the entry you Alias 1 entry e.g.: want to edit...
- Page 29 To Search for an Entry You will see associated number When in Contact List or Delete Contact menu, 01256488116 e.g : you may search for an alias (name) by entering Use the keypad to edit the number (see characters from the keypad. pages 8 and 9) or delete and enter a new number.
-
Page 30: User Absent
User Absent Display shows: Idle Freetext User Absent can be selected on your radio When you are able to take calls, ensure that when you are unable to take calls. Any calls to User Absent is switched off by: your radio will be put into the Missed Calls list automatically and the message ‘Will Call Back’... -
Page 31: Dedicated Calls
enabled, entry into the user absent mode is Manual Dialling automatic and any calls received when you are To make a call from the keypad (12) away from your radio will be put into the Missed Calls list automatically and the Enter Telephone Number message “Will call back”... -
Page 32: Last Number Redial
Last Number Redial Keypad Edit If the radio is displaying a Contact List number, The last number dialled by the radio is stored a Keypad Dialled number, Status number or in the memory of the radio. Missed Call number, the last digit may be Partially entered numbers are also stored. -
Page 33: Ending A Call
Cancelling a Call Enter new 12345699 At any time while setting up a call it may be numbers cancelled by: PTT button or # to make radio call. CLEAR BUTTON or x or You will see: Calling Cancelling Note: The edited number is not saved at the end of See "Call Progress - Cancelling a Call". -
Page 34: Missed Calls
For display Call Type see " Call Progress - Receiving a call on an OACSU system Receiving" When the radio is called: Note: The system may have a limited call time, Tone D sounds CallerID indicated on the display, and the call may be terminated automatically if this call time is Tone B sounds Call Type... - Page 35 With the display showing ‘Missed Calls’ , Example: pressing any of the menu buttons provides a Display shows quick access into the Missed Calls List. Reception S The Missed Call List can also be entered where S is a status message associated with directly by pressing the Missed Call button (if the call programmed) when the radio is in the IDLE...
- Page 36 You can call back to any number in the Missed On a successful call set- up, the entry is Call list by: automatically deleted from the list together with an associated voice message. until: Alias Unanswered calls may be deleted from the Missed Call list at any time by pressing: PTT button or # to make the call.
-
Page 37: Call Diversion
To exit the Missed Call List: *411* To divert speech calls x button *441* only or MISSED CALL button to exit Menu mode. *412* To divert status/ data calls only Display shows: Idle freetext *442* Note: The calls in the stack are not deleted when Enter ID of radio to which you are the radio is turned off. - Page 38 Will redirect all calls from the radio with ID 3 To cancel calls redirected to your radio “234” to the radio with ID“432” #45 followed by 1 or 2 if necessary and If a call is made to a radio whose calls are currently being diverted: Tone D sounds Diverting...
-
Page 39: Special Calls
SPECIAL CALLS Storing SDMs Incoming SDMs are stored on receipt in the Short Data Messages (SDM) Short Data Message Calls List. Up to ten Short data messages may be set up, sent and SDMs can be stored by the radio. The data received using the radio keypad and controls. - Page 40 To view the calls in the list via the menu To save an SDM to be retained after the radio is switched off. to enter Menu Mode. Read the data message in the Data Calls until: Data Calls List. to select: Data Calls First call in list Alpha Alias...
-
Page 41: Data Calls List
Deleting Messages from the Data Calls List Status/Voice Call replies to an SDM Where an SDM contains a calling party To delete data messages from the data number, the radio can respond with a status calls list or while viewing data messages. message or voice call. -
Page 42: Making An Sdm Call
To initiate a data call via the keypad: Making an SDM Call SDM Calls may be initiated in three different *2* Part of modifier ways: 2 Enter message from keypad in Via the keypad using a Call modifier alphanumeric characters (ref pages 8 & 9) Via the Contact List Note: The maximum data message size is limited Final part of modifier... -
Page 43: Status Calls
To initiate a Data call via the contact list Note: The maximum data message size is limited to 20 characters which includes address In this method data may consist of alphanumeric information and data selection characters. characters which are preprogrammed into your radio by your dealer. - Page 44 4 Enter Called radio address Display shows for Select Contact 10 seconds: 5 Display shows: *005*NNNNN Current entry in or turn rotary contact list knob to display: Where NNNNN is called radio address. Make the call by: until: Alpha Alias (required name or PTT button or # to make radio call.
-
Page 45: Receiving A Status Call
Conversely you can dial the number, prefixing Receiving a Status Call it with*9*. Your radio receives a Status Call when: To initiate an emergency call: Tone G sounds Display alternates Status 04 1 Press the Emergency button every 2 second between: On Break 2 *9* followed by the radio... -
Page 46: Priority Calls
Your radio may receive an emergency call Broadcast Calls when: A broadcast call allows you to make calls to groups of radios. Note that on a broadcast call Tone D or Ring tone only the calling radio can talk and there is no will sound and indication that any radios in the group have Emergency... -
Page 47: Dtmf
To initiate a DTMF call: DTMF DTMF means Dual Tone Multi Frequency and Enter Access code is used when the radio is required to operate in a radio system with an interface to telephone Press and hold PTT systems. Enter desired number An access code, which is system dependent, is normally needed for DTMF, please contact your dealer or network manager for further... -
Page 48: Personality
PERSONALITY Talkgroup Talkgroup is an MPT personality following the The personalities described below are same rules or protocol, but is primarily for programmed into your radio by your dealer and talkgroup calls. In talkgroup personality, are accessible either via the personality button talkgroups are contained in a Talkgroup list, or via the menu. -
Page 49: Conventional Mode
Incoming calls to fixed and dynamic group where xx is the channel number. Use the rotary numbers are detailed in Receiving a Call and knob (1) to display and select the desired displayed under Call Progress - Receiving. channel. To make an outgoing call to a selected Prior to transmission always make sure that talkgroup, press the PTT and speak after the the channel is free (red LED not flashing). -
Page 50: Personality Selection
Personality Selection The display will be held for 2 seconds Personality selection may be entered directly while your radio retunes to the new by pressing the Personality button (5). You personality. may then scroll using the rotary knob and select a personality as described in step 7 Your radio will below, or scroll and select a personality as return... -
Page 51: Call Progress
CALL PROGRESS Unit unavailable Unavailable When in operation, your radio monitors each Unit number invalid Invalid Number step in setting up a call whether sending or receiving. These steps are displayed to System Busy System busy, try again provide you with call progress and indicate call types. - Page 52 Call Progress - Receiving Talkgroup call received Talkgroup NN Tone Display Comment (NN is list number) A call is being received Caller ID Dynamic group call Dynamic NN on OACSU received (may be alias or number - NN) Ring Caller ID A call is being received on FOACSU.
- Page 53 Call Progress - Cancelling a call Call Progress - Ending a call Tone Display Comment Tone Display Comment Call successfully Call ended, another call D/G Cancelling Call Ended cancelled by user can now be made English...
- Page 55 Mukim 12, S.W.D. 11900 Penang, Malaysia. Printed in Malaysia. MOTOROLA and the Stylized M Logo are registered in the U.S. Patent and Trademark Office. All other product or service names are the property of their respective owners. © 2007 by Motorola, Inc.
- Page 56 Motorola GP-688 Описание Характеристики...
Need help?
Do you have a question about the GP-688 and is the answer not in the manual?
Questions and answers