Table of Contents
Advertisement
Quick Links
Advertisement
Table of Contents

Related Manuals for MSI Wind-Top-AE1941 Series


Summary of Contents for MSI Wind-Top-AE1941 Series
- Page 1 Wind Top AE1941 Series All-in-One (AIO) PC MS-A928 System G52-A9281X4...
-
Page 2: Table Of Contents
Preface Contents Copyright Notice ������������������������������������������������������������������������������������������������������iii Trademarks �������������������������������������������������������������������������������������������������������������iii Revision ������������������������������������������������������������������������������������������������������������������iii Upgrade and Warranty ��������������������������������������������������������������������������������������������iv Acquisition of Replaceable Parts ����������������������������������������������������������������������������iv Technical Support ���������������������������������������������������������������������������������������������������iv Green Product Features ������������������������������������������������������������������������������������������iv Environmental Policy ����������������������������������������������������������������������������������������������� v Chemical Substances Information �������������������������������������������������������������������������� v Battery Information �������������������������������������������������������������������������������������������������� v Safety Instructions ���������������������������������������������������������������������������������������������������vi CE Conformity �������������������������������������������������������������������������������������������������������... -
Page 3: Copyright Notice
Trademarks All trademarks are the properties of their respective owners� ■ MSI is a registered trademark of Micro-Star Int’l Co�, Ltd� ■ Intel is a registered trademark of Intel Corporation� ■... -
Page 4: Upgrade And Warranty
Alternatively, please try the following help resources for further guidance� ◙ Visit the MSI website for technical guide, BIOS updates, driver updates and other information via http://www�msi�com/service/download/ ◙ Contact our technical staff via http://support�msi�com/ Green Product Features ◙... -
Page 5: Environmental Policy
Users should contact the local authorized point of collection for recycling and disposing of their end-of-life products� ◙ Visit the MSI website and locate a nearby distributor for further recycling infor- mation� ◙ Users may also reach us at cso@msi�com for information regarding proper Dis- posal, Take-back, Recycling, and Disassembly of MSI products�... -
Page 6: Safety Instructions
Preface Safety Instructions Read the safety instructions carefully and thoroughly� All cautions and warnings on the equipment or user’s manual should be noted� Keep the User’s Guide that comes with the package for future reference� Keep this equipment away from humidity and high temperature� Lay this equipment on a reliable flat surface before setting it up�... - Page 7 Wind Top Series Never pour any liquid into the opening that could damage or cause electrical shock� Place the power cord in a way that people are unlikely to step on it� Do not place anything on the power cord� When installing the coaxial cable to the TV Tuner, it is necessary to ensure that the metal shield is reliably connected to protective earthing system of the building�...
-
Page 8: Ce Conformity
Preface CE Conformity Hereby, Micro-Star International CO�, LTD declares that this device is in compliance with the essential safety requirements and other relevant pro- visions set out in the European Directive� FCC-B Radio Frequency Interference Statement This equipment has been tested and found to comply with the limits for a Class B digital device, pursuant to Part 15 of the FCC Rules�... -
Page 9: Weee Statement
Wind Top Series WEEE Statement (English) Under the European Union (“EU”) Directive on Waste Electrical and Electronic Equip- ment, Directive 2002/96/EC, which takes effect on August 13, 2005, products of “electrical and electronic equipment” cannot be discarded as municipal waste anymore and manufacturers of covered electronic equipment will be obligated to take back such products at the end of their useful life�... - Page 10 Preface (Polish) (Polski) Zgodnie z Dyrektywą Unii Europejskiej (“UE”) dotyczącą odpadów produktów elektrycznych i elektronicznych (Dyrektywa 2002/96/EC), która wchodzi w życie 13 sierpnia 2005, tzw� “produkty oraz wyposażenie elektryczne i elektroniczne “ nie mogą być traktowane jako śmieci komunalne, tak więc producenci tych produktów będą zobowiązani do odbierania ich w momencie gdy produkt jest wycofywany z użycia�...
- Page 11 Wind Top Series (Serbian) (Srpski) Po Direktivi Evropske unije (“EU”) o odbačenoj ekektronskoj i električnoj op- remi, Direktiva 2002/96/EC, koja stupa na snagu od 13� Avgusta 2005, proizvodi koji spadaju pod “elektronsku i električnu opremu” ne mogu više biti odbačeni kao običan otpad i proizvođači ove opreme biće prinuđeni da uzmu natrag ove proizvode na kraju njihovog uobičajenog veka trajanja�...
- Page 12 Preface (Norwegian) (Norsk) Under den europeiske unionens (“EU”) direktiv om deponering av elektroni- sk og elektrisk utstyr, direktiv 2002/96/EC, som trer i effekt 13� august 2005, kan ikke produkter av “elektronisk og elektrisk ustyr” lenger deponeres som husholdningsavfall og fabrikantene av disse produktene er forpliktet å...
-
Page 13: Overview
Chapter 1 Overview This system is integrated in design, selecting a stylish appearance with a anti-glare screen, which displays the simplicity of modern individualism and the comfort of home. With a flawless audio/video capabilities, and intui- tive user interface, it blends technology with life, making computers easier and more fun to use —... -
Page 14: Packing Contents
Overview Overview Packing Contents Wind Top Series AC/DC Adapter AC Power Cord User Manual & Driver/Utility Disk LCD Display Wiper Quick Guide Keyboard (Optional) Mouse (Optional) Stylus (Optional) * Please contact us immediately if any of the items is damaged or missing. * The illustrations are for reference only and your packing contents may slightly vary depending on the model you purchased. -
Page 15: System Overview
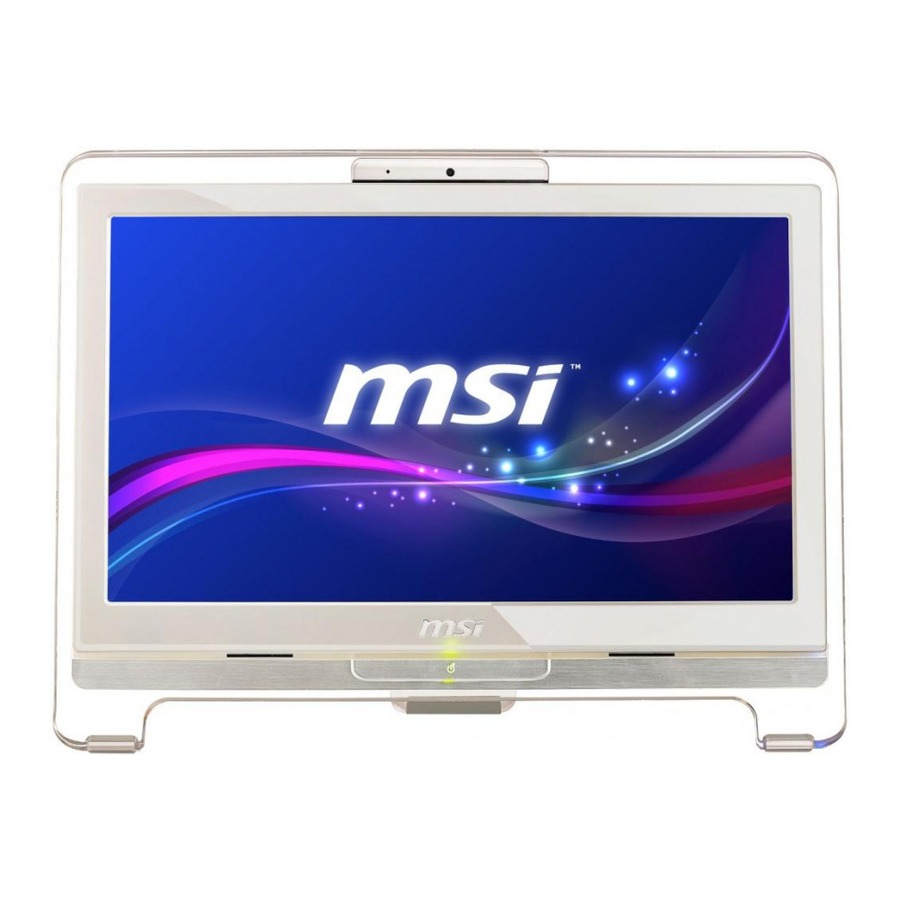
Wind Top Series Wind Top Series System Overview Front View Microphone The built-in microphone can be used for video chatting online. Webcam The built-in webcam with the microphone can be used for picture taking, video recoding, online conferencing and any other interactive applications. LCD Display The 18.5-inch TFT LCD display is with an optimal resolution of 1366 x 768 pixels and standard proportion of 16:9 widescreen. -
Page 16: Rear View
Overview Overview Rear View Important We suggest that you connect the AC/DC adapter to your AIO PC first and then connect the AC power cord to the socket-outlet for safety concerns. - Page 17 Wind Top Series Wind Top Series Ventilator The ventilator on the enclosure is used for air convection and to prevent the equipment from overheating. Do not cover the ventilator. Optical Disk Drive A DVD Super-Multi drive is integrated for your home entertainment. Card Reader Drive The built-in card reader may support various types of memory cards.
-
Page 18: Microphone Jack
Overview Overview RJ-45 LAN Jack The standard RJ-45 LAN jack is provided for connection to the Local Area Net- work (LAN). You can connect a network cable to it. Yellow Green/ Orange Color LED State Condition Left Yellow LAN link is not established. On (steady state) LAN link is established. -
Page 19: Side View
Wind Top Series Wind Top Series Side View Optical Disk Drive A DVD Super-Multi drive is integrated for your home entertainment. Eject Button Press the eject button to open the optical disk drive. Eject Hole Insert a thin, straight object (such as a paper clip) into the eject hole to open the optical disk drive manually if the eject button does not work. - Page 20 Overview Overview Card Reader Drive The built-in card reader may support various types of memory card. USB 2.0 Ports The USB (Universal Serial Bus) port is for attaching USB devices such as keyboard, mouse, or other USB-compatible devices. It supports up to 480Mbit/s (Hi-Speed) data transfer rate.
-
Page 21: System Specifications
Wind Top Series Wind Top Series System Specifications Processor ■ Intel Celeron Processor Processor ® ® ■ Thermal Design Power (TDP) 17W Chipset ■ Intel �M70 chipset �M70 chipset ® Memory ■ 1 DDR3 SO-DIMM slots (up to 4 GB) LA�... - Page 22 Overview Overview Storage ■ Hard Disk Drive: 2.5”, SATA ■ Optical Disk Drive: Slim DVD Super Multi (Blu-ray is optional) ■ Card Reader: 3-in-1 SD/ MS/ MMC 3-in-1 SD/ MS/ MMC Stereo Speaker ■ 2 stereo speakers WebCam ■ Support WebCam with microphone (optional) Power Supply ■...
-
Page 23: Component Replacement & Upgrade
Wind Top Series Wind Top Series Component Replacement & Upgrade Please note that certain components preinstalled in the product may be up- gradable or replaceable by user’s request depending on the models users pur- chased. 1-11 1-11 To learn more about upgrade limitation, please refer to the specifications in the User’s Manual. -
Page 25: Getting Started
Chapter 2 Getting Started This chapter provides you with the information on hard- ware setup procedures. While connecting peripheral devices, be careful in holding the devices and use a grounded wrist strap to avoid static electricity. -
Page 26: Safety & Comfort Tips
Getting Started Getting Started Safety & Comfort Tips The AIO PC is a portable platform that allows you to work anywhere. However, choosing a good workspace is important if you have to work with your PC for a long period of time. Your work area should have enough illumination. -
Page 27: Hardware Setup
Wind Top Series Wind Top Series Hardware Setup Positioning Your System 1. Place your system on a flat and steady surface such as a table or desk. 2. Pull the stand open and tilt the LCD display. To stabilize the system, make sure that you pull the stand to its fullest extent until it springs back. - Page 28 Getting Started Getting Started Connecting the AC Power 1. Assemble the AC/DC adapter and the AC power cord. 2. Plug the DC end of the adapter to the AIO PC. 3. Plug the male end of the AC power cord to the electrical outlet. Important We suggest that you connect the AC/DC adapter to your AIO PC first and then connect the AC power cord to the socket-outlet for safety concerns.
-
Page 29: Powering On The System
Wind Top Series Wind Top Series Powering on the System Press the power button to power on the system. -
Page 31: System Operations
Chapter 3 System Operations This chapter provides you with essential information on system operations, such as system boot setup, recovery disc creation, network connection, and so on. Important It is highly recommended that you create a system re- • covery disc as the backup solution in the event of a catastrophic disk failure or other accidents. -
Page 32: System Booting Setup For The First Time
System Operations System Operations System Booting Setup for the first time For the first-time use, you will need to go over the following steps to start using your Wind Top Series AIO PC. The entire booting setup will take you around 30 minutes. -
Page 33: Creating System Recovery Disc
Wind Top Series Wind Top Series Creating System Recovery Disc For the first-time use, it is highly recommended that you create a system recovery disc as the backup solution in the event of a catastrophic disk failure or other ac- cidents. - Page 34 System Operations System Operations 3. Select [Create and burn a recovery disc] and click [Next] to continue. Alterna- tively, choose [Advanced] to bring forth advanced options. 4. The image of recovery disc is being created. It takes some time to finish the processing.
- Page 35 Wind Top Series Wind Top Series 5. Follow the on-screen instructions to prepare enough number of blank DVD discs. Insert the blank DVD disc into the optical disc drive and click [Next] to continue. 6. The Windows Disc Image Burner pops up. Click [Burn] to start the burning progress.
- Page 36 System Operations System Operations 7. On completion of the disc creation, click [Close] to exit and take out the disc. Follow the on-screen instructions to create all recovery discs. 8. All recovery discs have been successfully created. Please store the discs carefully and click [Next] to continue.
- Page 37 Wind Top Series Wind Top Series 9. Check the following box if you want to remove the temporary files. Click [Fin- ish] to complete recovery disc creation.
-
Page 38: Network Connection Under Windows
System Operations System Operations Network Connection under Windows Wired LAN 1. Go to [Start] > [Control Panel]. 2. Select [Connect to the Internet] under [Network and Internet]. - Page 39 Wind Top Series Wind Top Series 3. Select [Broadband (PPPoE)] to connect using DSL or cable that requires a user name and password. 4. Type the information from your Internet Service Provider (ISP) and click [Connect] to establish your LAN connection.
-
Page 40: Wireless Lan
System Operations System Operations Wireless LAN 1. Go to [Start] > [Control Panel]. 2. Select [Connect to the Internet] under [Network and Internet]. 3-10 3-10... - Page 41 Wind Top Series Wind Top Series 3. Select [Wireless] to connect using a wireless router or a wireless network. 4. A list of available WLAN connections pops up. Choose a connection from the list or click [Open Network and Sharing Center] to establish a new connec- tion.
- Page 42 System Operations System Operations 6. Followingly, choose [Manually connect to a wireless network] and click [Next] to continue. 7. Enter information for the wireless network you intend to add and click [Next] to proceed. 3-12 3-12 8. A new WLAN connection has been made. Click [Close] to exit or select [Change connection settings] to modify the WLAN settings.
-
Page 43: Srs Premium Sound (Optional)
Wind Top Series Wind Top Series SRS Premium Sound (Optional) SRS Premium Sound is a comprehensive suite of state-of-the-art audio technologies that deliver a superior entertainment experience for playback of music, video and game content on the PC. With SRS Premium Sound your audio entertain- ment experience will sound better - more natural and immersive, with deeper bass, clearer dialog and outstanding surround sound. - Page 44 System Operations System Operations 3. Choose the audio content you are listening to. The SRS Premium Sound will automatically process the specified audio signals to deliver enhanced audio performance. 3-14 3-14 4. The following settings allow for specific control of SRS tuning parameters and are provided for External Speakers and Headphones.
-
Page 45: Power Management
Wind Top Series Wind Top Series Power Management Power management of personal computers (PCs) and monitors has the poten- tial to save significant amounts of electricity as well as deliver environmental benefits. To be energy efficient, turn off your display or set your PC to sleep mode after a period of user inactivity. - Page 46 System Operations System Operations ■ The Shut Down Computer menu presents the options of Sleep (S3/S4) & Shut Down (S5) for rapid and easy management of your system power. Power Management through ENERGY STAR qualified monitors (Optional) The power management feature allows the computer to initiate a low-power or “Sleep”...
-
Page 47: System Recovery
System Recovery Important The System Recovery Function is only available on systems bundled with Win- dows OS and MSI utilities by default. The purposes for using the System Recovery Function may include: ■ Restore the system back to the initial status of original manufacturer’s default settings. - Page 48 System Operations System Operations 3. Select [MSI Recovery Manager] to start the System Recovery Function; or select [EXIT] to restart the system. 4. The System Recovery Function will get your system back to default settings. Press [OK] to confirm. 5. Press [OK] to reconfirm and start the System Recovery Function. Alternatively, press [Cancel] to stop.
-
Page 49: Recovering The System With The Recovery Discs
Wind Top Series Wind Top Series Recovering the System with the Recovery Discs If the F3 hotkey recovery cannot work, try recovering your system with the recov- ery discs that you created beforehand. Follow the instructions below to continue: 1. - Page 50 System Operations System Operations 5. The system recovery menu pops up. [Hard Disk Recovery] will format the whole HDD. All data on the HDD will be erased while all settings will be re- stored to manufacturer default. Select [Hard Disk Recovery] only when your HDD is infected with fatal viruses and no solution can be found except a clear cleanup of the HDD.
- Page 51 Wind Top Series Wind Top Series 7. DO NOT turn off the system power while performing the system recovery func- tion, or it may cause unknown damage to the system. 8. The following message indicates successful system recovery. Press [OK] to restart the system and access the Windows operating system as usual.
-
Page 52: Troubleshooting
Appendix A Troubleshooting... - Page 53 Troubleshooting My system does not start. 1. Check if the system is connected to an electrical outlet and it is turned on. 2. Check if the power cord and all cables are connected firmly. When I turn on my computer, the message “Operating System not found” appears or Windows does not start.
- Page 54 Wind Top Series System speakers do not work. 1. Check the master volume setting in the Audio Mixer. 2. If you are using an application that has its own volume control, check if the volume is muted. 3. If you have connected an audio cable to the Headphone jack, disconnect it. 4.
Need help?
Do you have a question about the Wind-Top-AE1941 Series and is the answer not in the manual?
Questions and answers