Husqvarna 323R Operator's Manual
Brush cutter
Hide thumbs
Also See for 323R:
- User manual ,
- Operator's manual (44 pages) ,
- Operator's manual (40 pages)
Table of Contents

Related Manuals for Husqvarna 323R


Summary of Contents for Husqvarna 323R
- Page 1 Operator’s manual (EPA) 323R 325R X-SERIES 325RD X-SERIES Please read the operator’s manual carefully and make sure you E E E E n n n n g g g g l l l l i i i i s s s s h h h h...
- Page 2 Symbols WARNING! Clearing saws, brushcutters Always wear approved protective gloves. and trimmers can be dangerous! Careless or incorrect use can result in serious or fatal injury to the operator or others. Regular cleaning is required. Please read the operator’s manual carefully and make sure you understand the instructions before using the machine.
-
Page 3: Table Of Contents
CONTENTS Contents Note the following before starting: Symbols Husqvarna AB has a policy of continuous product development and therefore reserves the right to modify the CONTENTS design and appearance of products without prior notice. Contents ..............Note the following before starting: ........ -
Page 4: Safety Instructions
SAFETY INSTRUCTIONS Personal protective equipment CLOTHING Wear clothes made of a strong fabric and avoid loose clothing that can catch on twigs and branches. Always wear heavy, WARNING! Whenever you use a clearing long pants. Do not wear jewellery, shorts sandals or go saw, brushcutter or trimmer you must wear barefoot. - Page 5 SAFETY INSTRUCTIONS Muffler WARNING! Never use a cutting attachment without an approved guard. See the chapter The muffler is designed to keep noise levels to a minimum on Technical data. If an incorrect or faulty and to direct exhaust fumes away from the user. guard is fitted this can cause serious A muffler fitted with a catalytic converter is also designed to personal injury.
-
Page 6: Checking, Maintaining And Servicing The Machine S Safety Equipment
SAFETY INSTRUCTIONS Cutting equipment • Press the throttle lock and make sure it returns to its original position when you release it. Saw blades are intended for cutting fibrous types of wood. Grass blades and grass cutters are intended for cutting coarse grass. -
Page 7: Cutting Equipment
SAFETY INSTRUCTIONS Cutting attachment guard Never use a muffler with a defective spark arrestor mesh. • Ensure that the guard is undamaged and is not cracked. • Replace the guard if it has been exposed to impact or is cracked. Cutting equipment •... -
Page 8: Cutting Equipment
SAFETY INSTRUCTIONS Locking nut Filing the saw blade • When fitting, tighten the nut in the opposite direction to the • See the cutting attachment packaging for correct direction of rotation of the cutting attachment. To remove sharpening instructions. it, undo the nut in the same direction as the cutting •... -
Page 9: General Safety Precautions
SAFETY INSTRUCTIONS Trimmer head General safety precautions • Only use the recommended trimmer heads and trimmer cords. These have been tested by the manufacturer to suit IMPORTANT! a particular engine size. This is especially important when The machine is only designed for trimming grass, grass a fully automatic trimmer head is used. -
Page 10: General Working Instructions
SAFETY INSTRUCTIONS • Place the machine on the ground, ensure the cutting • The transport guard must always be fitted to the cutting attachment is clear of twigs and stones. Hold the body of attachment when the machine is being transported or in the machine on the ground using your left hand storage. -
Page 11: Basic Working Techniques
SAFETY INSTRUCTIONS Adjusting the harness and clearing saw Correct balance Let the cutting attachment rest lightly on the ground. If you use a saw blade it should balance about 10 cm above the WARNING! When using a clearing saw it ground to prevent contact with stones and the like. -
Page 12: Brush Cutting With A Saw Blade
SAFETY INSTRUCTIONS The ABC of clearing • A grass blade is used for all types of tall or coarse grass. • The grass is cut down with a sideways, swinging Always use the correct equipment. movement, where the movement from right-to-left is the Make sure the equipment is well adjusted. -
Page 13: Grass Trimming With A Trimmer Head
SAFETY INSTRUCTIONS Grass trimming with a trimmer head • Do not allow the trimmer head to constantly come into contact with the ground during normal cutting. Constant contact of this type can cause damage and wear to the Trimming trimmer head. Sweeping •... -
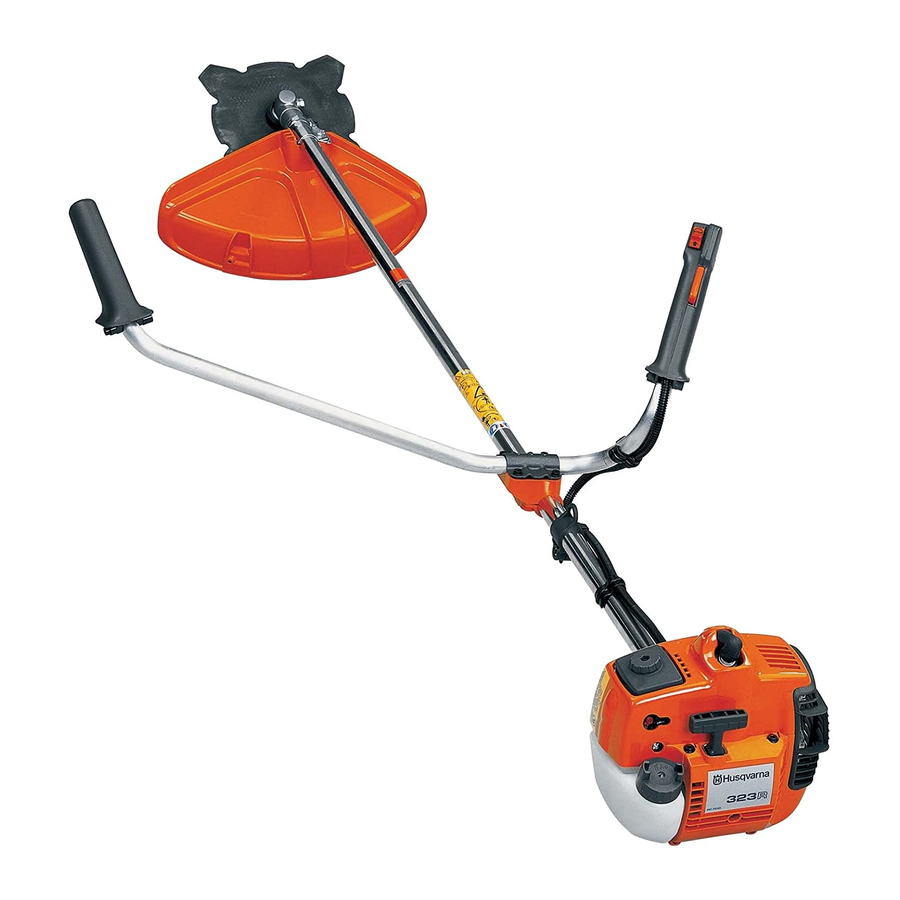
Page 14: What Is What
WHAT IS WHAT? What is what on the clearing saw? 1 Blade 18 Handle adjustment 2 Grease filler cap 19 Locking nut 3 Bevel gear 20 Support flange 4 Cutting attachment guard 21 Support cup 5 Shaft 22 Drive disc 6 Handlebar 23 Trimmer head 7 Throttle control... -
Page 15: Assembly
ASSEMBLY Fitting the handlebar Fitting the handlebar (323R) (325Rx, 325RDx) • Remove the screw at the rear of the throttle handle. • Remove the screw at the rear of the throttle handle. • Slide the throttle handle onto the right side of the •... -
Page 16: Transport Position, Handlebar
ASSEMBLY Transport position, handlebar Fitting a blade guard, grass blade and grass cutter (325Rx, 325RDx) • The handlebar can easily be turned to fit along the shaft for easier transportation and storage. • Loosen the knob. Turn the handlebar clockwise so that the throttle handle rests against the engine. -
Page 17: Fitting The Blade Guard And Saw Blade
ASSEMBLY Fitting the blade guard and saw arrow in the diagram shows the area where you should operate the socket spanner when loosening or tightening blade the nut. Fitting a trimmer guard and Superauto II trimmer head • Remove the mounting plate (H). Fit the adapter (I) and bracket (J) with the two screws (K) as shown. -
Page 18: Fitting Other Guards And Cutting Attachments
ASSEMBLY Assembling and dismantling the • Fit the bottom half of the trimmer head (K) to the cover (I) by pressing them together, with the cut-outs on the bottom two-piece shaft half aligned with the catches on the cover. (325RDx) Assembly: •... -
Page 19: Adjusting The Harness And Clearing Saw
ASSEMBLY Adjusting the harness and clearing Correct height Adjust the shoulder strap so that the cutting attachment is parallel to the ground. WARNING! When using a clearing saw it must always be hooked securely to the harness. Otherwise you will be unable to control the clearing saw safely and this can result in injury to yourself or others. -
Page 20: Fuel Handling
Always shut off the engine before refuelling. Always stop the engine and let it cool for a • For best results and performance use HUSQVARNA two- few minutes before refuelling. stroke oil, which is specially formulated for our two-stroke engines. Mixture 1:50 (2%). -
Page 21: Starting And Stopping
STARTING AND STOPPING Check before starting Starting and stopping • Check the blade to ensure that no cracks have formed at the bottom of the teeth or by the centre hole. The most WARNING! The complete clutch cover and common reason why cracks are formed is that sharp shaft must be fitted before the machine is corners have been formed at the bottom of the teeth while started, otherwise the clutch can come loose... -
Page 22: Warm Engine
STARTING AND STOPPING Warm engine Stopping Ignition: Set the stop switch to the start position. Choke: Set the throttle to the start position by moving the choke control to the choke position and then returning it to its Stop the engine by switching off the ignition. original position. -
Page 23: Maintenance
Carburettor CAUTION! If the cutting attachment rotates when the engine is idling the idle adjustment screw T should be Your Husqvarna product has been designed and turned anti-clockwise until the cutting attachment stops. manufactured to specifications that reduce harmful emissions. After the engine has used 8-10 tanks of fuel the Rec. - Page 24 MAINTENANCE Fine adjustment of the idle speed T CAUTION! For optimum adjustment of the carburettor, contact a qualified dealer/service workshop that has a Adjust the idle speed using the idle adjustment screw T, if it is revolution counter at their disposal. necessary to readjust.
-
Page 25: Muffler
filled three-quarters full with grease. Use and piston. HUSQVARNA special grease. CAUTION! Never use a machine with a defective muffler. The grease in the bevel gear does not normally need to be changed except if repairs are carried out. -
Page 26: Air Filter
This continues to rotate even after the throttle has been released. Ensure that the Always use HUSQVARNA filter oil, art. no. 503 47 73-01. The cutting attachment has stopped completely filter oil contains a solvent to make it spread evenly through and disconnect the HT lead from the spark the filter. -
Page 27: Filing The Saw Blade
Check fuel hose for cracks or other damage. Change if necessary. • Change the fuel filter in fuel tank. Note: Use only HUSQVARNA replacement parts. Use of other brands of replacement parts can cause damage to • Check the clutch, clutch springs and the clutch drum for your unit or injury to the operator or others. -
Page 28: Technical Data Technical Data
TECHNICAL DATA Technical data Technical data 323R 325RX 325RDX Engine Cylinder volume, cu.in/cm 1,50/24,5 1,50/24,5 1,50/24,5 Cylinder bore, inch/mm 1,34/34 1,34/34 1,34/34 Stroke, inch/mm 1,06/27 1,06/27 1,06/27 Idle speed, rpm 2700 2700 2700 Recommended max. speed, rpm 11000-11700 11000-11700 11000-11700... - Page 29 TECHNICAL DATA Approved accessories 323R Type Cutting attachment guard, Art. no. Centre hole in blades/cutters, Ø 25,4 mm Blade shaft thread M10 Grass blade/grass cutter Grass 255-4 1" (Ø 255 4-teeth) 503 93 42-02 Grass 255-8 1" (Ø 250 8-teeth)
-
Page 30: Federal Emission Control Warranty Statement
Operator s Manual. Husqvarna Forest & Garden responsibilities, you should contact your nearest authorized recommends that you retain all receipts covering servicing dealer or call Husqvarna Forest & Garden at 1-800- maintenance on your small nonroad engine, but Husqvarna 487-5963 Forest &... - Page 31 Super Auto II Super Auto II 1 " 4,0 m 15 cm ~2,0 m 6 " 6,5 ' 15 cm 6 "...
- Page 32 Tri Cut <20mm >20mm 6 Nm X 10...
- Page 33 Trimmy H II 15 cm 6" 7,5 m ~ 3,7 m 15 cm 6"...
- Page 34 Trimmy Hit “Click” 7,0 m 12 cm 5" ~ 3,5 m “Click” ~ 15 cm " 15 cm 6 "...
- Page 35 Trimmy Hit Pro 7,5 m 15 cm 6" ~ 3,7 m 15 cm 6" 15 cm “Click” 6"...
- Page 36 8,5 m 10 cm 4" 4,2 m "Clic" 15 cm 6"...
- Page 37 4,25 m 4,25 m 15 cm 6" 15 cm 6"...
- Page 38 8,5 m 10 cm 4" 4,3 m "Clic" 15 cm 6" ´®z+H03¶5£¨ ´®z+H03¶5£¨...
- Page 40 1140161-95 ´®z+H03¶5£¨ ´®z+H03¶5£¨ 2003-01-13...
Need help?
Do you have a question about the 323R and is the answer not in the manual?
Questions and answers
Which end of the carburator does the primer bulbsuck the gas I believe the carburator is also upside down
The primer bulb on the Husqvarna 323R sucks gas from the carburetor's fuel inlet side.
This answer is automatically generated