Table of Contents
Advertisement
Advertisement
Table of Contents

Subscribe to Our Youtube Channel
Summary of Contents for Sherbourn PT-7030
-
Page 3: Important Safety Precautions And Explanation Of Symbols
Do not install the PT-7030 in locations without proper ventilation. The PT-7030 should not be operated on a bed, sofa, rug, or similar surface that may block vents. The PT-7030 should not be installed in an enclosed location such as a bookcase, cabinet, or closed equipment rack unless sufficient forced-air ventilation is provided. - Page 4 PT-7030. You should seek service for your PT-7030 by qualified service personnel if any of the following occur: 1. The power-supply cord or the plug has been damaged.
-
Page 5: Fcc Interference Statement
Connect the equipment into an outlet on a circuit different from that of the receiver. Consult the dealer or an experienced radio/TV technician for help. For questions regarding service, please contact: Sherbourn Technologies, Inc. 131 SE Parkway Court Franklin, Tennessee... -
Page 6: Table Of Contents
Input Configuration Paradigm ..............26 Menus .......................27 Example Input Configuration ..............41 Infrared (IR) and Serial (RS-232) Remote Control Codes ......43 XLR Connector Pinouts ................44 Trigger Levels ...................44 Periodic Maintenance ................44 Sherbourn Technologies, LLC Ten-Year Limited Warranty .......45 Notes ......................47 Page 1... -
Page 7: The Sherbourn Pt-7030
About This Manual This manual will provide you with all the information you need to install and configure the PT-7030 to achieve its optimum potential. The manual also includes a brief summary of the features offered by the PT-7030 and descriptions of how the controls work. -
Page 8: Mechanical And Environmental
To avoid overheating, be sure to provide adequate clearance and ventilation. You should provide a minimum of 4 inches clearance on all sides of the PT-7030 (including the back). If the PT-7030 is to be installed in an enclosed space, be sure to provide adequate ventilation or forced air cooling. -
Page 9: Features
Component video inputs and outputs. • Full integration with popular remote control formats. • Bluetooth wireless audio. • 10 year Sherbourn Technologies Limited Warranty. You can find more information about the PT-7030 Home Theater Preamp / Processor on our website at www.sherbourn.com. Page 4... -
Page 10: Controls And Connectors
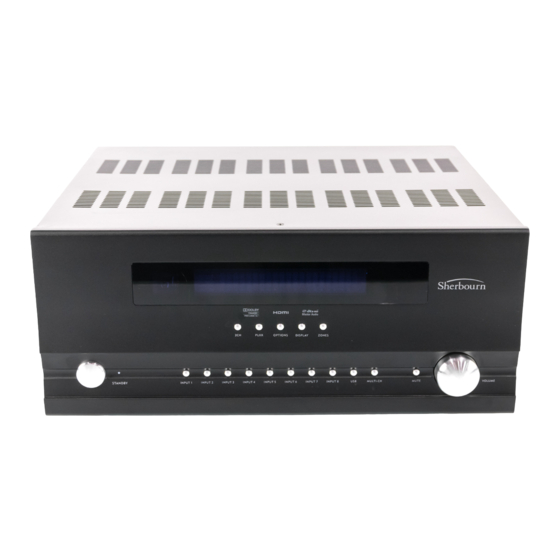
PT-7030: User Manual Controls and Connectors Front Panel - Controls and Indicators PLIIX OPTIONS DISPLAY ZONES STANDBY INPUT 1 INPUT 2 INPUT 3 INPUT 4 INPUT 5 INPUT 6 INPUT 7 INPUT 8 MULTI-CH MUTE VOLUME 1. Standby Button and Indicator Press this button to switch (toggle) the unit between Standby and On;... - Page 11 Press this button to mute the audio output; press it again to return to the previously set level. 10. Volume Control Rotate this knob to change the level. The Volume knob on the PT-7030 is a rotary encoder which instructs the control system to raise or lower the volume using the PT-7030’s precision digitally controlled analog attenuator.
- Page 12 PT-7030: User Manual Rear Panel - Input and Output Connections Page 7...
- Page 13 WARNING: DO NOT CONNECT A COMPUTER NETWORK CABLE TO THIS CONNECTOR! Doing so will result in hardware damage to your computer equipment or the PT-7030. 2. Trigger Outputs (6) Connect each Trigger Output to one piece of trigger-enabled audio equipment. You can then configure the PT-7030 to turn on specific trigger-enabled equipment when a certain input is selected.
- Page 14 IR signals cannot reach it, a receiver may be placed in the main zone to relay remote control signals in the main zone to the PT-7030. If one or two IR blasters are connected to the IR Outputs, signals received by these inputs will also be broadcast from those outputs.
- Page 15 Rear Panel - Power Connections ® 1. Power Switch Switches the AC main power to the PT-7030 On and Off. When this switch is Off, the PT-7030 will not respond to trigger signals or manual controls. 2. Input Voltage Selector Switch Always ensure that this switch is set for the proper line voltage for your area and installation.
- Page 16 PT-7030: User Manual Rear Panel - Video Inputs and Outputs (HDMI) ® 1. HDMI Inputs (6) Provide six inputs for components that have either HDMI or DVI-D outputs. (An appropriate adapter will be required to connect DVI-D devices, and not all features will be available.) All six HDMI inputs are identical, are HDMI 1.4 compatible, and support all standard formats (including 3D) up to...
- Page 17 Note: By default, only audio received from the source component is sent to the TV via the HDMI Outputs. To send decoded audio from the PT-7030 to the TV, select TV Mode in the Video menu.
- Page 18 PT-7030: User Manual Rear Panel - Video Inputs and Outputs (Component and Composite) ® 1. Zone Video Outputs (Zone 2 - Zone 4) Provide video outputs for Zones 2, 3, and 4 (composite only). Video inputs are assigned to the zones in the Zone Setup Menu.
- Page 19 (if different from the input resolution) and can be output on HDMI. Note: If the PT-7030 is connected to a TV which cannot show the selected output resolution (you get a blank screen), pressing the 2CH and Mute buttons on the front panel at the same time will change the video resolution to 480p/576p.
- Page 20 1. Reference Stereo Input Provides a balanced analog input for connecting a reference quality stereo component to the PT-7030 (typically the balanced analog output of a CD player or high-end BD player). This input is always assigned to Input 1 when used.
- Page 21 PT-7030’s audio outputs. You may also choose to have audio decoded by the PT-7030, and then have the decoded audio sent to the TV via the HDMI connection, by selecting TV Mode in the Video Menu.
- Page 22 When asked for a password, enter “0000” and accept. The PT-7030 will show on the OSD that a device is attempting to connect. Press Enter on the PT-7030 remote control and the PT-7030 will display “Running” on the OSD. At this point you will be able to stream audio to the PT-7030 from your Bluetooth device.
- Page 23 PT-7030’s audio outputs. You may also choose to have audio decoded by the PT-7030, and then have the decoded audio sent to the TV via the HDMI connection, by selecting TV Mode in the Video Menu.
- Page 24 PT-7030: User Manual Rear Panel - Audio Outputs (Main Analog Outputs) ® Main Outputs 1. 7.1 Unbalanced (audio) Outputs Provide one set of unbalanced audio outputs for connection to your main zone power amplifier(s) and up to two powered subwoofers.
- Page 25 Note: Typically all bass management is done by the PT-7030. If your main or surround speakers are not full range, then they should be configured as “small” in the PT-7030 setup menu, and appropriate crossover points should be set for them. Since advanced bass...
- Page 26 MUST connect an analog version of that source. For example, if you have your CD player connected to your PT-7030 via a digital connection, but you wish to also be able to listen to CDs independently in Zone 2, then you must ALSO connect the analog audio connection between the CD player and the PT-7030.
- Page 27 PT-7030: User Manual Rear Panel - Audio Outputs (Digital) ® 1. Digital (audio) Output - Coax Provides a digital copy of digital audio sources for copying (or for routing to another digital audio device like a DAC). 2. Digital (audio) Output - Toslink Optical Provides a digital copy of digital audio sources for copying (or for routing to another digital audio device like a DAC).
-
Page 28: Remote Control
PT-7030: User Manual Remote Control 1. On and Off Buttons The On button switches the PT-7030 On; the Off Button returns the PT-7030 to Standby. The rear panel Power switch must be in the On position for the PT-7030 to operate. - Page 29 IR Command Set 2, press the In2 and Number 2 buttons on the remote AT THE SAME TIME. Then point the remote control at the PT-7030 and hold the Number 2 button for at least five seconds (a message will display on the front panel “AUD ID: -->2”...
-
Page 30: Video Mode Support And Upsampling Options
Video Mode Support and Upsampling Options HDMI Inputs Signals received at the HDMI inputs of the PT-7030 are passed directly to the HDMI outputs without resampling to ensure the best possible output quality. Video signals received at the HDMI inputs are not available at the composite or component outputs. -
Page 31: Configuration And Operation
Note: The On-Screen Display (OSD) is ONLY displayed on the HDMI outputs. Input Configuration Paradigm The PT-7030 allows any input connector to be assigned to any input source using the Input Setup configuration screen. By default, the source input buttons are configured as follows:... -
Page 32: Menus
Menus Main Menu MAIN MENU INPUT SETUP SPEAKER SIZE VIDEO SETUP LEVEL CAL. ZONE SETUP SPKR DISTANCE PREFERENCES CROSSOVERS SYSTEM STATUS SUB LEVELS EQUALIZER EXIT The Main Menu is used to access all configuration options on the PT-7030. Page 27... -
Page 33: Input Setup
PT-7030: User Manual Input Setup INPUT SETUP INPUT NAME: INPUT 1 INPUT LEVEL: INPUT TITLE: BLURAY AUDIO SOURCE: HDMI VIDEO SOURCE: HDMI 1 DEFAULT MODE: Dolby PLII Mus TRIGGERS ACTIVE: 1 2 3 4 5 6 LIP SYNC: CINEMA EQ:... -
Page 34: Video Setup
Note: HDMI Audio must be set to Amplifier if you want the PT-7030 to decode your audio and send it to your power amplifier and speakers. If you set HDMI Audio to TV, audio will be sent to your monitor or TV but NOT to your amplifiers via the PT-7030. -
Page 35: Zone Setup
MUST connect an analog version of that source. For example, if you have your CD player connected to your PT-7030 via a digital connection, but you wish to also be able to listen to CDs independently in Zone 2, then you must ALSO connect the analog audio connection between the CD player and the PT-7030. - Page 36 RETURN EXIT The Preferences Menu is used to configure several basic system options on the PT-7030, including the Record Out source, the Startup Volume and Maximum Volume for the main zone, and the Default Language. Changing Software Update to YES and pressing Enter will open the Software Update sub-menu, which is used to install firmware updates to the PT-7030.
- Page 37 The Default Restore Options sub-menu is used to optionally save and restore user settings, and to restore the PT-7030 to either the factory defaults or the saved set of user settings. You will also have the option to set and change the password used to protect the saved user settings.
-
Page 38: System Status
The System Status Menu screen displays some basic settings, including the current status or selected input for each zone and the selected Record Out source. This screen also displays the current version of the various firmware modules installed in the PT-7030. Page 33... -
Page 39: Speaker Size
RETURN EXIT The Speaker Size Menu is used to configure whether each speaker used by the PT-7030 is considered to be “Small” or “Large”. Speakers configured as Large receive a full range audio signal, while those configured as Small receive only frequencies above their chosen crossover frequency. -
Page 40: Level Calibration
This menu screen instructs the PT-7030 to play a calibrated test tone from each speaker (as you step through each one in sequence). You may then use a sound level meter (or other similar device) to measure the actual output of each speaker and adjust each using the on-screen level trim adjustments. -
Page 41: Speaker Distance
RETURN EXIT The Speaker Distance Menu allows you to inform the PT-7030 of the distances from the listening position to each speaker. Sound being sent to each speaker is delayed by a carefully calculated amount to compensate for differences in the distance between each speaker and the listening position, ensuring the best surround sound “sound image”. - Page 42 PT-7030: User Manual Crossovers CROSSOVERS L&R FRONT: 50 Hz CENTER FRONT: 60 Hz L&R SURROUNDS: 80 Hz SURROUND BACK 80 Hz FRONT HEIGHT: 100 Hz SUBWOOFER: 80 Hz RETURN EXIT The Crossovers Menu screen allows you to adjust the crossover point for each set of speakers.
- Page 43 PT-7030: User Manual Subwoofer Levels SUBWOOFER LEVELS Dolby Digital: Dolby PLIIx: DTS: STEREO: MULTI-CHNL LPCM: 7.1 CHNL ANALOG: RETURN EXIT The Subwoofer Levels Menu allows you to adjust the level of your subwoofer individually for each of the common surround sound (and other) formats. (You may, for example, choose different subwoofer levels for use when playing Dolby Digital or DTS content.)
- Page 44 ADJUST EQ: RETURN EXIT The Equalizer Setup screen allows you to enable equalization on the PT-7030, and to configure whether EQ settings are Global (one setting applies to all channels) or Individual (you can adjust each channel/speaker separately). Changing Adjust EQ to YES and pressing Enter will open Equalizer Setup Settings sub-menu.
- Page 45 The Equalizer Setup Settings sub-menu allows you to configure the ten-band parametric equalizer in the PT-7030. You may adjust the center frequency, gain, and Q (sharpness) of each band individually. If EQ SETTINGS:Global was chosen in the Equalizer Settings Menu, then one setting will apply to all channels;...
-
Page 46: Example Input Configuration
PT-7030: User Manual Example Input Configuration The following is an example of how you might choose to configure your PT-7030. In the example, we will be configuring a typical 5.1 surround configuration, with five speakers and a sub, and a Blu-Ray and Cable Box as sources. - Page 47 PT-7030: User Manual Speaker Size • set Front: SMALL • set Center: SMALL • set Surround: SMALL • set Surround Back: NONE • set Subwoofer: YES Speaker Distance Set the distance from each speaker to your listening position. (It would be ideal to measure these each to within six inches or better.) Crossovers •...
-
Page 48: Infrared (Ir) And Serial (Rs-232) Remote Control Codes
PT-7030 or your network equipment. A cable is provided for connecting the PT-7030 to the RS-232 serial output of a PC computer or remote controller (or any other device which uses a standard serial connection). -
Page 49: Xlr Connector Pinouts
If necessary, the Sherbourn PT-7030 should be cleaned gently with a soft rag. • If something sticky gets on the front panel or case of the PT-7030, it should be cleaned with a mild cleaning solution applied to a soft rag, followed by wiping with a clean rag dampened with plain water and drying with a soft dry rag or cloth. -
Page 50: Sherbourn Technologies, Llc Ten-Year Limited Warranty
(1) receivers (including the SR-8100, SR-8200, and SR-120), preamp/processors (including the PT-7030, PT-7020C4, and PT-7020), preamplifiers (including the PRE-1), and the CD-1 CD Player (with the exception of the slot load CD engine) are covered by this warranty for five (5) years from the date of retail purchase by the original purchaser;... - Page 51 PT-7030: User Manual PRODUCTS. SOME STATES DO NOT ALLOW THE EXCLUSION OR LIMITATION OF INCIDENTAL OR CONSEQUENTIAL DAMAGES, SO THE ABOVE LIMITATION OR EXCLUSION MAY NOT APPLY. How do you get service? In order to make a claim under the warranty, you must: Call a customer service representative (“CSR”) of Sherbourn at (1-877-EMO-TECH /...
-
Page 52: Notes
PT-7030: User Manual Notes Manufactured under license under U.S. Patent Nos: 5,956,674; 5,974,380; 6,226,616; 6,487,535; 7,212,872; 7,333,929; 7,392,195; 7,272,567 & other U.S. and worldwide patents issued & pending. DTS-HD, the Symbol, & DTS-HD and the Symbol together are registered trademarks & DTS-HD Master Audio is a trademark of DTS, Inc. Product includes software.
Need help?
Do you have a question about the PT-7030 and is the answer not in the manual?
Questions and answers
turn off pop
To eliminate the popping sound on the Sherbourn PT-7030 during power on/off:
1. Turn CEC Control and CEC Power back ON in the menu:
- Go to Menu → Video Setup → CEC Control / CEC Power.
- Set both options to ON.
2. Use an unused input with triggers turned off when powering the unit on or off.
3. Wait for the amps to fully turn off before putting the PT-7030 into standby.
4. Avoid powering up or down on an active input to prevent popping.
Using a universal remote with macros can help automate this process.
This answer is automatically generated