West Bend Microwave Oven Instruction Manual
Microwave oven
Hide thumbs
Also See for Microwave Oven:
- Instruction manual (32 pages) ,
- Instruction manual (44 pages) ,
- Instruction manual (36 pages)
Table of Contents
Advertisement
Available languages
Available languages
Precautions To Avoid Possible Exposure To Excessive Microwave Energy........................2
Important Safeguards..................................................................................................................3
Setting Up Your Oven..................................................................................................................7
Operation......................................................................................................................................9
Troubleshooting.........................................................................................................................15
One Year Limited Warranty.......................................................................................................16
SAVE THIS INSTRUCTION MANUAL FOR FUTURE REFERENCE
© 201 West Bend
3
Manufactured and Distributed by Midea America Corp,Authorized Licensee,
P
arsippan ,NJ 07054
y
MICROWAVE OVEN
Instruction Manual
TM
,
a Brand of Focus
Products Group International, LLC.
Advertisement
Table of Contents

Subscribe to Our Youtube Channel
Related Manuals for West Bend Microwave Oven


Summary of Contents for West Bend Microwave Oven
-
Page 1: Table Of Contents
Setting Up Your Oven........................7 Operation............................9 Troubleshooting.........................15 One Year Limited Warranty.......................16 SAVE THIS INSTRUCTION MANUAL FOR FUTURE REFERENCE © 201 West Bend a Brand of Focus Products Group International, LLC. Manufactured and Distributed by Midea America Corp,Authorized Licensee, arsippan ,NJ 07054... -
Page 2: Precautions To Avoid Possible Exposure To Excessive Microwave Energy
PRECAUTIONS TO AVOID POSSIBLE EXPOSURE TO EXCESSIVE MICROWAVE ENERGY (a) Do not attempt to operate this oven with the door open as this can result in harmful exposure to microwave energy. It is important not to tamper with the safety interlocks. (b) Do not place any object between the oven front face and the door or allow soil or cleaner residue to accumulate on sealing surfaces. -
Page 3: Important Safeguards
IMPORTANT SAFEGUARDS CAUTION WARNING To reduce the risk of burns, electric shock, fire,injury to persons or exposure to excessive microwave oven energy when using your appliance, follow basic safety precautions, including the following: • Read all instructions before using the may explode and should not be heated appliance. -
Page 4: Grounding Instructions
Stir the liquid both before and halfway through heating it. iii) Do not use straight-sided containers with narrow necks. iv) After heating, allow the container to stand in the microwave oven for a short time before removing the container. -
Page 5: Radio Interference
SAVE THESE INSTRUCTIONS Radio Interference 1. Operation of the microwave oven may cause interference to your radio, TV, or similar equipment. 2. When there is interference, it may be reduced or eliminated by taking the... -
Page 6: Materials You Can Use In Microwave Oven
May cause a fire in the oven. Plastic foam Plastic foam may melt or contaminate the liquid inside when exposed to high temperature. Wood Wood will dry out when used in the microwave oven and may split or crack. English-6... -
Page 7: Setting Up Your Oven
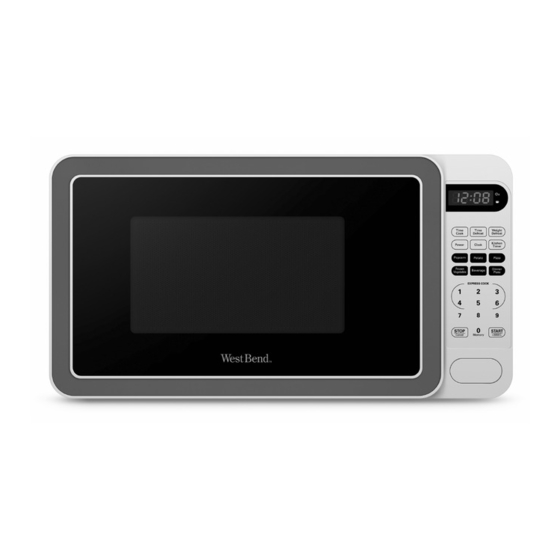
SETTING UP YOUR OVEN Names of Oven Parts and Accessories Remove the oven and all materials from the carton and oven cavity. Your oven comes with the following accessories: Glass tray Turntable ring assembly Instruction manual A) Control panel B) Turntable shaft C) Turntable ring assembly D) Glass tray Turntable Installation... -
Page 8: Before Installation
Remove all packing material and accessories. Cabinet: Remove any protective film found Examine the oven for any damage such as on the microwave oven cabinet surface. dents or broken door. Do not install if oven is Do not remove the light brown Mica cover damaged. -
Page 9: Operation
OPERATION Control Panel and Features (11) (1) Time Cook (10) (2) Time Defrost (3) Power (4) Clock (5) Auto menu: Popcorn, Potato, Pizza, Frozen Vegetable, Beverage, Dinner Plate (6) Number Buttons: 0-9 (7) Weight Defrost (8) Kitchen Timer function (9) Stop/Cancel: clears all previous setting pressed before cooking starts. During cooking: press once to stop oven;... -
Page 10: Clock Setting
OPERATION 1. Power Level 11 power levels are available. Level Power 100% Display PL10 2. Clock Setting (1) Press " CLOCK ", "00:00" will display. (2) Press the number keys and enter the current time. For example, time is 10:12 now, please press "1, 0, 1, 2". (3) Press "... -
Page 11: Speedy Cooking
Example: to cook the food with 50% microwave power for 15 minutes. a. Press "TIME COOK" once. "00:00" displays. b.Press "1", "5", "0", "0" in order. c.Press "POWER" once, then press "5" to select 50% microwave power. d.Press "START/+30SEC." to start cooking. Note:1) In the process of setting, if the "... -
Page 12: Frozen Vegetable
POPCORN a) Press " POPCORN " repeatedly until the package size of your popcorn appears in the display, "1.75", "3.0", "3.5" will display in order. For example, press "POPCORN" once, "1.75" appears. b) Press "START/+30 SEC." to cook, buzzer sounds once. When cooking finishes, buzzer will sound five times. - Page 13 DINNER PLATE a) Press " DINNER PLATE " repeatedly until the number you wish appears in the display, "9.0", "12.0", "18.0" oz will display in order. For example, press "DINNER PLATE" once, "9.0" appears. b) Press "START/+30 SEC." to cook, buzzer sounds once. When cooking finishes, buzzer sounds five times .
-
Page 14: Multi-Stage Cooking
15. Multi-stage Cooking At most, 2 stages can be set for cooking. In multi-stage cooking, if one stage is defrosting, then defrosting shall be placed at the first stage automatically. Note: Auto cooking cannot work in the multi-stage cooking. Example: if you want to cook with 80% microwave power for 5 minutes + 60% microwave power for 10 minutes. -
Page 15: Troubleshooting
Cooking time, power level is Overcooked foods power level. not suitable. a. Materials to be avoided in a. Use microwave-safe microwave oven were used. cookware only. b. Food is not defrosted b. Completely defrost food. completely. c. Check to see that oven venti- Undercooked foods c. -
Page 16: One Year Limited Warranty
ONE YEAR LIMITED WARRANTY This product carries a warranty that it will be free from defects in material and workmanship for a period of one year from the date of purchase. This warranty is valid for the original retail purchaser from the date of initial retail purchase and is not transferable. -
Page 17: Horno Microondas
G ía De Solución De Problemas ..................15 Garantía Limitada Por Un Año..................16 ..GUARDE ESTE MANUAL DE INSTRUCCIONES PARA FUTURAS CONSULTAS © 201 West Bend , una marc de Focus Products Group International, LLC. Fabricado y Distribuido por Midea America Corp. Licenciatario Autorizado,... - Page 18 PRECAUCIONES PARA EVITAR POSIBLE EXPOSICIÓN A EXCESIVA ENERGÍA DE MICROONDAS (a) No intente operar este horno con la puerta abierta ya que esto puede causar una exposición dañina a energía de microondas. Es importante no q uebrar u obstruir los cierres de seguridad. (b) No ubicar ningún objeto entre la pared frontal del horno y la puerta de suciedad o limpiadores se acumulen en las ni permitir que residuos...
- Page 19 INSTRUCCIONES DE SEGURIDAD IMPORTANTES PRECAUCIÓN ADVERTENCIA Con el fin de reducir el riesgo de que se produ can que- maduras, una descarga eléctrica, un incendio, lesiones o exposiciones a la energía microondas excesiva al mo- mento de usar este electrodoméstico, siga las siguientes precauciones de seguridad básicas: •...
- Page 20 • Los líquidos, tales como el agua, café o té pueden sobrecalentarse más allá del punto de ebullición sin parecer haber hervido. El burbujeo o hervido visible de un recipiente al momento de sacarlo del horno de microondas no siempre está presente. ESTO PODRÍA OCASIONAR QUE UN LÍQUIDO CALIENTE REPENTINAMENTE ROMPA EL HERVOR AL MOMENTO DE ACCIONAR ALGÚN MOVIMIENTO O METER UNA CUCHARA U OTRO UTENSILIO DENTRO DEL LÍQUIDO.
- Page 21 1. Un cable de abastecimiento corto reduce los riesgos derivados de enredarse o tropezarse con un cable mas largo. 2. Cordones más largos o cables de más extensión están disponibles y pueden ser ser utilizados si se ejerce el cuidado en su uso. 3.
- Page 22 Materiales que se pueden usar en el horno microondas Observaciones Utensilos Solamente como protección. Pequeñas piezas lisas pueden ser usadas Lámina de Aluminio para cubrir partes delgadas de carne o pollo para prevenir sobre cocción. Puede ocurrir que se formen arcos si el film está muy cerca de las paredes del horno.
- Page 23 PREPARANDO SU HORNO MICROONDAS PARA SO Nombres de las Partes y Accesorios Retire el horno y todos los materiales de su caja y de la cavidad del horno. Su horno viene con los siguientes accesorios: Plato de vidrio Conjunto aro giratorio Manual de instrucciones Panel de control Eje para lato gi ato o...
- Page 24 Previo a la Instalación Retire todo el material de embalaje y los Gabinete: Quite todo el film protector que accesorios. encuentre en la superficie del gabinete. Examine el horno para descubrir si este tiene No quite la tapa de Mica color marrón claro algún daño como ser abolladuras o la puerta adherida dentro de la cavidad del horno, ya desviada o rota.
- Page 25 FUNCIONAMIENTO Panel de Control y Funciones (11) (10) (1) Tiempo de ccion Descongelar por Tie (3) P otenc a (4) Reloj (5) Auto menus: Popcorn, Papas, Pizza, Vegetales ongelados, Bebida, Plato de mida Botones de N me s: 0-9 (7) Descongelar por Peso cion Temporizador Borra todo lo programado anteriormente antes de iniciarse la (9) Detener/Borrar:...
- Page 26 OPERACIÓN 1. N N i i v v e e l l d d e e Potenc a Niveles de potencia disponibles. Nivel 100% Potencia PL10 Pontalla de Aparato Ajuste de Reloj "CLOCK"(RELOJ) (1) Presione , se mostrará "00:00". (2) Presione las teclas de número e introduzca la hora actual. Por ejemplo, la hora actual es 1 :1 , por favor presione "1, ,1, ".
- Page 27 Ejemplo: para cocinar los alimentos con 50% de potencia de microondas por quince minutos. "TIME COOK"(TIEMPO DE COCCION) a. Presione una vez, aparecerá "00:00". b. Presione 1 ", "5", "0", "0" en orden. " "POWER"(POTENCIA) c. Presione una vez, luego presione "5" para seleccionar el 50% de microonda.
- Page 28 " "(Palomitas de Maiz) POPCORN a) Presione " " repetidas veces hasta que el tamaxo del empaque de palomitas POPCORN de maiz aparezca en la pantalla, "1.75 ", "3.0", " 3.5" oz aparecerá en orden. Por ejemplo, presione " " POPCORN (Palomitas de Maiz) una vez y aparecerá...
- Page 29 " " (Plato de Comida) DINNER PLATE "DINNER PLATE"(PLATO DE COMIDA) a) Presione repetidas veces hasta que el número , "18.0" oz aparecerá en orden. que desea aparezca en la pantalla, "9.0", "12.0" "DINNER PLATE"(PLATO DE COMIDA) Por ejemplo, presione una vez y aparecerá...
- Page 30 15. Fase de Cocción Múltiple Solo 2 etapas pueden ser programadas como máximo. En la fase cocción múltiple, si una etapa es el descongelamiento, entonces el descongelamiento deberá ubicarse en la primera etapa automáticamente. Nota: La auto-cocción no puede funcionar en una fase de cocción múltiple. Ejemplo: si desea cocinar con 80% de la potencia del microondas por 5 minutos + 60% de la potencia por 10 minutos, los pasos de cocción son los siguientes: "TIME COOK"(TIEMPO DE COCCION)
- Page 31 GU ÍA D E SOLUCIÓN DE PROBLEMAS Verifique su problema con uso de la tabla abajo y trate de resolverlo con las soluciones posibles. PROBLEMA POSIBLE CAUSA POSIBLE SOLUCIÓN El cable no esta Conecte el cable. El horno no da inicio a los conectado.
- Page 32 GARANTÍA LIMITADA POR UN AÑO Este producto cuenta con una garantía por defectos de materiales y fabricación por el período de un año a partir de la fecha de compra. Esta garantía es válida para el comprador minorista original desde la fecha de compra inicial y no es transferible. Guarde su comprobante de venta original.
Need help?
Do you have a question about the Microwave Oven and is the answer not in the manual?
Questions and answers