Table of Contents
Advertisement
Available languages
Available languages
User's Guide
*41209250*
*412092500*
Read these instructions before using your product.
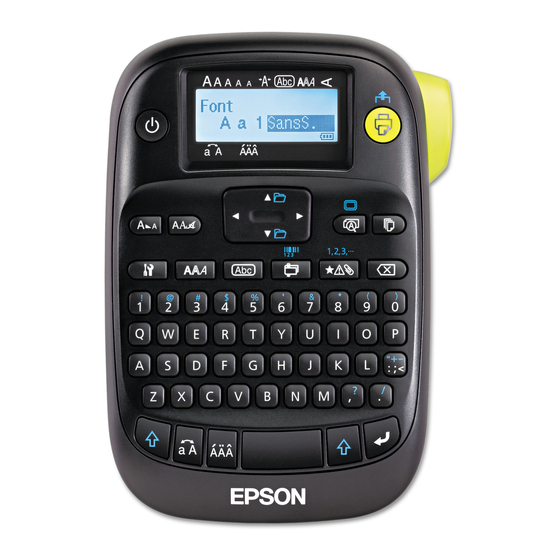
Button names and functions
1
2
3
4
5
6
7
8
9
10
1.
Power
2. Font
3. Font size
4. Frame
5. Font style
6. Settings
7.
Character keys
8. Shift key
9. Caps lock
10. Accent
11. Space
12. Shift key
13. Select/Enter
14. Punctuation
15. Delete (
+
deletes all text)
16. Symbols
17. Special formats
18. Print copies
19. Preview
20. Cursor keys (
+
previous or next label)
21. Print (
+
feeds the tape)
22.
Cut button
23. Display
Turning the power off
Press
to turn off the power. If using an AC adapter,
disconnect it from the wall outlet and the product.
If batteries are inserted, remove them only if the product
will not be used for a long period of time.
Display indicators
Indicators on the display show whether or not settings
are enabled.
11
10
9
8
1.
Font size
2. Font width
3. Frame
4. Font style
5. Vertical text
6. Battery level
7.
Accent mark options
8. Upper/lower case
9. Cursor (blinks to indicate current position)
10. Line number (appears when multiple lines exist)
Note: You can print up to four lines of text.
11. Label number (you can save up to 50 labels)
,
+
goes to
2 3 4 5
1
7
6
Display settings
You can adjust the following display settings:
Backlight: Turns the backlight of the display on or off.
Contrast: Adjusts the density of the fonts on the
display. (Value: -5 to +5)
Language: Changes the language of the settings and
messages on the display.
inch:cm: Selects the unit of measurement for length.
To adjust display settings, follow the steps below:
1. Press
to turn on the product.
+
2. Press
3. Press
press
to select it.
4. Press
press
.
Setup
This product operates with batteries (not included) or
with an AC adapter (not included).
Inserting batteries
1. Remove the rear cover.
23
2. Insert 6 AA alkaline batteries.
22
21
20
19
18
17
16
15
Note: If you need to install a tape cartridge, see "Inserting
14
a tape cartridge" below.
13
3. Replace the cover and snap it into place.
12
11
Optional AC adapter (APT0615Z1-1)
Warning: Make sure to use AC adapter APT0615Z1-1 or
damage may occur.
1. Plug one end of the AC adapter into the product.
2. Plug the the other end of the AC adapter into the wall
outlet.
Inserting a tape cartridge
1. Remove any slack from the ink ribbon.
2. Remove the rear cover, if necessary.
3. Insert the tape cartridge and press it down firmly until
it snaps into place. If there is excess tape, feed the end
of the tape through the tape guide slot.
4. Replace the cover and snap it into place.
Preparing the tape
After inserting a tape cartridge, make sure to feed
some tape through the tape guide slot to position it
for printing.
1. Press
to turn on the product.
2. Press
+
.
.
or
to highlight a setting, then
or
to select setting options, then
Advertisement
Table of Contents

Summary of Contents for Epson Epson LW-400
-
Page 1: Display Settings
Display settings You can adjust the following display settings: Backlight: Turns the backlight of the display on or off. Contrast: Adjusts the density of the fonts on the User’s Guide display. (Value: -5 to +5) Language: Changes the language of the settings and messages on the display. -
Page 2: Creating Labels
3. Press to confirm. 3. Press to select a font size, then 4. Press the Cut button to cut the tape. press Warning: Do not press the Cut button until the tape stops moving or the tape cartridge may be damaged. Tip: The setting is indicated on the display. -
Page 3: Troubleshooting
If the same message 4. When printing stops, press the Cut button to cut appears, turn the power off and the tape. A cut mark will be printed between each contact Epson. copy. Using scissors, cut along the marks to separate each label. -
Page 4: Specifications
• Make sure to peel off the backing paper before attaching the label. Epson is a registered trademark and Epson Exceed Your Vision is • Make sure the surface you are attaching to is clean a registered logomark of Seiko Epson Corporation. LC tape and and dry. -
Page 5: Guide De L'utilisateur
Paramètres d’affichage Vous pouvez régler les paramètres d’affichage suivants : Rétroéclairage : Pour allumer ou éteindre le rétroéclairage de l’écran d’affichage. Contraste : Pour régler la densité des polices affichées à Guide de l’utilisateur l’écran. (Valeur : -5 à +5) Langue : Pour modifier la langue des paramètres des messages affichés à... -
Page 6: Fonctions Utiles
2. Appuyez sur pour sélectionner l’étiquette à imprimer, puis 3. Appuyez sur pour confirmer. appuyez sur 4. Appuyez sur le bouton Couper pour couper le ruban. Fonctions utiles Avertissement : Appuyez sur le bouton Couper Vous trouverez ci-après certaines fonctions courantes qui seulement quand le ruban est à... -
Page 7: Dépannage
Impression d’une étiquette 3. Appuyez sur pour sélectionner Activée puis appuyez sur 1. Appuyez sur Pendant l’impression des étiquettes, la longueur de l’étiquette et le nombre de copies s’affichent à l’écran. 2. Une fois l’impression terminée, appuyez sur le bouton Création de formats spéciaux Couper. -
Page 8: Spécifications
Impossible de coller l’étiquette • Veillez à décoller la pellicule protectrice avant de coller Epson est une marque déposée et Exceed Your Vision est un l’étiquette. logotype déposé de Seiko Epson Corporation. Le ruban LC et leurs logos sont des marques déposées ou des marques de commerce de •...


Need help?
Do you have a question about the Epson LW-400 and is the answer not in the manual?
Questions and answers