Magicard Prima 4 User Manual
Double-sided inline laminator
Hide thumbs
Also See for Prima 4:
- Specifications (2 pages) ,
- User manual (125 pages) ,
- User manual (40 pages)

Related Manuals for Magicard Prima 4


Summary of Contents for Magicard Prima 4
- Page 1 Double-sided inline laminator User Manual Prima500 Doc No:1385 Issue 1.03 Ultra Electronics Card Systems www.magicard.com...
-
Page 2: Table Of Contents
Before Use Characteristics of this Unit Contents This laminator attaches a protective layer to one or both Before Use sides of the card printed by the card printer. Characteristics of this Unit ..........2 A hologram that helps to enhance the security level of the Contents ................2 card can be formed on the protective layer. - Page 3 Read through the following carefully before operating to ensure proper use of this laminator. After reading, store this manual at a place that can be easily retrieved when necessary. Information for USA For a Class A digital device or peripheral, the instructions furnished the user shall include the following or similar statement, placed in a prominent location in the text of the manual: Note: This equipment has been tested and found to comply with the limits for a Class A digital device, pursuant to part 15 of the FCC Rules.
-
Page 4: Safety Precautions
Before Use Safety Precautions... -
Page 6: About This Manual
Before Use About this Manual Films Handling procedures Pay attention to the following points when handling films. Do not touch the film surface with your hand. Doing so may result in poor adhesion. Symbols Used in this Manual Foreign objects attached to the surface of the film may result in poor adhesion. -
Page 7: Capability Of This Unit
LED display (blue) Capability of this Unit Blinks or lights up in blue, and combines with the A LED display (red) to indicate the status of the laminator. ( A page 15 “Laminator Status, LED Display and Card Printer’s Operation Panel Display”) Operation button This laminator selects the side of the card to be laminated Pressing this button when the laminate film is loaded will... -
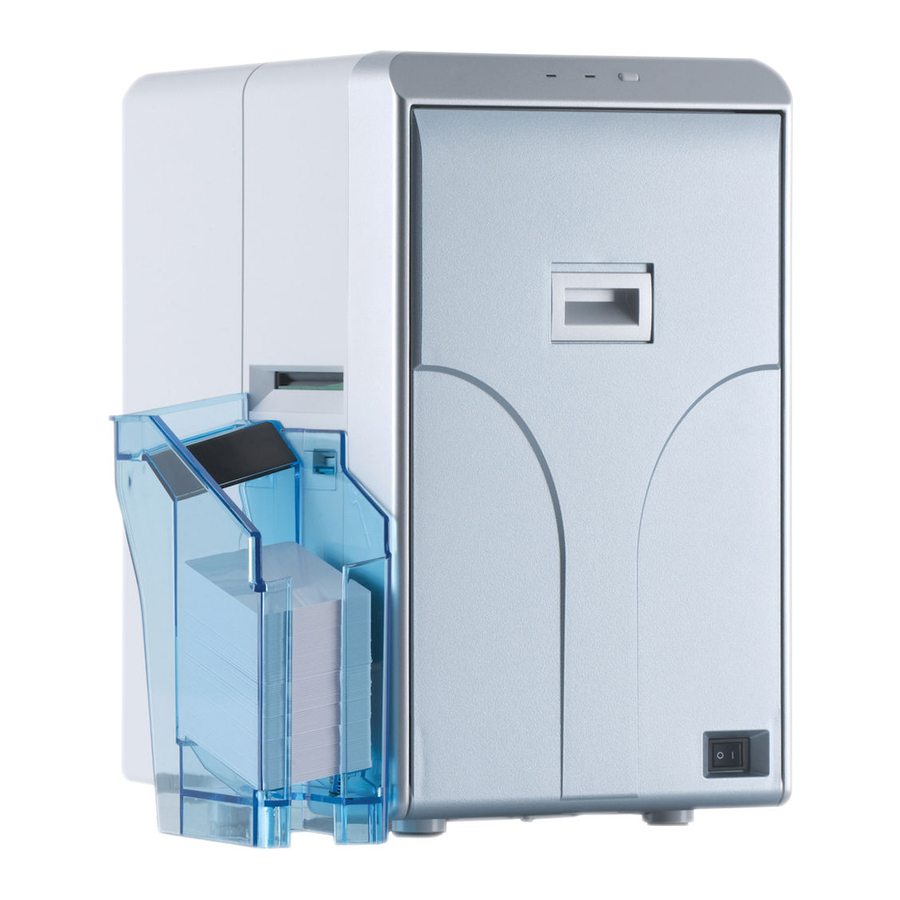
Page 8: Film Cassette
Before Use Right When Laminator Door is Open Cassette buttons Card feed port Press the buttons to remove the film cassette. Feeds the printed card from the card printer that is Top side film cassette (orange) connected to the laminator. For attaching the laminate film. -
Page 9: Internal Mechanism Diagram
Internal Mechanism Diagram Top take-up side laminate film Bottom side laminate film supply motor Top side laminate pressure motor Bottom supply side laminate film Top side laminate heater pressure mechanism Bottom side laminate heater pressure mechanism Top supply side laminate film Bottom side laminate pressure motor Top side laminate film supply motor Interlock switch... -
Page 10: Specifications
Before Use Specifications Accessories/Products Sold Separately Main Specifications Accessories Please check to ensure that the laminator accessories are in Item Description place when unpacking the product package. Recording system DC heat roller system Approx. 22 sec. to 38 sec. (Time varies according to the Transfer time Power Cord (2 m) x 2 setting.) -
Page 11: Setup
Setup Installation and Connection Card Printer Connection Fit the card printer to the supplied unit connection adapter Installation Location Ventilation holes for the cooling fan are located at the rear of the laminator as well as the side and rear of the card printer. -
Page 12: Setting Laminate Film
Setup Setting Laminate Film Card Stacker Hook the tab of the card stacker that is supplied with the card printer to the card stacker attachment slot Attach a patch film or overlay film on the film cassette. The film type is set to patch film by default. When using overlay film for the first time after purchasing the laminator, turn on the laminator and the card printer and change [Film Type] of the laminator to [Overlay] on the status monitor... - Page 13 Press and hold down the cassette button, and pull out the film cassette Top Side Film Cassette Bottom Side Film Cassette C Wind the film twice around the take-up side. Top Side Film Cassette Bottom Side Film Cassette Remove any slack in the laminate film Attach the tip of the new laminate film to the bobbin Place the new laminate film and the take-up bobbin side by side on a clean and flat platform.
-
Page 14: Operating The Laminator
Operating the Laminator Operating the Laminator Operation Panel The status display of the laminator is displayed on the operation panel of the card printer as well as the status monitor of the computer that is connected to the card printer. The status is indicated on the laminator unit using a combination of solid and blinking LED displays in red and blue colors. - Page 15 Laminator Status, LED Display and Card Printer’s Operation Panel Display Card Printer LED display LED display Laminator Status Operation Panel Description (red) (blue) Display Initializing Initializing.. Initializing in progress Preheating Preheating.. Adjusts the heating roller to the preset temperature Blinking Low temperature standby mode Standby In HR Control mode...
- Page 16 Operating the Laminator Settings Checking the Laminator Settings Laminator Mode: Laminate, Pass Settings can be viewed on the card printer’s operation Set to [Laminate] to perform laminating. panel. Set to [Pass] if you do not want to laminate. Settings can be changed on the status monitor of the Cassette: None, Top, Bottom, Both computer that is connected to the card printer.
-
Page 17: Initializing
Factory Settings Closing the Laminator Door Item Factory Settings Closing the laminator door when the laminate film is loaded will reset the laminator settings. Mode Laminate Loading a patch film will forward the laminate film by one Film-T Patch image and reset the laminator settings. Film-B Patch Film-T Pos... -
Page 18: Turning On The Power
Operating the Laminator Turning On the Power Turning Off the Power Check to ensure that the card printer and laminator Turn off the power of the card printer are properly connected Turn on the power of the laminator Turn off the power of the laminator Turn on the power of the card printer Turn on the power again only after both LED displays of the laminator have been turned off. -
Page 19: Firmware Update
Data download from the computer starts Firmware Update A [Downloading..] message appears. D o w n l o a d i n g . . K e e p P o w e r O n Setting the laminator and card printer to download mode enables you to update the firmware for the laminator by Cautions: using a PC through card printer connection. -
Page 20: Settings
Settings Settings Status Monitor Settings What is status monitor? Status Monitor is a software that displays the status for the card printer and laminator, and enables you to adjust the settings for the card printer and laminator. Start the status monitor by using a computer that is connected to the card printer. For details on starting the status monitor, refer to the manual of the card printer. - Page 21 List of Error Codes Error Code Error Display Message Action Check to ensure that the laminator is properly connected to the card printer. ( A Page 11 “Card 05000050 Failure occurred during card loading. Printer Connection”) Remove the card. ( A Page 32 “Card Jam”) The temperature of the heating roller may be too 05000051 Card jam near the card feed roller.
-
Page 22: Printer Driver Settings
Settings Temperature [Laminator] Tab Sheet For setting the temperature of the bottom side and top side heating roller. Settable range is between 90 °C For changing laminator settings. and 180 °C. (A temperature of 185°C or higher may be selectable depending on the version of the status monitor. However, in this case, the temperature for the heating roller remains at 180 °C.) Common Setting... -
Page 23: Replacement
Replacement Remove any slack in the laminate film Laminate Film Turn the knob on the film cassette in the direction indicated by the arrow. This laminator selects the side of the card to be laminated by the presence of the film cassette. Load the film cassette to the side of the card to be laminated. - Page 24 Replacement Attach the tip of the new laminate film to the bobbin Remove any slack in the laminate film Place the new laminate film and the take-up bobbin side by side on a clean and flat platform. Attach the tip of the new laminate film to the take-up bob- bin using the fixing tape.
-
Page 25: Maintenance
Maintenance Film residue and dust may cause lamination defects if Press and hold down the cassette button, and pull they are accumulated inside the laminator. Clean all parts out the film cassette regularly. Cautions: After cleaning is complete, check to ensure that all dismantled parts are restored to their original positions. - Page 26 Maintenance Cleaning the laminator alone Insert the cleaning card (sold separately) into the card cleaner Open the laminator door Press and hold down the cassette button, and pull The cleaning card is discharged from the card outlet of out the film cassette the laminator.
- Page 27 Press the operation button for two seconds or Insert the film cassette all the way in along the longer guide rail until a “click” sound is heard, and close the laminator door The cleaning process starts. Orange Yellowish- green Cautions: The cleaning operation does not start if the heating roller Cautions: is still hot.
-
Page 28: Fan Filter
Maintenance Set the fan filter Fan Filter Cautions: Start work after ensuring that the power has been turned Set the filter cover off. Replace the fan filter with a new one after using it for about one year. For details on its replacement, please consult our authorized dealers. - Page 29 Remove any slack in the laminate film Remove the laminate film from the film cassette Turn the knob on the film cassette in the direction Apply alcohol to a rag that does not produce lint indicated by the arrow. easily (such as a cleaning wipe) Wipe the four film guides Film Guides Top Side Film Cassette...
-
Page 30: Interior Of Laminator
Maintenance Remove any slack in the laminate film Interior of Laminator Turn the knob on the film cassette in the direction indicated by the arrow. Dirt during card feed or burrs caused by friction between the bobbin holder and bobbin may adhere to the card or film, causing lamination defects as a result. - Page 31 Apply alcohol to a cotton swab (large), and use it to Apply alcohol to a cotton swab (small), and use it wipe the bobbin holder (x4) to wipe the guide rail (x2) in front (Cotton swab and alcohol: sold separately) Bobbin holder Remove any slack in the laminate film Apply alcohol to a cotton swab (large), and use it to...
-
Page 32: Troubleshooting
Troubleshooting Troubleshooting Card Jam Use the jog dial to remove the card. Make use of the jog dials that are supplied with the card printer. Cautions: If the security lock of the card printer is on, deactivate it. After work is complete, activate the security lock again. For details on locking/unlocking the security lock, refer to the manual of the card printer. - Page 33 Attach the jog dial to the jog dial insertion slot Insert the film cassette all the way in along the guide rail until a “click” sound is heard, and close the laminator door Orange Yellowish- green Turn the jog dial in the anti-clockwise direction Cautions: Make sure to insert the film cassette all the way in until a “click”...
-
Page 34: Film Is Entangled
Troubleshooting Remove any slack in the laminate film Film is Entangled When the film cassette is taken out and the film is entangled due to the laminate film been peeled off from the film cassette or card jams, use the methods below to untangle and reattach the film. -
Page 35: Misaligned Patch Position
Attach the unused portion at the supply side to the Misaligned Patch Position other end at the take-up side using an adhesive tape, while making sure that the joint surface is even The patch position may vary slightly with respect to the card depending on the type of film used and the different methods used during the manufacturing process. -
Page 36: Card Warpage
Troubleshooting Card Warpage During laminating, heating by the heating roller may cause warpage in cards with a low heat resistance, such as PVC ones. If card is significantly warped Lowering the temperature or increasing the speed helps to reduce the heat load on the card, thus causing less warpage. Alter the temperature and speed gradually while making sure that the adhesiveness is not affected. - Page 37 Setting example for double-sided printing and bottom side lamination (Heat-resistant PET-G card) Film 1mil 0.6mil Overlay Ambient Condition Temperature 15 °C to 28 °C Humidity 35 % to 60 % Laminator Temperature (Bottom Side) 155 °C 155 °C 125 °C CL-600D Speed 5.0 mm/s...
-
Page 38: List Of Error Codes
Troubleshooting List of Error Codes LED displays and error codes The error codes are displayed on the operation panel of the card printer as well as the status monitor of the computer that is connected to the card printer. For error codes displayed on the status monitor, refer to page 21. display display Error Code... - Page 39 display display Error Code Error Content Actions (red) (blue) The top side heating roller thermistor Thermistor-T 67 is faulty. The bottom side heating roller Thermistor-B 68 thermistor is faulty. Turn off the power and turn it on again. If the same problem occurs, consult our authorized dealers or Top side heating roller pressing servicing personnel.
- Page 41 Prima 4 driver manual 2012:Layout 1 5/4/12 11:23 Page 2 Ultra Electronics Card Systems Ultra Electronics Card Systems Inc. Hampshire Road, Weymouth, North American Sales Support Center & Dorset DT4 9XD, United Kingdom 6711 - 176th Avenue NE Redmond, WA 98052...
Need help?
Do you have a question about the Prima 4 and is the answer not in the manual?
Questions and answers