M&S Systems dmc3-4 Owner's Manual
Hide thumbs
Also See for dmc3-4:
- Installation instructions manual (25 pages) ,
- Troubleshooting manual (9 pages) ,
- Owner's manual (24 pages)
Table of Contents
Advertisement
Advertisement
Table of Contents

Subscribe to Our Youtube Channel
Related Manuals for M&S Systems dmc3-4


Summary of Contents for M&S Systems dmc3-4
- Page 1 Owner’s Manual...
-
Page 2: Safety First
Warning: Always follow these safety instructions. Retain these instructions for future system reference. DO NOT expose the dmc3-4 to moisture. Doing so can create fire or shock hazards and void the warranty. DO NOT attempt to service this product yourself as opening or removing covers may expose you to dangerous voltage or other hazards and will void your warranty. - Page 3 The exclamation point within an equilateral trianf59.20 intended to alert the user to the presence of important operating and maintenance (servicing) instruction0 in the literature accompanying the product. USE ONLY M&S Systems replacement parts and have them installed by an M&S Systems dealer or installer.
-
Page 4: Table Of Contents
Table of Contents Safety First ........................i Table of Contents....................iii Introduction ......................1 System Overview ....................1 Master Station ..........................1 Room/Patio Station........................2 Door Station............................2 System Settings.......................2 Clock Settings ..........................3 Music Settings..........................4 Audio Settings ..........................7 Display Brightness ..........................9 Intercom Selector Switch Settings....................9 Intercom Operation....................11 Master Station Operation ..................12... - Page 5 Table of Figures Figure 1—System Settings.........................2 Figure 2—Clock Settings: Set Time....................3 Figure 3—Preset Radio Stations......................5 Figure 4—Scan Progressions......................6 Figure 5—Scan Mode.........................7 Figure 6—Audio Settings: Music Volume ..................8 Figure 7—Tone Settings: Loudness ....................9 Figure 8—Intercom Settings......................10 Figure 9—Room/Patio Station 4-wire System................13 Figure 11—Door Station ........................15...
-
Page 6: Introduction
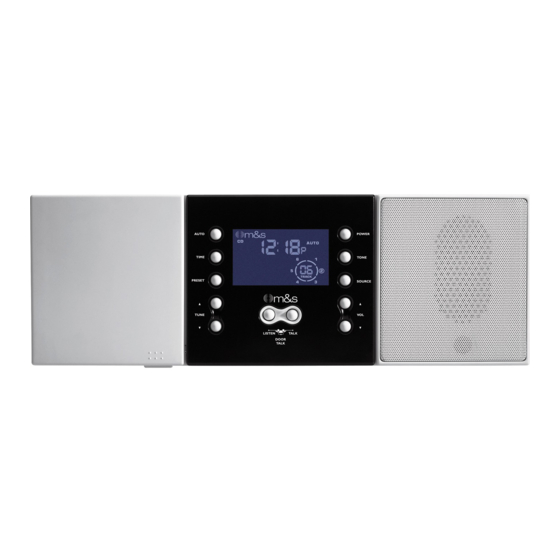
Introduction The dmc3-4 is an intercom and sound system designed for today’s home. Its compact size and modern, elegant look complement any décor. The dmc3-4 offers more than just sensible good looks. It gives you peace of mind as it allows you to communicate with family members and monitor specified rooms. -
Page 7: Room/Patio Station
The Door Station is an exterior intercom speaker and doorbell installed at home entrances. The dmc3-4 system supports up to 3 door stations. The door station allows for communications from within the house to visitors. Any station with its Intercom Selector Switches set to Intercom or Radio/INT can communicate with the Door Station. -
Page 8: Clock Settings
Clock Settings You can set two clock functions: • Normal—Displays the normal time of day. • Music Auto On/Off—Sets the times to automatically turn the last music source on and then off. Figure 2—Clock Settings: Set Time To change clock settings: 1. -
Page 9: Music Settings
4. Press TIME to continue through the settings: Music Auto On, hour and minutes and Music Auto Off, hour and minutes. 5. After you have entered Music Auto Off minutes, press TIME to return to Normal Time display. Note: You can enable or disable the AUTO function. The word “Auto” will appear on the display when Auto Function is on. -
Page 10: Figure 3-Preset Radio Stations
Tune the Radio To tune a radio station: 1. Press POWER to turn on the music. 2. Select FM or AM. See Music Settings/Music Source for instructions. 3. Use TUNE UP or TUNE DOWN to find a station. If you press and release, within second, TUNE UP or TUNE DOWN, the tuner goes into Seek Mode and finds the next station with a strong signal. -
Page 11: Figure 4-Scan Progressions
5. If you don’t want to assign a preset number, wait 5 seconds and your selected radio station will automatically be assigned to the preset number that is displayed. If you want to select the preset number, press the PRESET button repeatedly to cycle through numbers -8 until you reach the preset number you want. -
Page 12: Audio Settings
To set the Scan Mode: 1. To change the scan mode, simultaneously press and release PRESET and SOURCE again. The display shows either Scan1 or Scan2. Note: Exit out of scan mode by pressing PRESET and SOURCE or waiting for the display to show the clock time again. -
Page 13: Figure 6-Audio Settings: Music Volume
To change volume and tone settings: 1. Press POWER to turn on music. The system defaults to music volume. Use VOLUME UP and VOLUME DOWN to adjust the music volume from 0-29. All other audio settings return to music volume after 5 seconds. -
Page 14: Display Brightness
Turn music on AUTO POWER 12:20 TONE TIME Select setting to change LOUDNESS PRESET SOURCE Change setting LISTEN TALK TUNE VOLUME TUNE DOOR TALK Figure 7—Tone Settings: Loudness Display Brightness DOOR TALK DOOR TALK 1. Simultaneously press TUNE UP and POWER. The display cycles through brightness levels: low, medium, and high, then repeats the cycle. -
Page 15: Figure 8-Intercom Settings
INTERCOM RADIO/INT MONITOR Figure 8—Intercom Settings Intercom When a station is set to Intercom (Intercom only): • You can talk and listen from this station. • The room does not receive music. • The room cannot be monitored. • The room cannot hear other rooms that are set to Monitor. -
Page 16: Intercom Operation
• The station itself cannot be monitored. Note: When a station is set to Radio/INT, the sound and activity in that room can be heard by another room station by pressing the LISTEN button. • The station hears the door chime and communicate with and listen to a door Station. -
Page 17: Master Station Operation
This optional function can control another system that is properly connected to the dmc3-4. For example, it may control a door release mechanism, turn on the lights, set off an alarm, etc. This function is available from the Master Station and all remote scan Room Stations (dmc3-4RS). -
Page 18: Room/Patio Station Operation 4-Wire (M&S Systems Retrofit)
Room/Patio Station Operation 4-Wire (M&S Systems Retrofit) VOLUME UP + VOLUME DOWN Scan music sources. Hold for 4+ seconds to activate Security/Home Automation TALK + LISTEN function. (Not available on Patio Talk and listen to Door Station Station.) Listen to all stations set to Intercom... -
Page 19: Select Music Source
Select Music Source The system music source can be selected from any Room/Patio Station. The music sources that are available vary depending on the Scan setting on the Master Station. (See Master Station Settings/Music Settings/Scan Mode for details.) Note: You cannot select specific tracks on the CD from a Room/Patio Station. -
Page 20: Door Station Functions
Note: If you press and hold these buttons for 4 seconds or more, you initiate the Security/Home Automation function. (See Intercom Operation/Security/Home Automation for details.) This function is not available on the Patio Station. VOLUME UP + VOLUME DOWN Scan music sources. -
Page 21: Cd Player Operation (Optional)
CD Player Operation (Optional) 1. Load up to 6 CDs in the CD changer. 2. Press POWER to turn on music. 3. Select CD as the music source. See Master Station Settings/Music Settings/Music Source for instructions. When CD is selected as the music source, the display shows the following information: •... -
Page 22: Rf Remote Control (Optional)
RF Remote Control (Optional) Up to 4 different remotes can be programmed to control the Master Station. The system obtains a unique code from the remote, virtually insuring that no one else can interfere with your system and you will not interfere with anyone else. -
Page 23: M&S Systems 2-Year Warranty
M&S Systems 2-Year Warranty M&S Systems warrants its products to be free of defects for 2 years. Except for the AirVac Gold power units. The warranty period begins on either (a) the date of purchase or installation date of this product or (b) the date of closing on a new residence in which this product was originally installed. - Page 24 115992-2 M&S Systems | 2861 Congressman Lane | Dallas, Texas 75220 | 800.877.6631 | www.mssystems.com...
Need help?
Do you have a question about the dmc3-4 and is the answer not in the manual?
Questions and answers