Table of Contents
Advertisement
Quick Links
Advertisement
Table of Contents

Related Manuals for Planet Audio P9690B


Summary of Contents for Planet Audio P9690B
- Page 2 7. Specification General Specification Power Supply Requirement..........DC 12V Maximum Power Output....4 x 80W(measured at DC 14.4 V) Dimensions(w x h x d)..........7”W x 2”H x 6.5”D DVD Deck Specification To ensure safety while driving Format........DVD/VCD/MP4/JPEG//MP3/WMA/CD Video System................NTSC Audio System..............24 bit/96KHz Loading System............
- Page 3 6. Trouble Shooting PRECAUTION Please read the user manual carefully before using the DVD player. If you have any trouble in using this player, try to troubleshoot by using the recommended suggestions mentioned below . If you are still having difficulty, please contact the company or the technical service center authorized by us.
-
Page 4: Table Of Contents
Contents 4.3 To redial the last phone number dialled 1. Before Operation...................4 (1) Short press TEL button . It will show a line on the display. 1.1 Glossary....................4 1.2 Precautions....................4 (2) Short press REDIAL button, It will dial the last phone number. 1.3 Maintenance and Cleaning of Discs............5 1.4 Battery Information of the Remote Control..........5 1.5 The Remote Control Description..............6... -
Page 5: Before Operation
5. BLUETOOTH HANDFREE SYSTEM(Option) 1. Before Operation 1. Pairing and connection 1.1 Glossary 1) Turn on the Bluetooth mode of the mobile phone; PBC (playback control) It is a kind of signal(menu) recorded in the disc with SVCD or VCD2.0 2) Select the item of Finding the BLUETOOTH Device and press enter. -
Page 6: Maintenance And Cleaning Of Discs
4.25 Parental Control 1.3 Maintenance and Cleaning of Discs Disc Maintenance Q:After inserting DVD disc into disc compartment, a dialogue window will appear asking for a password of 4 digits. Why ? 1. To keep the disc clean, andle the disc by its edge, do not touch the disc surface of the play side. -
Page 7: The Remote Control Description
Remote Control Description 4.24.6 DIGITAL SETUP 1. BACK BUTTON 2. MENU/PBC BUTTON 3. POWER BUTTON 4. ^ BUTTON 5. >>| BUTTON 6. > BUTTON DYNAMIC RANGE 7. |<</CLEAR BUTTON After selecting the compression mode of LINE OUT, set the item, so you can adjust the linear compression ratio. -
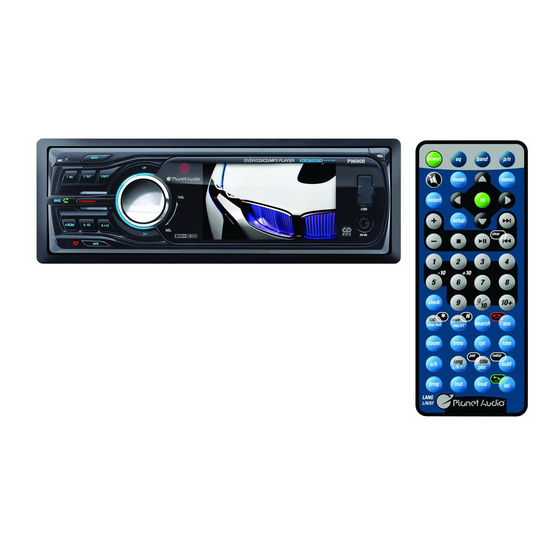
Page 8: Locations And Names Of The Controls
1.6 Locations and Names of Controls 4.24.4 VIDEO SETUP BRIGHTNESS It is for adjusting the brightness of the video output. CONTRAST It is for adjusting the contrast of the video output. The figure of front panel It is for adjusting the hue of the video output. SATURATION It is for adjusting the saturation of the video output. -
Page 9: Description Of The Rear Cabinet
1.7 Description of the Rear Cabinet 2. Select the RATING item and then press the > button to enter it, then use the direction buttons to select your desired rating level, then press the OK button to confirm. 3. Select the PASSWORD item again and then press the > button to enter it, then input the password, and then press the OK button to lock the new setting of the rating level of the Parental Control. -
Page 10: Unit Installation
The Description of the Fixed ISO Female Connector 4.24 DVD System Menu Setup Operation 1. Press the SETUP button on the remote controller to access the DVD System Menu on the monitor. 2. There are 6 setup pages in all for the System Menu. Press the > or < button to select an desired setup page. -
Page 11: Common Operation
When you select a JPEG file sort icon, press the ^ or > button to select the 2. Common Operation first JPEG file, then press the v button to select the desired JPEG file, finally press the OK or PLAY/PAUSE button to display the JPEG picture in full screen from the selected JPEG picture. - Page 12 10.To adjust sound modes 4.19 Program Playback To adjust the sound modes, briefly and repeatedly press the SEL button on the front panel to select one of the sound modes such as : VOL, BAS It allows you to enter the order in which you want some chapters/tracks in (without preset EQ), TRE (without preset EQ), BAL, FAD and EQ.
-
Page 13: Radio Operation
3. Radio Operation 1. BAND BUTTON 4.14 Playback in Random Press the BAND button on the front panel to select your desired radio band of FM1, FM2, FM3, AM1 and AM2, and the selected When playing DVD/VCD(PBC OFF)/MP3/WMA/CD discs, press the RDM band will be displayed on the monitor of the front panel, press button to switch between RANDOM (ON)/RANDOM OFF. -
Page 14: A-B Repeat
7. PTY (PROGRAM TYPE) BUTTON Press the PTY button briefly to select one of the following modes: 4.11.2 A-B Repeat PTY MUSIC group- - PTY SPEECH group- - PTY OFF When PTY group is on, press the VOL+ or VOL- button on the remote Press the A-B button if you want to repeat a specific segment on a disc controller or rotate the VOL knob on the front panel to select one of PTY that you define:... - Page 15 4.8Playback with Speed 4. Basic Disc, USB or SD Operation During normal playback, press and hold the UP/DN button on the front panel or the >>|/|<< button on the remote controller continuously to fast forwards 4.1 Begin playback or backwards at the following speeds: x2, x4, x8, x20, normal. 1.
-
Page 16: Select Chapter/Track With The Up/Dn Or The >>|/|<< Buttons
4.5 Select Chapter/Track with Number Buttons Press OSD on the remote to turn on function select. When playing DVD/VCD(PBC OFF)/MP3/WMA/CD discs, press one of the 1~9 :select to pause playback. number buttons to directly select and play the 1st to 9th track /chapter. If you want to play the track/chapter with serial number bigger than 9, For example 1, to play the 13th track/chapter,just press 1 and then press 3, : select to stop playback .
Need help?
Do you have a question about the P9690B and is the answer not in the manual?
Questions and answers