Table of Contents
Advertisement
Quick Links
Download this manual
See also:
User Manual
Advertisement
Table of Contents

Related Manuals for Linksys AM200


Summary of Contents for Linksys AM200
- Page 1 Package Contents • ADSL Modem • Power Supply • User Guide on CD-ROM • Telephone Cable • Ethernet Cable ADSL Modem Quick Installation Guide WIRED AM200 (EU/LA) Model No.
-
Page 2: Connecting The Adsl Modem
There are two ways to configure the Modem. Choose one of the following: Use this Quick Installation guide - If you wish, you can use the Modem’s web-based utility to install the Modem. Proceed to Step 1, and follow the Quick Installation’s instructions. - Page 3 Connect one end of the provided Ethernet cable to your PC’s Ethernet adapter (Figure C). Connect the other end of the cable to the Ethernet port on the back of the Modem (Figure D). Connect the power adapter to the Modem (Figure E).
- Page 4 Configuring the ADSL Modem In Step 2, you will configure your Linksys Modem to be able to gain access to the Internet through your Internet Service Provider (ISP). You will need the setup information provided by your ADSL ISP . If you do not have this information, please contact them before proceeding.
- Page 5 The Basic Setup screen will appear with the Setup tab selected. Based on the setup instructions from your ISP , you may need to provide the following information. ADSL Settings. The Modem supports the following Encapsulations: RFC 1483 Bridged, RFC 1483 Routed, RFC 2516 PPPoE, RFC 2364 PPPoA and Bridged Mode Only.
-
Page 6: Static Ip Address
1 RFC 1483 Bridged Dynamic IP Address If your ISP says that you are connecting through a dynamic IP address, perform these steps: Select RFC 1483 Bridged for the Encapsulation. Dynamic IP Address Select Obtain an IP Address Automatically as the IP Setting. - Page 7 Enter the DNS in the Primary and/or Secondary fields. You need to enter at least one DNS address. Click the Save Settings button to save the settings. 2 RFC 1483 Routed If your ISP says that you are connecting through RFC 1483 Routed using a static IP address, perform these steps: Select RFC 1483 Routed...
- Page 8 3 RFC 2516 PPPoE or RFC 2364 PPPoA If your ISP says that you are connecting through PPPoE or PPPoA, or if you normally enter a user name and password to access the Internet, perform these steps: PPPoA Select RFC2516 PPPoE or RFC 2364 PPPoA as appropriate for the Encapsulation.
- Page 9 Website http://www.linksys.com/international Product Registration http://www.linksys.com/registration Linksys is a registered trademark or trademark of Cisco Systems, Inc. and/or its affiliates in the U.S. and certain other countries. Copyright © 2006 Cisco Systems, Inc. All rights reserved. AM200 EU/LA-QIG-60503NC RR...
- Page 10 Pakkens indhold • ADSL-modem • Strømforsyning • Brugervejledning på cd-rom • Telefonledning • Ethernet-kabel ADSL-modem Installationsvejledning WIRED AM200 (DK) Modelnr.
- Page 11 Du kan konfigurere modemet på to måder. Vælg en af følgende: Brug denne installationsvejledning - du kan eventuelt bruge modemets webbaserede hjælpeprogram til installation af modemet. Fortsæt til trin 1, og følg instruktionerne i installationsvejledningen. Kør installations-cd-rom'en - Hvis du vil, kan du installere modemet vha. installations-cd-rom'en.
- Page 12 Tilslut den ene ende af det medfølgende Ethernet- kabel til pc'ens Ethernet-kort (Figur C). Tilslut den anden ende af kablet til Ethernet-porten bag på modemet (Figur D). Tilslut strømforsyningen til modemet (Figur E). Tilslut strømforsyningen til stikkontakten. Tilslutningen af modemet er gennemført.
- Page 13 Konfiguration af ADSL-modemet I trin 2 konfigurerer du dit Linksys- modem, så du kan oprette adgang til internettet via din internetudbyder. Du skal have konfigurationsoplysningerne fra din ADSL-udbyder. Hvis du ikke har disse oplysninger, skal du kontakte udbyderen, før du fortsætter.
- Page 14 Skærmbilledet Basic Setup (Grundlæggende konfiguration) vises med fanen Setup (Konfiguration) valgt. Afhængigt af vejledningen fra din internetudbyder skal du muligvis angive følgende oplysninger. ADSL-indstillinger. Modemet understøtter følgende indkapslingsmetoder: RFC 1483 Bridged, RFC 1483 Routed, RFC 2516 PPPoE, RFC 2364 PPPoA og Bridged Mode Only.
- Page 15 1 RFC 1483 Bridged Dynamisk IP-adresse Hvis din internetudbyder har oplyst, at du opretter forbindelse via en dynamisk IP-adresse, skal du følge nedenstående fremgangsmåde: Vælg RFC 1483 Bridged under Encapsulation Dynamisk IP-adresse (Indkapslingsmetode). Vælg Obtain an IP Address Automatically (Hent automatisk en IP-adresse) under IP Setting (IP-indstilling).
- Page 16 Indtast DNS-adressen i feltet Primary (Primær) og/eller Secondary (Sekundær). Du skal indtaste mindst én DNS-adresse. Klik på knappen Save Settings (Gem indstillinger) for at gemme indstillingerne. 2 RFC 1483 Routed Hvis din internetudbyder har oplyst, at du opretter forbindelse via en RFC 1483 Routed med statisk IP-adresse, skal du følge nedenstående fremgangsmåde: Vælg RFC 1483 Routed...
- Page 17 3 RFC 2516 PPPoE eller RFC 2364 PPPoA Hvis din internetudbyder har oplyst, at du opretter forbindelse via PPPoE eller PPPoA, eller hvis du normalt indtaster et brugernavn og en adgangskode for at oprette forbindelse til internettet, skal du følge nedenstående PPPoA fremgangsmåde: Vælg RFC2516 PPPoE...
- Page 18 Websted http://www.linksys.com/international Produktregistrering http://www.linksys.com/registration Linksys er et registreret varemærke tilhørende Cisco Systems, Inc. og/eller Cisco Systems' associerede selskaber i USA og visse andre lande. Copyright © 2006 Cisco Systems, Inc. Alle rettigheder forbeholdes.
- Page 19 Lieferumfang • ADSL-Modem • Netzteil • Benutzerhandbuch auf CD-ROM • Telefonkabel • Ethernet-Kabel ADSL-Modem Kurzanleitung WIRED AM200 (DE) Modell-Nr.
- Page 20 Sie können das Modem auf zwei Arten konfigurieren. Wählen Sie eine der folgenden Methoden aus: Verwenden der Kurzanleitung – Sie können das Modem auch unter Verwendung des integrierten webbasierten Dienstprogramms installieren. Beginnen Sie mit Schritt 1, und befolgen Sie die Anweisungen in der Kurzanleitung.
- Page 21 Schließen Sie ein Ende des beigelegten Ethernet-Kabels an den Ethernet-Adapter des PCs an (Abbildung C). Schließen Sie das andere Ende des Kabels an den Ethernet-Port an der Rückseite des Modems an (Abbildung D). Schließen Sie das Netzteil an das Modem an (Abbildung E).
- Page 22 Konfigurieren des ADSL-Modems In Schritt 2 konfigurieren Sie das Linksys Modem für den Zugriff auf das Internet über Ihren ISP . Sie benötigen hierzu die Setup- Informationen Ihres ADSL-ISPs. Wenn Sie nicht über diese Informationen verfügen, wenden Sie sich an Ihren ISP , bevor Sie beginnen.
- Page 23 Das Fenster Basic Setup (Grundlegende Einrichtung) wird mit ausgewählter Registerkarte Setup (Einrichtung) angezeigt. Je nach den Setup- Informationen von Ihrem ISP müssen Sie unter Umständen die folgenden Informationen eingeben. ADSL Settings (ADSL- Einstellungen). Das Modem unterstützt die folgenden Kapselungstypen: RFC 1483 Bridged (RFC 1483-Überbrückung), RFC 1483 Routed (RFC 1483-Weiterleitung),...
- Page 24 1 RFC 1483-Überbrückung Dynamische IP-Adresse Wenn Sie laut ISP über eine dynamische IP-Adresse verbunden sind, führen Sie die folgenden Schritte aus: Wählen Sie als Kapselungs- methode RFC 1483 Bridged Dynamische (RFC 1483- Überbrückung) aus. IP-Adresse Wählen Sie Obtain an IP Address Automatically (IP-Adresse automatisch beziehen) als IP-Einstellung aus.
- Page 25 Geben Sie die Standard- Gateway-Adresse ein. Geben Sie die DNS-Adressen in die Felder Primary DNS (Primärer DNS) und Secondary DNS (Sekundärer DNS) ein. Sie müssen mindestens eine DNS-Adresse eingeben. Klicken Sie auf die Schaltfläche Save Settings (Einstellungen speichern), um die Einstellungen zu speichern.
- Page 26 3 RFC 2516 PPPoE oder RFC 2364 PPPoA Wenn Sie laut ISP über PPPoE oder PPPoA verbunden sind oder Sie normalerweise einen Benutzernamen und ein Passwort eingeben müssen, um auf das Internet zuzugreifen, führen Sie die PPPoA folgenden Schritte aus: Wählen Sie RFC2516 PPPoE oder RFC 2364 PPPoA als Kapselungsmethode aus.
- Page 27 E-Mail weitere Unterstützung anfordern. Website http://www.linksys.com/international Produktregistrierung http://www.linksys.com/registration Linksys ist eine eingetragene Marke bzw. eine Marke von Cisco Systems, Inc. und/oder deren Zweigunternehmen in den USA und anderen Ländern. Copyright © 2006 Cisco Systems, Inc. Alle Rechte vorbehalten. AM200 DE-QIG-60503NC RR...
- Page 28 Contenido del paquete • Módem ADSL • Alimentación • Guía del usuario en CD-ROM • Cable telefónico • Cable Ethernet Módem ADSL Guía de instalación rápida WIRED AM200 (ES) Nº de modelo...
- Page 29 Puede configurar el módem de dos formas. Seleccione una de las siguientes: Utilice esta guía de instalación rápida: Si lo desea, puede usar la utilidad basada en Web del módem para instalarlo. Vaya al paso 1 y siga las instrucciones de instalación rápida. Ejecute el CD-ROM de configuración: Si lo desea, puede utilizar el CD-ROM de configuración para instalar el módem.
- Page 30 Conecte un extremo del cable Ethernet proporcionado al adaptador Ethernet del PC (figura C). Conecte el otro extremo del cable al puerto Ethernet de la parte posterior del módem (figura D). Conecte el adaptador de corriente al módem (figura E). Conecte el adaptador de corriente a la toma de corriente.
- Page 31 Configuración del módem ADSL En el paso 2, debe configurar el módem Linksys para poder acceder a Internet mediante un proveedor de servicios de Internet (ISP). Necesitará la información de configuración proporcionada por el ISP de ADSL. Si no la tiene, póngase en contacto con el ISP...
- Page 32 Aparece la pantalla Basic Setup (Configuración básica) con la ficha Setup (Configuración) seleccionada. Según las instrucciones de configuración del ISP , quizá necesite proporcionar la siguiente información. Parámetros ADSL. El módem admite los siguientes tipos de encapsulación: RFC 1483 Bridged (RFC 1483 con puente), RFC 1483 Routed (RFC 1483 enrutado), RFC 2516 PPPoE, RFC 2364...
- Page 33 1 RFC 1483 Bridged (RFC 1483 con puente) Dirección IP dinámica Si el ISP indica que su conexión se realiza mediante una dirección IP dinámica, siga estos pasos: En Encapsulation (Encapsulación), seleccione Dirección IP RFC 1483 Bridged dinámica (RFC 1483 con puente). En IP Settings (Parámetros IP), seleccione Obtain an IP Address Automatically...
- Page 34 Introduzca la dirección IP (IP Address) y la máscara de subred (Subnet Mask). Introduzca la dirección de la puerta de enlace predeterminada (Default Gateway). Introduzca la dirección DNS en los campos correspondientes a las direcciones DNS principal (Primary DNS) y secundaria (Secondary DNS).
- Page 35 Introduzca la dirección de la puerta de enlace predeterminada (Default Gateway). Introduzca la dirección DNS en los campos correspondientes a las direcciones DNS principal (Primary DNS) y secundaria (Secondary DNS). Debe introducir por lo menos una dirección DNS. Haga clic en el botón Save Settings (Guardar parámetros) para guardar los parámetros.
- Page 36 Troubleshooting (Resolución http://www.linksys.com/registration de problemas) de la guía del usuario. Linksys es una marca registrada o marca comercial de Cisco Systems, Inc. y/o sus filiales en EE.UU. y otros países. Copyright © 2006 Cisco Systems, Inc. Todos los derechos reservados.
- Page 37 Contenu de l'emballage • Modem ADSL • Alimentation • Guide de l'utilisateur sur CD-ROM • Câble téléphonique • Ethernet 1,8 m Modem ADSL Guide d'installation rapide CABLE Modem AM200 (FR) Modèle...
- Page 38 Vous pouvez configurer le modem de deux manières. Choisissez l'une des deux méthodes suivantes : Utilisez ce guide d'installation rapide. Vous pouvez, si vous le souhaitez, utiliser l'utilitaire Web du modem pour installer le modem. Passez à l'étape 1 et suivez les instructions du guide d'installation rapide. Exécutez le CD-ROM d'installation.
- Page 39 Branchez l'une des extrémités du câble Ethernet fourni sur la carte Ethernet de votre ordinateur (Figure C). Branchez l'autre extrémité du câble sur le port Ethernet situé à l'arrière du modem (Figure D). Connexion de l'adaptateur électrique au modem (Figure E). Branchez l'adaptateur électrique sur la prise d'alimentation électrique.
- Page 40 Configuration du modem ADSL Au cours de l'étape 2, vous allez configurer votre modem Linksys afin qu'il puisse accéder à Internet via votre Fournisseur d'accès Internet (FAI). Vous devez disposer des informations de configuration fournies par votre fournisseur d'accès Internet ADSL.
- Page 41 L'écran Basic Setup (Configuration de base) s'affiche avec l'onglet Setup (Configuration) sélectionné. Selon les instructions de configuration provenant de votre FAI, vous devrez peut-être fournir les informations suivantes. ADSL Settings (Paramètres ADSL). Le modem prend en charge les cinq encapsulations suivantes : RFC 1483 Bridged (ponté), RFC 1483 Routed (routé), RFC 2516 PPPoE, RFC 2364...
- Page 42 1 RFC 1483 Bridged (RFC 1483 ponté) Adresse IP dynamique Si votre FAI vous indique que vous êtes connecté via une adresse IP dynamique, effectuez les opérations suivantes : Sélectionnez RFC 1483 Adresse IP Bridged (RFC 1483 ponté) pour l'encapsulation. dynamique Sélectionnez Obtain an IP Address Automatically...
- Page 43 Saisissez le nom de domaine dans les champs Primary DNS et/ou Secondary DNS (Nom de domaine primaire/ secondaire). Vous devez entrer au moins une adresse DNS. Cliquez sur le bouton Save Settings (Enregistrer les paramètres) pour enregistrer les paramètres. RFC 1483 Routed (RFC 1483 routé) Si votre FAI vous indique que vous êtes connecté...
- Page 44 3 RFC 2516 PPPoE ou RFC 2364 PPPoA Si votre FAI vous indique que vous êtes connecté via PPPoE ou PPPoA, ou si vous devez entrer un nom et un mot de passe utilisateur pour vous connecter à Internet, effectuez les opérations suivantes : PPPoA Sélectionnez le paramètre RFC2516 PPPoE ou RFC...
- Page 45 Site Web http://www.linksys.com/international Enregistrement du produit http://www.linksys.com/registration Linksys est une marque déposée ou une marque commerciale de Cisco Systems, Inc. et/ou de ses filiales aux Etats-Unis et dans certains autres pays. Copyright © 2006 Cisco Systems, Inc. Tous droits réservés.
- Page 46 Contenuto della confezione • Modem ADSL • Alimentatore • Guida per l'utente su CD-ROM • Cavo telefonico • Cavo Ethernet Modem ADSL Guida di installazione rapida WIRED AM200 (IT) N. modello...
- Page 47 È possibile configurare il modem in due modi diversi. Scegliere una delle modalità riportate di seguito. Seguire le istruzioni riportate in questa Guida di installazione rapida. Se lo si desidera, utilizzare l'utilità basata sul Web per installare il modem. Continuare con la fase 1 e attenersi alle istruzioni riportate nella Guida di installazione rapida.
- Page 48 Collegare un'estremità del cavo Ethernet in dotazione all'adattatore Ethernet del PC (Figura C). Collegare l'altra estremità del cavo alla porta Ethernet sul retro del modem (Figura D). Collegare l'adattatore di corrente al modem (Figura E). Collegare l'adattatore di corrente a una presa elettrica.
- Page 49 Configurazione del modem ADSL Nella fase 2, il modem di Linksys viene configurato in modo che sia in grado di accedere a Internet attraverso il provider di servizi in uso. È necessario disporre delle informazioni sulla configurazione fornite dal provider di servizi Internet ADSL.
- Page 50 Viene visualizzata la schermata Basic Setup (Configurazione di base) in cui è selezionata la scheda Setup (Configurazione). In base alle istruzioni fornite dal provider di servizi Internet, è necessario specificare le seguenti informazioni. ADSL Settings (Impostazioni ADSL). Il gateway supporta i seguenti metodi di incapsulamento: RFC 1483 Bridged (Bridging RFC 1483),...
- Page 51 1 RFC 1483 Bridged (Bridging RFC 1483) Indirizzo IP dinamico Se il provider di servizi Internet fornisce una connessione tramite un indirizzo IP dinamico, attenersi alla seguente procedura: Selezionare RFC 1483 Indirizzo IP dinamico Bridged (Bridging RFC 1483) per l'incapsulamento. Selezionare Obtain an IP Address Automatically (Ottieni automaticamente...
- Page 52 Immettere gli indirizzi DNS nei campi Primary DNS (DNS primario) e Secondary DNS (DNS secondario). È necessario specificare almeno un indirizzo DNS. Fare clic sul pulsante Save Settings (Salva impostazioni) per salvare le impostazioni. 2 RFC 1483 Routed (Routing RFC 1483) Se il provider di servizi Internet fornisce una connessione tramite RFC 1483 Routed...
- Page 53 3 RFC 2516 PPPoE o RFC 2364 PPPoA Se il provider di servizi Internet fornisce una connessione tramite PPPoE o PPPoA o se normalmente si utilizza un nome utente e una password per l'accesso a Internet, attenersi alla PPPoA seguente procedura: Selezionare RFC2516 PPPoE o RFC 2364 PPPoA come appropriato per...
- Page 54 Sito Web http://www.linksys.com/international Registrazione del prodotto http://www.linksys.com/registration Linksys è un marchio o marchio registrato di Cisco Systems, Inc. e/o delle relative aziende affiliate negli Stati Uniti e in altri Paesi. Copyright © 2006 Cisco Systems, Inc. Tutti i diritti riservati.
- Page 55 Inhoud van de verpakking • ADSL-modem • Netstroom • Gebruikershandleiding op cd-rom • Telefoonkabel • Ethernet-kabel ADSL-modem Installatiehandleiding WIRED AM200 (NL) Modelnr.
- Page 56 Er zijn twee manieren om de modem te configureren. Kies een van de volgende opties: Gebruik deze installatiehandleiding. Als u wilt, kunt u het webgebaseerde hulpprogramma van de modem gebruiken om de modem te installeren. Ga verder met stap 1 en volg de instructies in de installatiehandleiding. Gebruik de installatie-cd-rom.
- Page 57 Sluit het ene uiteinde van de meegeleverde Ethernet-kabel aan op de Ethernet-adapter van uw pc (afbeelding C). Sluit het ene uiteinde van de kabel aan op de Ethernet-poort aan de achterkant van de modem (afbeelding D). Sluit de netstroomadapter aan op de modem (afbeelding E).
- Page 58 De ADSL-modem configureren In stap 2 configureert u uw Linksys-modem zodat u toegang hebt tot internet via uw internetprovider. U hebt de instellingsgegevens nodig die u van uw ADSL-leverancier ontvangt. Hebt u deze gegevens niet, neem dan contact op met uw provider voordat u verdergaat.
- Page 59 Het scherm Basic Setup (Basisinstellingen) verschijnt, waarin het tabblad Setup (Instellingen) is geselecteerd. Afhankelijk van de installatie- instructies van uw internetprovider dient u wellicht de volgende informatie te verstrekken. ADSL-instellingen. De modem ondersteunt de volgende methoden voor inkapseling: RFC 1483 Bridged (Brug), RFC 1483 Routed (Gerouteerd), RFC 2516 PPPoE, RFC 2364...
- Page 60 1 RFC 1483 Bridged (Brug) Dynamisch IP-adres Als uw internetprovider aangeeft dat u verbinding maakt via een dynamisch IP-adres, volgt u de onderstaande stappen: Selecteer RFC 1483 Dynamisch IP-adres Bridged (Brug) als encapsulatiemethode. Selecteer Obtain an IP Address Automatically (Automatisch een IP-adres laten toewijzen) als IPHinstelling.
- Page 61 Selecteer Use the following IP Address (Het volgende IP-adres gebruiken) als IP-instelling. Voer het IP-adres en het subnetmasker in. Voer het adres van de standaardgateway in. Voer de DNS-gegevens in de velden Primary (Primaire DNS) en/of Secondary (Secundaire DNS) in. Vul ten minste één DNS-adres in.
- Page 62 Voer het adres van de standaardgateway in. Voer de DNS-gegevens in de velden Primary (Primaire DNS) en/of Secondary (Secundaire DNS) in. Vul ten minste één DNS-adres in. Klik op de knop Save Settings (Instellingen opslaan) om de instellingen op te slaan. 3 RFC 2516 PPPoE of RFC 2364 PPPoA Als uw internetprovider aangeeft...
- Page 63 Productregistratie gebruikershandleiding http://www.linksys.com/registration raadplegen. Linksys is een gedeponeerd handelsmerk van Cisco Systems, Inc. en/of zijn dochterondernemingen in de VS en bepaalde andere landen. Copyright © 2006 Cisco Systems, Inc. Alle rechten voorbehouden. AM200 NL-QIG-60503NC RR...
- Page 64 Conteúdo da embalagem • Modem ADSL • Fonte de alimentação • Manual do Utilizador em CD-ROM • Cabo telefónico • Cabo Ethernet Modem ADSL Manual de Instalação Rápida WIRED AM200 (PT) Modelo n.º...
- Page 65 Existem dois modos de configurar o Modem. Escolha um dos seguintes: Utilizar este Manual de Instalação Rápida - Se pretender, poderá utilizar o utilitário baseado na Web do Modem para instalar o Modem. Avance para o Passo 1 e siga as instruções do Manual de Instalação Rápida. Executar o CD-ROM de configuração - Se pretender, poderá...
- Page 66 Ligue uma extremidade do cabo Ethernet fornecido à placa Ethernet do computador (Figura C). Ligue a outra extremidade do cabo à porta Ethernet situada na parte posterior do Modem (Figura D). Ligue o transformador ao Modem (Figura E). Ligue o transformador à tomada eléctrica.
- Page 67 Configurar o Modem ADSL No Passo 2, configurará o Modem da Linksys para conseguir aceder à Internet através do Fornecedor de serviços Internet (ISP). Necessitará das informações de configuração fornecidas pelo ISP do serviço ADSL. Caso não tenha estas informações, contacte o ISP antes de continuar.
- Page 68 Será apresentado o ecrã Basic Setup (Configuração básica) com o separador Setup (Configuração) seleccionado. Com base nas instruções de configuração do ISP , poderá necessitar de fornecer as seguintes informações. ADSL Settings (Definições de ADSL). O Modem suporta os seguintes métodos de encapsulamento: RFC 1483 Bridged, RFC 1483 Routed, RFC 2516 PPPoE, RFC 2364...
- Page 69 1 RFC 1483 Bridged Endereço IP dinâmico Se o ISP indicar que está a estabelecer ligação através de um endereço IP dinâmico, execute os seguintes passos: Seleccione RFC 1483 Bridged como Endereço IP Encapsulation dinâmico (Encapsulamento). Seleccione Obtain an IP Address Automatically (Obter automaticamente um endereço IP) como IP...
- Page 70 Introduza o IP Address (Endereço IP) e a Subnet Mask (Máscara de sub-rede). Introduza o endereço do Default Gateway (Gateway predefinido). Introduza o DNS nos campos Primary (Primário) e/ou Secondary (Secundário). É necessário introduzir, pelo menos, um endereço de DNS. Clique no botão Save Settings (Guardar definições) para guardar...
- Page 71 Introduza o endereço do Default Gateway (Gateway predefinido). Introduza o DNS nos campos Primary (Primário) e/ou Secondary (Secundário). É necessário introduzir, pelo menos, um endereço de DNS. Clique no botão Save Settings (Guardar definições) para guardar as definições. 3 RFC 2516 PPPoE ou RFC 2364 PPPoA Se o ISP indicar que está...
- Page 72 Registo do produto e configuração neste http://www.linksys.com/registration Manual de Instalação Linksys é uma marca registada ou marca Rápida ou consulte a comercial da Cisco Systems, Inc. e/ou das secção de resolução de respectivas afiliadas nos E.U.A. e noutros países.
- Page 73 Innehåll i förpackningen • ADSL-modem • Nätadapter • Användarhandbok på cd-skiva • Telefonkabel • Ethernet-kabel ADSL-modem Snabbinstallationshandbok WIRED AM200 (SE) Modellnr...
- Page 74 Du kan konfigurera modemet på två sätt. Välj något av följande alternativ: Använd snabbinstallationshandboken. Om du vill kan du även använda modemets webbaserade verktyg till att installera modemet. Gå vidare till steg 1 och följ anvisningarna i snabbinstallationshandboken. Kör installations-cd-skivan – Om du vill kan du även använda installations- cd-skivan till att installera modemet.
- Page 75 Anslut den ena änden av den medföljande Ethernet- kabeln till Ethernet-kortet i datorn (bild C). Anslut den andra änden av kabeln till Ethernet-porten på modemets baksida (bild D). Anslut strömadaptern till modemet (bild E). Anslut strömadaptern till eluttaget Uppkopplingen till modemet är slutförd.
- Page 76 Konfigurera ADSL-modemet I steg 2 konfigurerar du Linksys- modemet så att du får åtkomst till Internet genom din Internet- leverantör. Du behöver inställningsinformationen från din ADSL-leverantör. Om du inte har tillgång till denna information bör du kontakta leverantören innan du fortsätter.
- Page 77 Skärmen Basic Setup (Grundläggande inställningar) visas med fliken Setup (Inställningar) vald. Beroende på inställningsanvisningarna från Internet-leverantören kan du behöva uppge följande information. ADSL-inställningar. Modemet har funktioner för följande inkapslingsmetoder: RFC 1483 Bridged, RFC 1483 Routed, RFC 2516 PPPoE, RFC 2364 PPPoA och Bridged Mode Only.
- Page 78 1 RFC 1483 Bridged (RFC 1483 Bryggkopplad) Dynamisk IP-adress Om Internet-leverantören anger att du ska ansluta till Internet via en dynamisk IP-adress ska du följa dessa steg: Välj RFC 1483 Bridged (RFC 1483 Bryggkopplad) vid Dynamisk IP-adress Encapsulation (Inkapsling). Välj Obtain an IP Address Automatically (Hämta IP-adress automatiskt) vid IP Settings (IP-inställningar).
- Page 79 Skriv DNS-adressen i fältet Primary (Primär) eller Secondary (Sekundär). Du måste ange minst en DNS-adress. Spara inställningarna genom att klicka på Save Settings (Spara inställningar). 2 RFC 1483 Routed (RFC 1483 Dirigerad) Om Internet-leverantören anger att du ska ansluta till Internet via RFC 1483 Routed (RFC 1483 Dirigerad) med en statisk IP-adress ska du följa dessa steg:...
- Page 80 3 RFC 2516 PPPoE eller RFC 2364 PPPoA Om Internet-leverantören anger att du ska ansluta till Internet via PPPoE eller PPPoA, eller om du brukar skriva ett användarnamn eller lösenord för att komma åt Internet, ska du följa dessa steg: PPPoA Välj RFC2516 PPPoE eller RFC 2364 PPPoA vid...
- Page 81 Webbplats http://www.linksys.com/international Produktregistrering http://www.linksys.com/registration Linksys är ett registrerat varumärke eller ett varumärke som tillhör Cisco Systems, Inc. och/ eller dess samarbetspartner i USA och i vissa andra länder. Copyright © 2006 Cisco Systems, Inc. Med ensamrätt. AM200 SE-QIG-60503NC RR...
- Page 82 ADSL Modem User Guide WIRED AM200 (EU/LA) Model No.
- Page 83 ADSL Modem Copyright and Trademarks Specifications are subject to change without notice. Linksys is a registered trademark or trademark of Cisco Systems, Inc. and/or its affiliates in the U.S. and certain other countries. Copyright © 2006 Cisco Systems, Inc. All rights reserved.
-
Page 84: Table Of Contents
ADSL Modem Table of Contents Chapter 1: Introduction Welcome What’s in this Guide? Chapter 2: Getting to Know the ADSL Modem The Back Panel The Front Panel Chapter 3: Setting Up and Connecting the ADSL Modem Overview Wall-Mount Option Connecting the Modem Chapter 4: Configuring the ADSL Modem Overview How to Access the Web-based Utility... - Page 85 ADSL Modem List of Figures Figure 2-1: Back Panel Figure 2-2: Front Panel Figure 3-1: Wall-Mount Option Figure 3-2: DSL Connection Figure 3-3: Ethernet Connection Figure 3-4: Power Connection Figure 4-1: Password Screen Figure 4-2: Basic Setup Tab Figure 4-3: Dynamic IP Figure 4-4: Static IP Figure 4-5: RFC Routed Figure 4-6: RFC 2516 PPPoE...
- Page 86 ADSL Modem Figure 4-23: NAT Mapping Table Figure 4-24: DMZ Figure 4-25: Management Figure 4-26: SNMP Figure 4-27: Log Figure 4-28: Incoming Log Figure 4-29: Outgoing Log Figure 4-30: Diagnostic Tests Figure 4-31: Ping Test Figure 4-32: Traceroute Test Figure 4-33: Firmware Upgrade Figure 4-34: Factory Defaults Figure 4-35: Reboot Figure 4-36: Status...
-
Page 87: Chapter 1: Introduction
Installation is quick and simple. Connect it directly to any PC with an available Ethernet port, and you’re ready to surf the Internet. Or connect it to a Linksys router and share that high-speed Internet access with everyone on your home network. -
Page 88: What's In This Guide
• Appendix F: Regulatory Information This appendix supplies the regulatory information regarding the ADSL Modem. • Appendix G: Contact Information This appendix provides contact information for a variety of Linksys resources, including Technical Support. Chapter 1: Introduction What’s in this Guide? -
Page 89: Chapter 2: Getting To Know The Adsl Modem
Power The Power port is where you connect the power adapter. With these, and many other, Linksys products, your networking options are limitless. Go to the Linksys international website at www.linksys.com/international for more information about products that work with the Modem. -
Page 90: The Front Panel
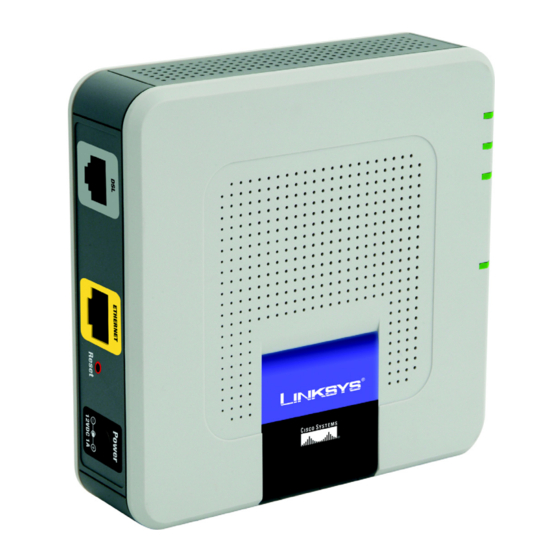
ADSL Modem The Front Panel The Modem's LEDs, where information about network activity is displayed, are located on the front panel. Figure 2-2: Front Panel Power Green. The Power LED lights up when the Modem is powered on. Ethernet Green. The Ethernet LED serves two purposes. If the LED is continuously lit, the Modem is successfully connected to a device through the Ethernet port. -
Page 91: Chapter 3: Setting Up And Connecting The Adsl Modem
ADSL Modem Chapter 3: Setting Up and Connecting the ADSL Modem Overview In this chapter, you will connect the Modem to your DSL line and to a computer in your home or business. It is not necessary to mount your Modem, but may be useful to conserve space. There are 2 slots on the underside of the Modem that can be used for wall mounting. -
Page 92: Figure 3-3: Ethernet Connection
ADSL Modem IMPORTANT: For countries that have phone jacks with RJ-11 connectors, make sure to only place the microfilters between the phone and the wall jack and not between the Modem and the wall jack or your DSL will not connect. For countries that do not have phone jacks with RJ-11 connectors (e.g. -
Page 93: Chapter 4: Configuring The Adsl Modem
ADSL Modem Chapter 4: Configuring the ADSL Modem Overview Follow the steps in this chapter and use the Modem’s web-based utility to configure the Modem. This chapter will Have You: Enabled TCP/IP on your computers? describe each web page in the Utility and each page’s key functions. The utility can be accessed via your web computers communicate over the network with browser through use of a computer connected to the Modem. - Page 94 ADSL Modem • Port Triggering. To set up triggered ranges and forwarded ranges for Internet applications, click this tab. • NAT Mapping Table. This table displays the current NAPT address mappings. • DMZ. To allow one local user to be exposed to the Internet for use of special-purpose services, use this screen.
-
Page 95: How To Access The Web-Based Utility
ADSL Modem How to Access the Web-based Utility To access the web-based utility, launch Internet Explorer or Netscape Navigator, and enter the Modem’s default IP address, 192.168.1.1, in the Address field. Then press Enter. A Log In screen appears. Enter admin (the default user name) in the Username field, and enter admin (the default password) in the Password field. -
Page 96: Figure 4-3: Dynamic Ip
ADSL Modem RFC 1483 Bridged Dynamic IP IP Settings. Select Obtain an IP Address Automatically if your ISP says you are connecting through a dynamic IP address. Static IP If you are required to use a permanent (static) IP address to connect to the Internet, then select Use the Figure 4-3: Dynamic IP following IP Address. -
Page 97: Figure 4-6: Rfc 2516 Pppoe
ADSL Modem RFC 2516 PPPoE Some DSL-based ISPs use PPPoE (Point-to-Point Protocol over Ethernet) to establish Internet connections. If you are connected to the Internet through a DSL line, check with your ISP to see if they use PPPoE. If they do, you will have to enable PPPoE. -
Page 98: Figure 4-8: Bridged Mode Only
ADSL Modem Bridged Mode Only If you are using your Modem as a bridge, which makes the Modem act like a stand-alone modem, select Bridged Mode Only. All NAT and routing settings are disabled in this mode. Optional Settings (required by some ISPs) Figure 4-8: Bridged Mode Only •... -
Page 99: Figure 4-10: Dyndns.org
ADSL Modem Time Setup • Set Time Zone. Select the appropriate time zone for the Modem’s location. If appropriate, check the Automatically adjust clock for daylight saving changes checkbox. • Configure Time Server (NTP). When the Automatic Time Server Maintenance checkbox is selected, the Current Date and Time are synchronized to the selected Primary Server or Secondary Server (if the Primary is unavailable) over the Internet. -
Page 100: Figure 4-12: Advanced Routing
ADSL Modem When finished making your changes on this tab, click the Save Settings button to save these changes, or click the Cancel Changes button to undo your changes. Advanced Routing The Advanced Routing screen allows you to configure the dynamic routing and static routing settings. •... -
Page 101: The Security Tab
ADSL Modem The Security Tab Firewall When you click the Security tab, you will see the Firewall screen. You can add Firewall Protection and Filter Multicast. • Firewall Protection. To add Firewall Protection, click Enabled. If you do not want Firewall Protection, click Disabled. -
Page 102: Figure 4-16: Edit Schedule Rule
ADSL Modem Schedule Rule To set time periods for filtering or access, click Add Schedule Rule. The Schedule Rule Table displays these scheduling rules. • Name/Comment. Choose a name for the rule (example: NoSurfingAfter10PM) and enter it in the Name field. Enter a definition or comment for the rule (example: Block kids from Web after 10) in the Comment field. -
Page 103: Figure 4-18: Url Blocking
ADSL Modem URL Blocking This screen allows the user to block access to certain web sites from a particular PC by entering either a full URL address or just a keyword of the web site. If you want to remove all the URLs and Keywords from the list, click the Clear All button. -
Page 104: The Applications And Gaming Tab
ADSL Modem • IPSec Passthrough. Internet Protocol Security (IPSec) is a suite of protocols used to implement secure exchange of packets at the IP layer. To allow IPSec Passthrough, click the Enabled option. To disable IPSec Passthrough, click the Disabled option. •... -
Page 105: Figure 4-22: Port Triggering
ADSL Modem When finished making your changes on this tab, click the Save Settings button to save these changes, or click the Cancel Changes button to undo your changes. Port Triggering Port Triggering is used for special applications that can request a port to be opened on demand. For this feature, the Modem will watch outgoing data for specific port numbers. -
Page 106: The Administration Tab
ADSL Modem When finished making your changes on this tab, click the Save Settings button to save these changes, or click the Cancel Changes button to undo your changes. The Administration Tab Management This section of the Administration tab allows the network’s administrator to manage specific Modem functions for access and security. -
Page 107: Figure 4-27: Log
ADSL Modem • Access. Select the type of access allowed to the Modem’s SNMP information by the selected community: read or write. • Valid. To enable the community’s access, click the Valid checkbox. SNMP Trap Trap to. Enter the IP address of the remote host computer that will receive the trap messages. Community. -
Page 108: Figure 4-30: Diagnostic Tests
ADSL Modem Diagnostics The diagnostic tests (Ping and Traceroute) allow you to check the connections of your network components. Ping Test. The Ping test will check the status of a connection. Click the Ping button to open the Ping Test screen. Enter the address of the PC whose connection you wish to test and how many times you wish to test it. -
Page 109: Figure 4-33: Firmware Upgrade
Firmware can be upgraded by clicking the Upgrade button after browsing for the firmware, which you can download from the Linksys website. Do not upgrade your firmware unless you are experiencing problems with the Modem. For more information about upgrading firmware, refer to “Appendix B: Upgrading Firmware”. -
Page 110: The Status Tab
ADSL Modem The Status Tab Modem This screen displays information about your Modem and its Internet connection. Modem Information Modem Information displays the Software Version, ADSL Version, Boot Code Version, and MAC Address. DSL Status The DSL Status will be displayed after connecting to the DSL. They are the DSL Status, DSL Modulation Mode, DSL Path Mode, Downstream Rate, Upstream Rate, Downstream Margin, Upstream Margin, Downstream Line Attenuation, Upstream Line Attenuation, Downstream Transit Power, Upstream Transit Power, and LOS Errors. -
Page 111: Appendix A: Troubleshooting
Provided are possible solutions to problems that may occur during the installation and operation of the Modem. Read the descriptions below to help you solve your problems. If you can’t find an answer here, check the Linksys international website at www.linksys.com/international. - Page 112 ADSL Modem 7. Toward the bottom of the window, select Use the following DNS server addresses, and enter the Preferred DNS server and Alternative DNS server (provided by your ISP). Contact your ISP or go on its website to find the information. 8.
- Page 113 5. I need to upgrade the firmware. In order to upgrade the firmware with the latest features, you need to go to the Linksys website and download the latest firmware at www.linksys.com or http://www.linksys.com/international.
-
Page 114: Frequently Asked Questions
ADSL Modem 7. The Power LED flashes continuously. The Power LED lights up when the device is first powered up. In the meantime, the system will boot up itself and check for proper operation. After finishing the checking procedure, the LED remains steady to show that the system is working fine. - Page 115 Does the Modem support any operating system other than Windows 98SE, Windows Millennium, Windows 2000, or Windows XP? Yes, but Linksys does not, at this time, provide technical support for setup, configuration or troubleshooting of any non-Windows operating systems. The web page hangs; downloads are corrupt, or nothing but junk characters are being displayed on the screen.
-
Page 116: Appendix B: Upgrading Firmware
Administration tab. Follow these instructions:. Firmware Upgrade 1. Click the Browse button to find the firmware upgrade file that you downloaded from the Linksys website and then extracted. 2. Double-click the firmware file you downloaded and extracted. Click the Upgrade button, and follow the instructions there. -
Page 117: Appendix C: Glossary
This glossary contains some basic networking terms you may come across when using this product. For more advanced terms, see the complete Linksys glossary at http://www.linksys.com/glossary. Access Point - A device that allows wireless-equipped computers and other devices to communicate with a wired network. - Page 118 ADSL Modem DMZ (Demilitarized Zone) - Removes the Router's firewall protection from one PC, allowing it to be “seen” from the Internet. DNS (Domain Name Server) - The IP address of your ISP's server, which translates the names of websites into IP addresses.
- Page 119 Passphrase - Used much like a password, a passphrase simplifies the WEP encryption process by automatically generating the WEP encryption keys for Linksys products. Ping (Packet INternet Groper) - An Internet utility used to determine whether a particular IP address is online.
- Page 120 ADSL Modem RJ-45 (Registered Jack-45) - An Ethernet connector that holds up to eight wires. Roaming - The ability to take a wireless device from one access point's range to another without losing the connection. Router - A networking device that connects multiple networks together. Server - Any computer whose function in a network is to provide user access to files, printing, communications, and other services.
- Page 121 ADSL Modem TKIP (Temporal Key Integrity Protocol) - a wireless encryption protocol that provides dynamic encryption keys for each packet transmitted. Topology - The physical layout of a network. TX Rate - Transmission Rate. Upgrade - To replace existing software or firmware with a newer version. Upload - To transmit a file over a network.
-
Page 122: Appendix D: Specifications
ADSL Modem Appendix D: Specifications Standards IEEE 802.3, IEEE 802.3u, G.992.1 (G.dmt), G.992.2 (G.lite), G.922.3, G.992.5, T1.413i2 Ports Power, DSL, Ethernet Buttons Reset Cabling Type UTP CAT 5 or better, Phone Cable (RJ-11) LEDs Power, Ethernet, DSL, Internet Dimensions 110 mm x 110 mm x 32 mm Unit Weight 0,135 kg Power... -
Page 123: Appendix E: Warranty Information
Your exclusive remedy and Linksys' entire liability under this warranty will be for Linksys at its option to repair or replace the Product or refund Your purchase price less any rebates. This limited warranty extends only to the original purchaser. -
Page 124: Appendix F: Regulatory Information
ADSL Modem Appendix F: Regulatory Information FCC Statement This product has been tested and complies with the specifications for a Class B digital device, pursuant to Part 15 of the FCC Rules. These limits are designed to provide reasonable protection against harmful interference in a residential installation. - Page 125 Equipment (WEEE) This document contains important information for users with regards to the proper disposal and recycling of Linksys products. Consumers are required to comply with this notice for all electronic products bearing the following symbol: Appendix F: Regulatory Information...
- Page 126 ADSL Modem Appendix F: Regulatory Information...
- Page 127 ADSL Modem Appendix F: Regulatory Information...
- Page 128 ADSL Modem Appendix F: Regulatory Information...
- Page 129 ADSL Modem For more information, visit www.linksys.com. Appendix F: Regulatory Information...
-
Page 130: Appendix G: Contact Information
Appendix G: Contact Information Need to contact Linksys? Visit us online for information on the latest products and updates to your existing products at: http://www.linksys.com/international If you experience problems with any Linksys product, you can e-mail us at: In Europe E-mail Address Austria support.at@linksys.com... - Page 131 E-mail Address Switzerland support.ch@linksys.com United Kingdom support.uk@linksys.com Outside of Europe E-mail Address Asia Pacific asiasupport@linksys.com (English only) Latin America support.portuguese@linksys.com or support.spanish@linksys.com Middle East & Africa support.mea@linksys.com (English only) South Africa support.ze@linksys.com (English only) support.ae@linksys.com (English only) U.S. and Canada support@linksys.com...
Need help?
Do you have a question about the AM200 and is the answer not in the manual?
Questions and answers