Table of Contents
Advertisement
Advertisement
Table of Contents

Related Manuals for ROSENLEW RK 50E


Summary of Contents for ROSENLEW RK 50E
- Page 1 RK 50E 821 03 58-01...
-
Page 2: Table Of Contents
Contents Contents Safety ............3 The Cooker ..........4 Unpacking .......... 4 The accessories ......... 4 The safety equipment ....... 5 Non-tip device ........5 The hob guard (optional accessory) 5 The door catch ........6 Before the first use ........6 Cleaning the cooker ...... -
Page 3: Safety
Safety Safety Cooker technology is constantly improving. The way you use your new cooker may be different from the way you used your old one. Please read the whole instruction book before using your new cooker. This cooker is intended for normal domestic use. Take care of the instruction book which will be needed by the new owner if the cooker is sold or passed on to someone else. -
Page 4: The Cooker
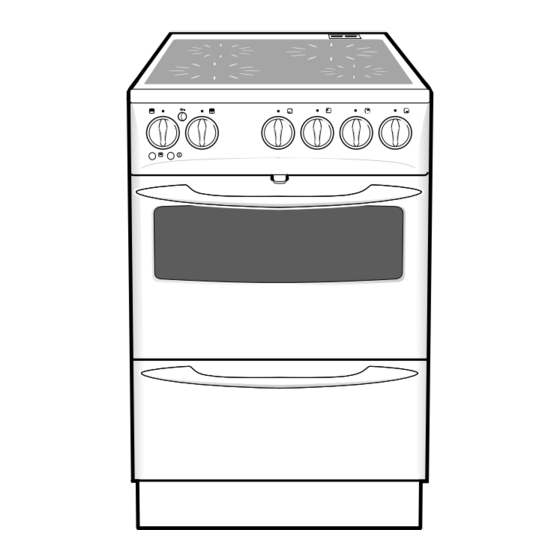
The Cooker The Cooker Removable oven vent Hob with HEATING ZONES Control panel with CONTROLS Oven Storage drawer Plinth To make it easier to clean behind the cooker, it has wheels at the rear. To move the cooker forwards, open the oven door, lift carefully holding the upper edge and then pull the cooker out from the wall. -
Page 5: The Safety Equipment
The safety equipment The safety equipment There should be at least 40 cm of worktops on both sides min. 40 cm min. 40 cm of the cooker . Alternatively the cooker can be SEE PICTURE installed with a wall or a tall kitchen unit on one side and a worktop on the other. -
Page 6: The Door Catch
The safety equipment The door catch The door catch makes it harder for children to open the oven door/storage drawer. The catches are already activated when the cooker is supplied new, but can be deactivated if necessary. Press the catch down when you want to open the door. If you wish to deactivate the catch, check first that the oven is not hot. -
Page 7: The Control Panel
The safety equipment The control panel indicator light COOKER indicator light OVEN function control OVEN temperature control OVEN controls HEATING ZONE Cooker function lock The indicator light bulbs These are neon indicator lights, which normally have a long service life. If one should fail, contact your service centre. -
Page 8: The Ceramic Hob
The ceramic hob The ceramic hob The ceramic hob has four cooking areas (hotplates). Even with the control still turned on during cooking, these areas may be seen to switch off and on at intervals, depending partly on the heat setting used. This switching can also occur with the control turned to its maximum setting, to prevent overheating. - Page 9 The ceramic hob Which heat setting should you use? You will soon learn which setting and heating zone to choose depending on your pans and what you are cooking. Here is a brief guide to choosing the correct setting: Boiling You normally start cooking with the hotplate switched to maximum heat before turning it down to a lower heat.
-
Page 10: Cleaning The Ceramic Hob
The ceramic hob Choosing suitable pans To help you save both time and energy, the bases of saucepans and frying pans should: • be at least as large as the hotplate. If the base is smaller than the hotplate, any spillages are quite likely to burn onto the hob. - Page 11 The ceramic hob The razor blade scraper: . Use the KEEP THE SCRAPER AWAY FROM CHILDREN razor blade scraper carefully. The razor blade is extremely sharp. Use the scraper to remove spillages from the ceramic hob. You will have to turn the razor blade round before using it for the first time since it has been reversed for transport safety reasons.
-
Page 12: Functions For Safety
The ceramic hob Functions for safety The cooker function lock There is a lock built in to the oven’s thermostat control with two safety positions. You can choose whether to use the lock with single or double safety or not at all. The main power supply to the cooker is still con- NOTE nected. -
Page 13: The Oven
The oven The oven The oven has removable side racks for the shelves with three rungs on each side. The functions of the oven For all oven functions, the indicator light comes on when the oven is heating and goes out when the set temperature is reached (goes on and off as the thermo- stat switches in and out). -
Page 14: Practical Use
The oven Practical use Never place aluminium foil, baking trays or oven dishes directly on the bottom of the oven. Block- ing heat from the bottom of the oven can damage the enamel through overheating. The oven gets hot when in use: CHILDREN NEARBY MUST BE SUPERVISED The baking tray may warp temporarily due to tempera-... - Page 15 The oven eter reaches the required temperature. Cover the meat with aluminium foil and let it stand for about 15 min- utes. This will make it easier to carve, and less meat juices will be lost when carving. Grilling Size, shape, quantity, the degree of fat marbling, and even the initial temperature of the meat all affect the outcome and time of the grilling process.
-
Page 16: Cleaning And Maintenance
The oven ing’. Low temperature cooking is therefore ideal for dishes such as rice pudding and potato gratin. Set the temperature control at the lowest temperature. After a few hours the dish can be cooked as usual when it has finished ‘melting’. -
Page 17: Storage Drawer
The oven scraper supplied with the cooker. Make sure the door is properly secured on both sides. Press the two springs on the top edge of the door and press the door front into place. Remove the oven cloths. To change the oven light bulb Turn all controls to off and check that the oven is not hot. -
Page 18: Installation
Installation Installation Work on the cooker must be carried out by a qualified electrician. The cooker is heavy. Cer- tain edges and corners which will not normally be exposed may be sharp. when moving USE GLOVES the cooker. Before installing the cooker, you should check that its dimensions correspond to the rest of your kitchen units. -
Page 19: Electrical Connection
Installation Electrical connection Repairs and work on the cooker must be carried out by a . Work performed QUALIFIED ELECTRICIAN by unqualified persons can damage the cooker, and may also lead to personal injury and/or damage to property. The connection options for the cooker are shown on the plate on the rear of the cooker. -
Page 20: Service
Service Service Repairs and work on the cooker must be carried out by a qualified electrician. Work performed by unqualified persons can damage the cooker, and may also lead to personal injury and/or damage to property. If your cooker is not working properly, refer to pages 22 and 23 for suggestions on how to rectify the problem. -
Page 21: Technical Data
Technical data Technical data We reserve the right to alter these specifications. This appliance conforms with EC-directive 89/336/EEC and 73/23/EEC IEC class:Y. RK 50E Width (mm): Height, when delivered (mm): Depth (mm): Oven volume (litres): Total wattage 230V- model (W):... -
Page 22: Practical Tips And Advice
Practical tips and advice Practical tips and advice Problem Cause Action needed Bread and cakes are not rising Too low an oven temperature means that Check the temperature used against that the baking is rising but then sinking flat recommended in the recipe. properly. -
Page 23: Problems And Actions Needed
Problems and actions needed Problems and actions needed Never attempt any repairs or work on the cooker which could cause injury or damage the product. If you cannot solve the problem after checking the list below, contact a service company approved by the supplier. Problem Action needed The cooker has no electrical supply... - Page 24 ROSENLEW 2B tecknare Ab © MO-STK 2000-12-04 Printed on environmentally sound paper...
Need help?
Do you have a question about the RK 50E and is the answer not in the manual?
Questions and answers