Table of Contents
Advertisement
Quick Links
Advertisement
Table of Contents

Related Manuals for VIETA VTC2500BT


Summary of Contents for VIETA VTC2500BT
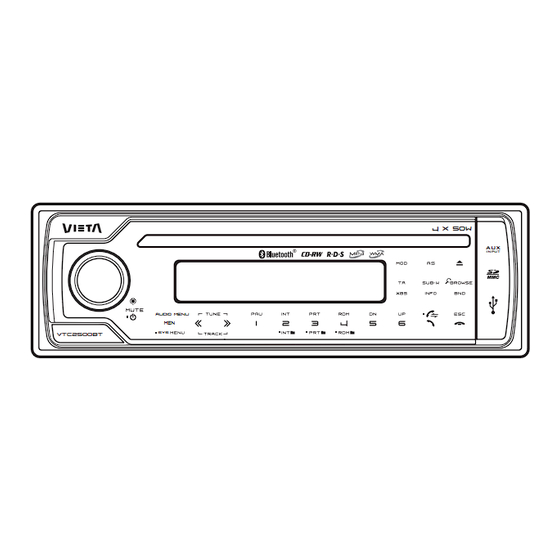
- Page 2 4 X 50W INPUT AUDI O MENU vtc2500BT This radio is equipped with the most advanced "TOUCH SENSE PANEL", so that it is easy and convenient to use while driving. TIPS Here are some tips to show you how easy it is to use this touch sense panel: Using a very light touch on the radio panel will activate that feature.
-
Page 3: Note Of Discs
1. NOTE OF DISCS MOISTURE CONDENSATION On a rainy day or in a very damp area, moisture may condense on the lenses inside the unit. Should this occur, the unit will not operate properly. In such a case, remove the disc and wait for about an hour until the moisture has evaporated. -
Page 4: Installation
2. INSTALLATION Before finally installing the unit, connect the wiring temporarily and make sure it is all connected up properly and the unit and system work properly. Use only the parts included with the unit to ensure proper installation. The use of unauthorized parts can cause malfunctions. - Page 5 Removing the unit a. Frame b. Insert fingers into the groove in the front of frame and pull out to remove the frame. (When re-attaching the frame, point the side with a groove down wards and attach it.) c. Insert the levers supplied with the unit into the grooves at both sides of the unit as shown in figure until they click.
- Page 6 3. DETACHABLE CONTROL PANEL (D.C.P .) Removing The Detachable Control Panel (D.C.P .). 1. Turn the power off 2. Press the D.C.P . release button 3. Remove the D.C.P . PANEL RELEASE BUTTON Attaching the DCP 1. Attach the panel at the right side first, with point B on the main unit touching point A on the D.C.P .
- Page 7 4. WIRING DIAGRAM (BUILT-IN ISO) ANTENNA ANTENNA EXTENDER JACK CABLE REAR SUB-W OUT CONNECTOR (Not Supplied) Figure 2 ISO CONNECTOR WIRING CHART WIRE COLOR FUNCTION/LABEL YELLOW BATTERY(+) POWER ANTENNA BLUE IGNITION(ACC) BLACK GROUND RIGHT REAR SPEAKER (+) VIOLET VIOLET/BLACK RIGHT REAR SPEAKER (-) GREY RIGHT FRONT SPEAKER (+) GREY/BLACK...
- Page 8 5. CONTROL PANEL FUNCTION(RDS+BLUETOOTH) 4 X 50W INPUT AUDI O MENU vtc2500BT OPERATIONS: SYSTEM TUNER CD/MP3/WMA Bluetooth Short Long Short Long Short Long Short Long Press Press Press Press Press Press Press Press Audio Sys tem Menu Menu Eject Panel Releas e button...
-
Page 9: Basic Operations
6. BASIC OPERATIONS 3) PANEL RELEASE BUTTON (REL) Press this button to remove the control panel. 4) POWER ON/OFF BUTTON ( POWER/MUTE ) Hold & press POWER/MUTE button or any other button on the front of the radio (except Open/Eject) to turn the unit on. And hold & press POWER /MUTE button again to turn the unit off. -
Page 10: System Menu Setting
7. SYSTEM MENU SETTING 1) MENU FUNCTION LIST (MENU) Hold & press MENU button to access into the System Menu setting mode. Will appear in the display momentarily. Navigate the menu by pressing MENU momentarily to move to the next option. Once the desired option appears in the display, adjust that option by rotating the Encoder Volume Knob(press the volume up / down button ) within 5 seconds. - Page 11 INFO SYS ( System Information ) Once into the System Information mode, press the Audio button to view the details system software informations of this unit. E - 10 need to translation...
-
Page 12: Adjust Audio Setting
8. ADJUST AUDIO SETTING Press MENU button to access the Audio Menu. Once the desired menu item appears on the display, adjust that option by rotate the Encoder Volume Knob. The following menu items can be adjusted as described above. BAS (Bass Level) User has 5 seconds to use the Encoder Volume Knob to adjust the desired Bass level range from -10 to +10. -
Page 13: Tuner Operation
9. TUNER OPERATION BAND BUTTON (BROWSE/BAND) Press BROWSE/BAND button to change between FM bands and AM(MW) bands. 20-21) TUNING UP/DOWN BUTTON ( Manual Tuning Hold & press the Up Tuning or Down Tuning button to move the radio frequency number up or down one step. -
Page 14: Rds Operation
10. RDS OPERATION RDS functions The unit is equipped with the following RDS function: - AF Alternative Frequencies - CT Clock Time - PI Program identifications - PS Program service name - PTY Program Type - TA Traffic Announcement - TP Traffic program 1. -
Page 15: Cd/Mp3/Wma Operation
11. CD /MP3/WMA OPERATION INSERT AND EJECT CD Insert a CD label-side up with the unit turned on, and the disc will begin to play. Press the Eject button to stop CD play and eject the CD. The unit does not have to be turned on to eject the CD. CD-DA OPERATION PAUSE BUTTON ( Press the PAUSE button to suspend disc play. - Page 16 MP3/WMA written in the formats other than the above may not be successfully played and their file names or folder names may not be properly displayed. MP3/WMA Encoder and CD Writer Settings Use the following settings when compressing audio data in MP3 data with the MP3 encoder. Transfer bit rate : 32- 320 kbps Sampling frequency : 32,44.1,48 kHz(WMA) 16,22.05,24,32,44.1, 48kHz (MP3) When using a CD writer to record MP3/WMA up to the maximum disc capacity, disable additional...
- Page 17 Files Playing Order When selected for play, Folder Search, File Search or Folder Select, files and folders are accessed in the order in which they were written by the PC writer. Because of this, the order in which they are expected to be played may not match the order in which they are actually played.
- Page 18 File/Folder Repeat play : Press M3 button more than 3 seconds during playing MP3/WMA disc for “repeat play” all files of the current folder. And keep on repeat playing the current folder until “repeat play” is disabled. To disable current folder “repeat play”, long press M3 button more than 3 seconds Press M3 button less than 3 seconds to “repeat play”...
-
Page 19: Usb Operation
1 . USB OPERATION The unit can support USB Host Function. It can playback MP3 and WMA Audio format which are stored into USB Memory Stick or USB interface Music Player. Please read below before you start the operation of USB HOST Function. Inserting and Removing USB Drive Warning: Always remove the USB stick before detach... -
Page 20: Memory Card Operation
13. MEMORY CARD OPERATION The unit can support playback MP3 and WMA Audio format which are stored into SD Card. Please read below before you start the operation of Memory Card. Inserting and Removing a SD card on the main unit Face Click Insert the Memory Card... -
Page 21: Bluetooth Hand Free Operation
14. BLUETOOTH HAND FREE OPERATION User Guide For Bluetooth Operation 1. When user use our Bluetooth HEAD UNIT, please make sure the mobile phone you use must /does support Bluetooth functions (Headset or Handsfree profiles or both) 2. Before you start to use our Bluetooth HEAD UNIT, please make sure complete pairing with your mobile phone first. - Page 22 Bluetooth Hand Free Panel Function Key Matrix 4 X 50W INPUT AUDI O MENU vtc2500BT Panel Function Button Bluetooth Hand Free Function Encoder Volume Knob ( Short Press ) Confirm to answer an incoming call 1. Reject Incoming call Call/Esc ( Short Press ) 2.
- Page 23 PAIRING Pairing The Bluetooth System Between Mobile Phone & The Unit Open your Mobile Phone and switch Bluetooth to on, and search Bluetooth device. “BT89” should appear in the pairing list on the Mobile Phone. User need to select “BT89” and then input the password “1234”.
-
Page 24: Incoming Call
Dis-Connection of the Bluetooth System The unit have a option function for user to disconnect the Bluetooth system with the unit. The unit can be Dis-connected by the following methods. Access into System Menu - DIS-CONN mode to activate the manual Dis-Connection. Please refer System Menu Setting for more details of how to access into System Menu mode. -
Page 25: Outgoing Call
OUTGOING CALL Making An Outgoing Call User can use his / her Mobile Phone to dial and make an outgoing call. Once the user has completed the dialling, the display should show “ ”. The audio output of the present mode will ONLY be muted after pressing the “PHONE” button as a confirmation to dial the outgoing call. - Page 26 Bluetooth Audio Streaming A2DP (Advanced Audio Distribution Profile) User can listen to music files on an audio device on this unit if the audio device supports A2DP (Advanced Audio Distribution Profile) of Bluetooth Technology. Please read the below instruction before operating the Bluetooth Audio streaming function on this unit. Connecting A Bluetooth Audio Device With This Unit Before using audio device to play music on this unit, the audio device must be paired with this unit first.
- Page 27 Operating an audio device with this unit AVRCP ( Audio Video Remote Control Profile ) This unit can perform the following operations with the connecting Audio device whichsupports AVRCP (Audio Video Remote Control Profile) & only if the Audio device does support AVRCP . (1) Start playing - Every time when user change mode into “BT AUDIO”...
-
Page 28: Specifications
15. SPECIFICATIONS CD PLAYER Compact disc audio system System Compact disc Usable disc 44.1KHz Sampling frequency 1bit No of quantization bits 5-20,000Hz Frequency 2 stereo Number of channels 70dB S/N Ratio MEDIA SECTION USB Host Host 1.1 compatibles 2.0 Memory Card Support Type of Memory Card RADIO SECTION Frequency Range... -
Page 29: Troubleshooting
16. TROUBLE SHOOTING Before going through the check list, check wiring connection. If any of the problems persist after check list has been made, consult your nearest service dealer. Symptom Cause Solution The car ignition is not on. If the power supply is properly connected to No power the car accessory terminal, switch the ignition key to “ACC”...
Need help?
Do you have a question about the VTC2500BT and is the answer not in the manual?
Questions and answers