Table of Contents
Advertisement
Advertisement
Table of Contents

Related Manuals for Zanussi ZKT 641 H


Summary of Contents for Zanussi ZKT 641 H
- Page 1 Ceramic hob ZKT 641 H Installation and Operating Instructions...
-
Page 2: Dear Customer
Dear Customer, Please read these user instructions carefully and keep them to refer to later. Please pass the user instructions on to any future owner of the appliance. The following symbols are used in the text: Safety instructions Warning! Notes that concern your personal safety. Important! Notes that show how to avoid damage to the appliance. -
Page 3: Table Of Contents
Contents Operating Instructions ........Safety instructions . -
Page 4: Operating Instructions
Operating Instructions Safety instructions Please comply with these instructions. If you do not, any damage resulting is not covered by the warranty. Correct use • This appliance is not intended for use by children or other persons whose physical, sensory or mental capabilities or lack of experience and knowl- edge prevents them from using the appliance safely without supervision or instruction by a responsible person to ensure that they can use the ap- pliance safely. -
Page 5: Safety During Use
Safety during use • Remove stickers and film from the glass ceramic. • There is the risk of burns from the appliance if used carelessly. • Cables from electrical appliances must not touch the hot surface of the appliance or hot cookware. •... -
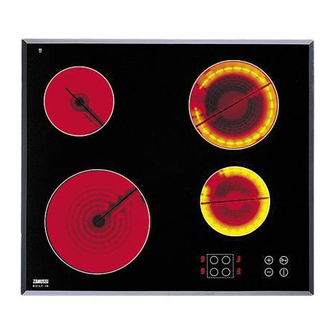
Page 6: Description Of The Appliance
Description of the Appliance Cooking surface layout Single cooking zone Double ring cooking zone 1200W 700/1700W Single ring cooking zone Control panel Single cooking zone Halogen 2400W 1200W Control panel layout Lock Cooking zone indicators with pilot light Heat setting selection Timer function Timer display Double ring cooking zone... -
Page 7: Touch Control Sensor Fields
Touch Control sensor fields The appliance is operated using Touch Control sensor fields. Functions are controlled by touching sensor fields and confirmed by displays and acoustic signals. Touch the sensor fields from above, without covering other sensor fields. Sensor field Function On / Off Switches appliance on and off... -
Page 8: Operating The Appliance
Operating the appliance Switching the appliance on and off Control panel Display Pilot light ¾ Switch on Touch for 2 seconds lights up Switch off Touch for 1 second / none goes out After switching on, within approx. 10 seconds a heat setting or a function must be set, otherwise the appliance automatically switches itself off. -
Page 9: Using The Automatic Warm-Up Function
Using the automatic warm-up function All cooking zones are equpped with an automatic warm up function When ¾ setting a heat setting using , when starting from , the cooking zone switches to full power for a certain amount of time and then automatically switches back to the heat setting set. -
Page 10: Locking/Unlocking The Control Panel
Locking/unlocking the control panel The control panel, with the exception of the “On/Off” sensor field, can be locked at any time in order to prevent the settings being changed e.g. by wiping over the panel with a cloth. Control panel Display Switch on Touch... -
Page 11: Using The Child Safety Device
Using the child safety device The child safety device prevents unintentional use of the appliance. Switching on the child safety device Step Control panel Display/Signal ¾ Switch on appliance. (Do not set a heat setting.) Touch for 4 seconds The child safety device is switched on. Switching off the child safety device Step Control panel... -
Page 12: Using The Timer
Using the timer Function Condition Outcome after the time has elapsed Automatic cut-out a heat setting is set acoustic signal flashes Cooking zone switch- es off Countdown timer cooking zones not in use acoustic signal flashes If a heat setting is set on this cooking zone in addition to a countdown timer, the cooking zone is switched off after the time set has elapsed. - Page 13 Setting the time Step Control panel Indicator Select cooking Pilot light for the cooking zone selected zone flashes Touch minutes After a few seconds the pilot light flashes more slowly. The time is set. The time counts down. Switching off the timer function Step Control panel Indicator...
-
Page 14: Automatic Switch Off
Switching off the acoustic signal Step Control panel field Acoustic signal Touch Acoustic signal to acknowledge. Acoustic signal stops. Automatic switch off Cooking surface • If after switching on the cooking surface, a heat setting is not set for a cooking zone within approx. -
Page 15: Tips On Cooking And Frying
Tips on cooking and frying Information about acrylamides According to the latest scientific research, intensive browning of food, espe- cially in products containing starch, may present a health risk due to acryla- mide. Therefore we recommend cooking at low temperatures and not browning foods too much. -
Page 16: Examples Of Cooking Applications
Examples of cooking applications The information given in the following table is for guidance only. Heat Cooking set- suitable for Cook time Tips/Hints process ting Off position Keeping Keeping cooked foods food as required Cover warm warm Hollandaise sauce, Melting melting butter, chocolate, 5-25 mins. -
Page 17: Cleaning And Care
Cleaning and care Take care! Risk of burns from residual heat. Important Sharp objects and abrasive cleaning materials will damage the appliance. Clean with water and washing up liquid. Important Residues from cleaning agents will damage the appliance. Re- move residues with water and washing up liquid. Cleaning the appliance after each use 1. -
Page 18: What To Do If
What to do if … Problem Possible cause Remedy The cooking zones will not More than 10 seconds have Switch the appliance on switch on or are not function- passed since the appliance again. was switched on The child safety device is Deactivate the child safety switched on device (See the section... - Page 19 Problem Possible cause Remedy and number are displayed Electronics fault Disconnect the appliance from the electrical supply for a few minutes (Take the fuse out of the house’s wiring sys- tem) If after switching on again, is displayed again, call the customer service department If you are unable to remedy the problem by following the above sug- gestions, please contact your local Service Force Centre.
-
Page 20: Disposal
Disposal Packaging material The packaging materials are environmentally friendly and can be recycled. The plastic components are identified by markings, e.g. >PE<, >PS<, etc. Please dispose of the packaging materials in the appropriate container at your local waste disposal facilities. Old appliance The symbol on the product or on its packaging indicates that this prod-... -
Page 21: Installation Instructions
Installation Instructions Safety instructions Warning! This must be read! The laws, ordinances, directives and standards in force in the country of use are to be followed (safety regulations, proper recycling in accordance with the regulations, etc.) Installation may only be carried out by a qualified electrician. The minimum distances to other appliances and units are to be observed. - Page 22 A device must be provided in the electrical installation which allows the ap- pliance to be disconnected from the mains at all poles with a contact open- ing width of at least 3 mm Suitable isolation devices include line protecting cut-outs, fuses (screw type fuses are to be removed from the holder), earth leakage trips and contac- tors.
-
Page 23: Electrical Connection Diagram
Electrical Connection Diagram For UK only: 230V...240V~ Sticking on the seal • Clean the worktop in the area of the cut-out section. • Stick the one-sided self-adhesive sealing tape supplied all the way round the lower edge of the cooking surface along the outer edge of the glass ceramic panel. -
Page 24: Assembly
Assembly... -
Page 27: Rating Plate
Rating Plate ZKT 641H 949 592 392 55HAD78AO 230 V 50 Hz 6,5 kW ZANUSSI... -
Page 28: Guarantee/Customer Service
Guarantee/Customer Service Standard guarantee conditions We, Zanussi-Electrolux, undertake that if within 12 months of the date of the purchase this Zanussi-Electrolux appliance or any part thereof is proved to be defective by reason only of faulty workmanship or materials, we will, at... -
Page 29: European Guarantee
Ireland +353 1 40 90 753 Long Mile Road Dublin 12 Italia +39 (0) 434 558500 C.so Lino Zanussi, 26 - 33080 Porcia (PN) Latvija +37 17 84 59 34 Kr. Barona iela 130/2, LV-1012, Riga Žirmūnų 67, LT-09001 Vilnius... - Page 30 Vennootsweg 1, 2404 CG - Nederland +31 17 24 68 300 Alphen aan den Rijn Norge +47 81 5 30 222 Risløkkvn. 2 , 0508 Oslo Österreich +43 18 66 400 Herziggasse 9, 1230 Wien Polska +48 22 43 47 300 ul.
-
Page 31: Service And Spare Parts
Customer Care For general enquiries concerning your Za- nussi appliance, or for further information on Zanussi products please contact our Customer Care Department by letter or telephone at the address below or visit our website at www.zanussi.co.uk.. - Page 32 867 201 157-M-071207-01 Subject to change without notice...
Need help?
Do you have a question about the ZKT 641 H and is the answer not in the manual?
Questions and answers