
Related Manuals for Harman Kardon AVR 435


Summary of Contents for Harman Kardon AVR 435
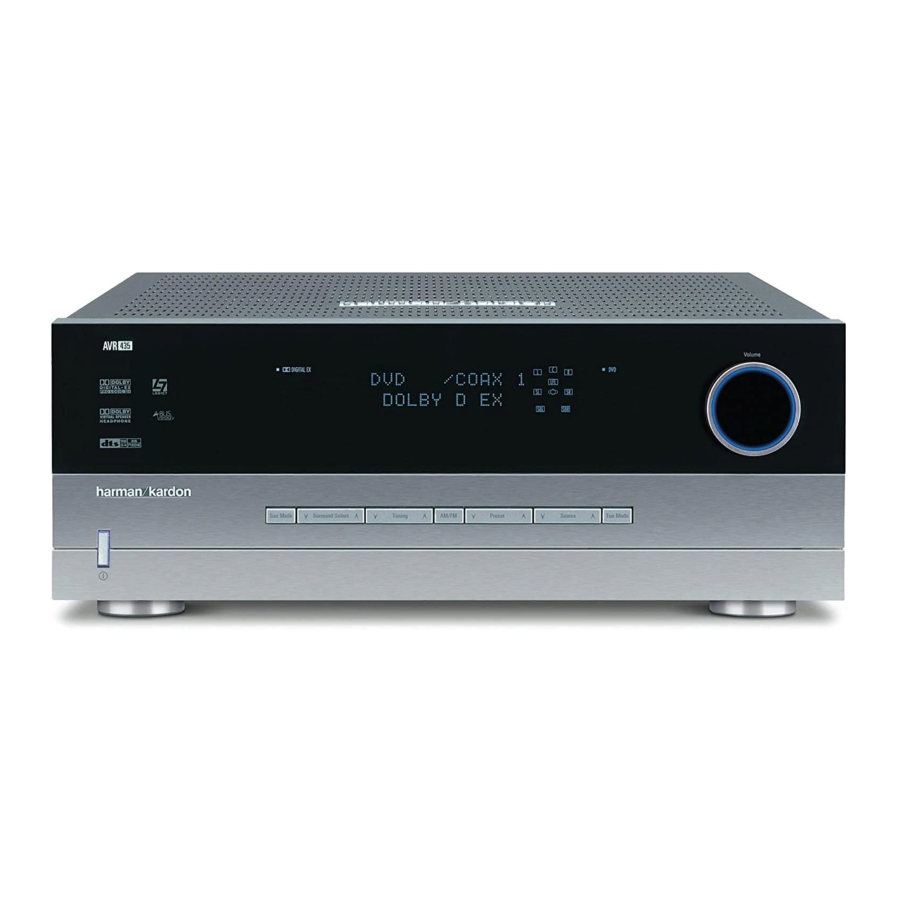
- Page 1 AVR 435 Audio/Video Receiver OWNER’S MANUAL Power for the Digital Revolution ®...
-
Page 2: Table Of Contents
Table of Contents Introduction Safety Information Unpacking Front Panel Controls Rear Panel Connections Main Remote Control Functions Zone II Remote Control Functions Installation and Connections Audio Connections Video Connections SCART A/V Connections System and Power Connections Speaker Selection Speaker Placement System Configuration First Turn On Using the On-Screen Display... -
Page 3: Introduction
DTS Neo:6 and the latest 7.1 channel versions of Harman's own Logic 7 technology. The AVR 435 has been engineered so that it is easy to take advantage of all the power of its digital technology. To obtain the maximum enjoyment from your new receiver, we urge you to read this manual. -
Page 4: Safety Information
4 INTRODUCTION / SAFETY INFORMATION Important Safety Information Verify Line Voltage Before Use Your AVR 435 has been designed for use with 220-240-Volt AC current. Connection to a line voltage other than that for which it is intended can create a safety and fire hazard and may damage the unit. -
Page 5: Front Panel Controls
Front Panel Controls Main Power Switch System Power Control Power Indicator Headphone Jack Surround Mode Group Selector Speaker Selector Button Tone Mode Surround Mode Selector Tuning Selector Tuner Band Selector Main Power Switch: Press this button to apply power to the AVR. When the switch is pressed in, the unit is placed in a Standby mode, as indicated by the orange LED surrounding the System Power Control... - Page 6 Front Panel Controls Surround Mode Selector: Press this button to cycle through the individual surround modes available after the Surround Mode Group Selector was pressed (see item above). Note that depending on the type of input, some modes are not always available. (See page 36 for more information about surround modes).
-
Page 7: Rear Panel Connections
Rear Panel Connections AM Antenna FM Antenna Tape Inputs Tape Outputs Subwoofer Output DVD Audio Inputs CD Inputs Multiroom Outputs A-BUS Connector 8-Channel Direct Inputs Digital Audio Outputs Video Monitor Outputs DVD Video Inputs Front Speaker Outputs Center Speaker Outputs NOTE: To assist in making the correct connec- tions for multichannel input/output and speaker connections, all connection jacks and terminals... - Page 8 Rear Panel Connections Video Monitor Outputs: Connect this jack to the composite and/or S-Video input of a TV monitor or video projector to view the on-screen menus and the output of any standard Video or S-Video source selected by the receiver’s video switcher.
- Page 9 SBR terminals to the red and black terminals on the right remote zone speaker. RS-232 Port: This jack may be used to con- trol the AVR 435 over a bi-directional RS-232 serial control link to a compatible computer or programmable remote control system. Due to...
-
Page 10: Main Remote Control Functions
Main Remote Control Functions Power Off Button IR Transmitter Window LCD Information Display Power On Button Input Selectors AVR Selector AM/FM Tuner Select 6-Channel/8-Channel Direct Input Test Button Sleep Button Surround Mode Selector Night Mode Channel Select Button Dim Button Navigation Button Set Button Digital Select... -
Page 11: Information Display
Main Remote Control Functions IMPORTANT NOTE: The AVR 435’s remote may be programmed to control up to seven devices, including the AVR. Before using the remote, it is important to remember to press the Input Selector button that corresponds to the unit you wish to operate. - Page 12 Main Remote Control Functions Tuning Up/Down: When the tuner is in use, these buttons will tune up or down through the selected frequency band. If the Tuner Mode but- has been pressed or the Band button on the front panel was held pressed so that appears in the Main Information Display , pressing either of the buttons will...
- Page 13 Main Remote Control Functions VDI Button: This button does not have any function for the AVR, but is provided for your use in programming the codes that are used to scroll up or down through the available inputs on your video display.
-
Page 14: Zone Ii Remote Control Functions
Zone II Remote Control Functions POWER MUTE VID 2 VID 1 AM/ / FM VID 3 VID 4 TAPE TUNING PRESET DISC SKIP DISC SKIP VOLUME Power Off AVR Selector AM/FM Tuner Select Input Selectors Tuning Up/Down – Fast Play Record/Pause Preset/Track Skip Disc Skip... -
Page 15: Installation And Connections
Installation and Connections After unpacking the unit, and placing it on a solid surface capable of supporting its weight, you will need to make the connections to your audio and video equipment. Audio Equipment Connections We recommend that you use high-quality inter- connect cables when making connections to source equipment and recorders to preserve the integrity of the signals. -
Page 16: Scart A/V Connections
Component DVD Inputs . Although this set of inputs may be assigned to any of the four video inputs on the AVR 435, the factory default is for this input to be assigned to the DVD Audio Inputs Remember to make a digital... - Page 17 Installation and Connections Figure 1: SCART/Cinch-Adapter for playback; signal flow: SCART ¡ Cinch Figure 2: SCART/Cinch-Adapter for record and playback; signal flow: SCART ↔ Cinch Black Black Figure 3: Yellow Yellow Cinch/SCART-Adapter for playback; signal flow: Cinch ¡ SCART Figure 4: SCART/S-Video Adapter for playback;...
-
Page 18: System And Power Connections
Installation and Connections System and Power Connections The AVR 435 is designed for flexible use with multiroom systems, external control components and power amplifiers. Main Room Remote Control Extension If the receiver is placed behind a solid or smoked glass cabinet door, the obstruction may prevent the remote sensor from receiving commands. -
Page 19: Speaker Selection
Installation and Connections The AVR features a removable power cord that allows wires to be run to a complex installation so that the unit, itself, need not be installed until it is ready for connection. When all connections described above have been made, connect the AC Power cord to the AC Power Cord Jack The AVR draws significantly more current than other household devices such as computers that... -
Page 20: System Configuration
You are now ready to power up the AVR 435 to begin these final adjustments. First Turn On You are now ready to power up the AVR to begin these final adjustments. -
Page 21: Audio Setup
HDTV set-top may change between analog and digital outputs, depending on which channel is in use. The AVR 435’s Auto Polling feature allows you to avoid losing the audio feed when this happens by permitting both analog and digi- tal connections to the same source on the AVR. -
Page 22: Surround Setup
System Configuration sources are processed at their native sample rate. For example, a 48kHz digital source will be processed at 48kHz. However, the AVR allows you to upsample the incoming 48kHz signals to 96kHz for added resolution. To take advantage of this feature, press the so that the ©... -
Page 23: Night Mode Settings
BACK TO presss the Set Button Using EzSet/EQ The AVR 435 uses Harman Kardon’s EzSet/EQ technology to automatically configure your system to deliver the best possible performance based on your specific speaker selection, where the speak- ers are placed in the room and the acoustic influ- ences in your listening room. - Page 24 Near Field measurements from the front left, center and right speakers. By taking this separate set of measurements, the AVR 435 is able to com- plete its view of the room’s sonic signature and apply equalization as needed to correct spikes and dips in the system’s response.
-
Page 25: Navigation Button
Go to page 35 for complete information on operating your AVR 435. SYSTEM CONFIGURATION 25... -
Page 26: Manual Setup
However, if you feel that your listen- ing room or system components are best suited to manual entry of these settings, the AVR 435 also allows you to enter or trim any of these tra- ditional system parameters. Even if you do make... - Page 27 System Configuration If you are in doubt as to which setting best describes your speakers consult the specifications in the speakers’ owner’s manual, visit the speak- er manufacturer’s web site or ask the dealer or installer from whom you purchased the speakers. Begin your changes to the speaker setup process by making certain that the cursor is pointing at line, which sets the con-...
-
Page 28: Speaker Crossover Setting
The settings on menu also allow you to set the high pass filter that determines which fre- quencies go to the subwoofer when the AVR 435 is playing back the low frequency effects (LFE) channel from a digital soundtrack. -
Page 29: Delay Settings
System Configuration To assist in making these settings, the icons in the Speaker/Channel Input Indicators will change as the speaker type is selected at each position. When only the inner icon box is lit, the speaker is set for “small. ” When the inner box and the two outer boxes with circles inside them are lit, the speaker is set for “large."... -
Page 30: Output Level Adjustment
System Configuration When the delay settings are complete, press the Button once so that the cursor is next to menu line and press the Set Button to return to the menu. Note that the delay settings may also be adjusted at any time when the Dolby Digital or Dolby Pro Logic II modes are in use by pressing the Delay button on the remote... - Page 31 System Configuration After checking for speaker placement, let the test noise circulate again, and listen to see which channels sound louder than the others. Using the front left speaker as a reference, press the Buttons on the remote to bring all speakers to the same volume level.
-
Page 32: Additional Input Adjustments
System Configuration When all changes to the Channel Output levels and the associated level trim settings have been made press the Navigation Button until the cursor is on the menu and then pressing the Set Button so that you may make any other adjustments to the system parameters. -
Page 33: Operation
Operation Surround Mode Chart MODE FEATURES DOLBY DIGITAL Available only with digital input sources encoded with Dolby Digital data. It provides up to five separate main audio channels and a special dedicated Low Frequency Effects channel. DOLBY DIGITAL EX Available when the receiver is configured for 6.1/7.1 channel operation, Dolby Digital EX is the latest version of Dolby Digital. - Page 34 Operation Surround Mode Chart MODE FEATURES DTS Neo:6 Cinema These two modes are available when any analog source is playing to create a six-channel DTS Neo:6 Music surround presentation from conventional Matrix-encoded and traditional Stereo sources. Select the Cinema version of Neo:6 when a program with any type of analog Matrix surround encoding is present.
-
Page 35: Channel Direct Input
Operation Basic Operation Once you have completed the setup and configu- ration of the AVR, it is simple to operate and enjoy. The following instructions should be fol- lowed for you to maximize your enjoyment of your new receiver: Turning the AVR On or Off •... -
Page 36: Surround Mode Selection
Operation appear momentarily in the Main Information Display . To return the tone controls to an active condition, press the Tone Mode but- ton once or twice so that the words momentarily appear in the Main Information Display • When the tone controls are active, the amount of bass and treble boost/cut may be adjusted by first pressing the Tone Mode Button on the front panel... -
Page 37: Dts
DVD players or DTS- encoded laser discs. In order to provide maximum playback compati- bility with DVDs, the AVR 435 receiver will always default first to the playback mode embedded in a disc’s digital “flag” information. For Dolby Digital... -
Page 38: Selecting A Digital Source
Operation Selecting a Digital Source To utilize either digital mode you must have properly connected a digital source to the AVR. Connect the digital outputs from DVD players, HDTV receivers, satellite systems or CD players to the Optical or Coaxial inputs on the rear or front panel . -
Page 39: Night Mode
Operation indicators will light, as analog signals have only left and right channels. Digital signals, however, may have one, two, five, six or seven separate channels, depending on the program material, the method of transmission and the way in which it was encoded. When a digital signal is playing, the letters in these indicators will light in response to the specific signal being received. -
Page 40: Output Level Adjustment With Source Signals
Operation Output Level Adjustment With Source Signals Normal output level adjustment for the AVR is established using the test tone, as out- lined on page 26. In some cases, however, it may be desirable to adjust the output levels using pro- gram material such as a test disc, or a selection you are familiar with. -
Page 41: Advanced Features
Advanced Features The AVR is equipped with a number of advanced features that add extra flexibility to the unit’s operation. While it is not necessary to use these features to operate the unit, they provide addi- tional options that you may wish to use. Front-Panel-Display Fade In normal operation, the front-panel displays and indicators remain on at full brightness, although... -
Page 42: Full-Osd Time Out Adjustment
In order to provide the greatest flexibility in accommodating the widest range of sources, the AVR 435 includes both analog and digital audio inputs for all sources. In most cases you will want to use one or the other, but not both. However, in... -
Page 43: Multiroom Operation
Multiroom Operation Installation Although simple remote room systems may be installed by the average do-it-yourself hobbyist, the complexity of your multizone/multiroom sys- tem involves running wires inside of walls where the services of a specially trained installer may be required. Regardless of who does the work, please remember that local building codes may govern in-wall electrical work, including proper specification of any wiring used and the way in... -
Page 44: 44 Tuner Operation
Multiroom Operation / Tuner Operation and then press the Navigation Button so that display changes to Press the Set Button again to activate the setting. Note that this method may be used to turn the Multiroom system on or off even when the AVR is in the Standby mode in the main lis- tening room. -
Page 45: Rds Operation
Tuner Operation RDS Operation The AVR is equipped with RDS (Radio Data System), which brings a wide range of informa- tion to FM radio. Now in use in many countries, RDS is a system for transmitting station call signs or network information, a description of station program type, text messages about the station or specifics of a musical selection, and the correct time. -
Page 46: Configuring The Remote
CD players and changers, CD recorders and cassette decks. The codes for other brand devices may be programmed into the AVR 435 remote using its extensive library of remote codes or a head-to-head learning process for codes not in the internal library. -
Page 47: Automatic Code Entry
Programming the Remote Although the AVR remote is preprogrammed with an extensive library of codes for many major brands, it is also possible that you may have attempted to program a product that is too new or too old, and thus not all of its commands will be in the code library. -
Page 48: Learning Codes For An Input Selector
Step 3. Learning Codes for an Input Selector The AVR 435’s remote allows you to learn a spe- cific code to be attached to one of the Input Selectors so that whenever that button is pressed, you will not only be selecting that device as the AVR’s input and telling the remote... -
Page 49: Macro Programming
Programming the Remote problem in doing that, but in normal operation the commands issued after selecting the VID 2 input are for a television, not a VCR. The AVR remote allows you to correct that situa- tion through the “Changing Devices” process. That enables you to assign the codes from one type of device to a different button. - Page 50 Programming the Remote Buttons . Press the Navigation Buttons until the name of the button you wish to program the macro into is shown. For this example we will show how to pro- gram a series of commands that will automat- ically be sent out every time the Power button is pressed.
-
Page 51: Punch-Through Configuration
Programming the Remote 4. The next display screen (Figure 47) is where you select the macro to be read. Press the Navigation Buttons until the name of the macro you wish to read appears. For this example, we will read back the Power On macro created in the previous section. -
Page 52: Renaming
Programming the Remote D E V I C E I N U S E V C R Figure 55 5. At the next display screen (Figure 56), you will select the device whose Channel Up/Down commands will be used. Press the Navigation Buttons until the desired device name appears to the right of the device... - Page 53 Programming the Remote 4. The next display screen (Figure 68) is where you select the device that will be renamed. In our example, that is the TV button. Press the Navigation Buttons until the name of the base device appears and then press the Set Button R E N A M E D E V I C E Figure 68...
-
Page 54: Resetting The Remote
C O M P L E T E Figure 76 Backlight Options The AVR 435’s remote has a built-in backlight system that makes it easier to use the remote when the room lighting is dimmed for an optimal home theater experience. To turn the backlight- ing on, simply press the Light Button . - Page 55 Programming the Remote 4. Press the Set Button one more time. The LCD display will show the word SAVING on the top line for about 2 seconds and then flash four times on the bottom line to indicate that the setting has been accepted by the remote’s memory.
-
Page 56: Troubleshooting Guide
Troubleshooting Guide SYMPTOM CAUSE Unit does not function when Main • No AC Power Power Switch is pushed Display lights, but no sound • Intermittent input connections or picture • Mute is on • Volume control is down Units turns on, but Front-Panel •... -
Page 57: Technical Specifications
16 µsec Slew Rate 40V/µsec** Supplied Accessories The following accessory items are supplied with the AVR 435. If any of these items are missing, please contact Harman Kardon customer service at www.harmankardon.com. • A system remote control • A Zone II remote control •... -
Page 58: 2, Route De Tours
250 Crossways Park Drive, Woodbury, New York 11797 www.harmankardon.com Harman Consumer Group International: 2, route de Tours, 72500 Château-du-Loir, France © 2005 Harman Kardon, Incorporated Part No.: ZKD2001HA00-2...
Need help?
Do you have a question about the AVR 435 and is the answer not in the manual?
Questions and answers