Table of Contents
Advertisement
Quick Links
Advertisement
Table of Contents

Related Manuals for Behringer Powerplay Pro HA4400


Summary of Contents for Behringer Powerplay Pro HA4400
- Page 1 User’s Manual Version 1.1 January 2001 www.behringer.com...
-
Page 2: Safety Instructions
POWERPLAY PRO HA4400 SAFETY INSTRUCTIONS CAUTION: To reduce the risk of electrical shock, do not remove the cover (or back). No user serviceable parts inside; refer servicing to qualified personnel. WARNING: To reduce the risk of fire or electrical shock, do not expose this appliance to rain or moisture. - Page 3 It is our philosophy to share our joy with you, because you are the most important member of the BEHRINGER family. With your highly competent suggestions for new products you’ve greatly contributed to shaping our company and making it successful.
- Page 4 POWERPLAY PRO HA4400 POWERPLAY PRO POWERPLAY PRO POWERPLAY PRO POWERPLAY PRO POWERPLAY PRO Professional, multi-purpose headphone amplifier system for stage and studio applications Four totally independent stereo high-power amplifiers in 1 RU package Highest sonic quality even with extremely high volume levels...
-
Page 5: Table Of Contents
POWERPLAY PRO HA4400 TABLE OF CONTENT 1. INTRODUCTION........................6 2. THE DESIGN CONCEPT ....................... 7 2.1 High quality components and design ....................7 2.2 Inputs and outputs ..........................7 2.2.1 Balanced MAIN inputs ......................7 3. INSTALLATION ........................7 3.1 Rack mounting ..........................7 3.2 Mains voltage ............................ -
Page 6: Introduction
POWERPLAY PRO HA4400 1. INTRODUCTION In purchasing the new POWERPLAY PRO HA4400, you have acquired a headphone amplifier of the high-end class which meets all the demands and requirements of studio work. Due to its extensive functions and the new design the POWERPLAY PRO is an extremely efficient and universal headphone amplifier. It has been designed above all as a reference unit for the sonic evaluation of the final mix as well as a distribution monitor amplifier for musicians in the studio. -
Page 7: The Design Concept
3.1 Rack mounting The BEHRINGER POWERPLAY PRO fits into one standard 19" rack unit of space (1 3/4"). Please allow at least an additional 4" depth for the connectors on the back panel. Be sure that there is enough air space around the unit for cooling and please do not place the POWERPLAY PRO on high temperature devices such as power amplifiers etc. -
Page 8: Audio Connections
POWERPLAY PRO HA4400 3.3 Audio connections The MAIN inputs on the BEHRINGER POWERPLAY PRO are fully balanced. If possible, connect the unit to other devices in a balanced configuration to allow for maximum interference immunity. Please ensure that only qualified persons install and operate the POWERPLAY PRO. During installation and operation the user must have sufficient electrical contact to earth. -
Page 9: Controls
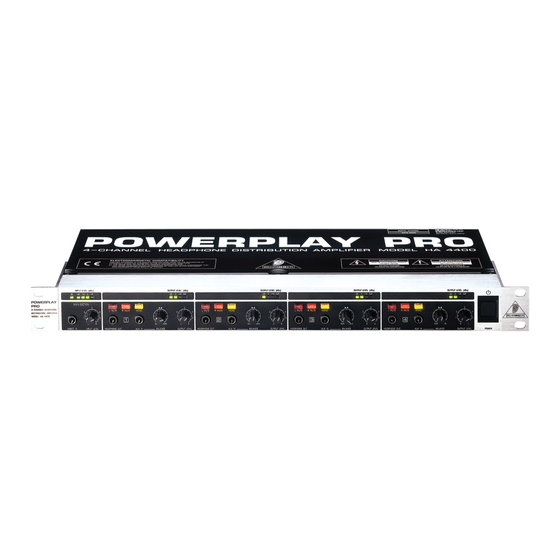
4. CONTROLS Fig. 4.1: POWERPLAY PRO front panel The BEHRINGER POWERPLAY PRO has four identical channels and provides 3 illuminated push-button switches, 2 rotary controls, 2 jacks and 4 LEDs per channel. The common main section contains 1 rotary control, 1 jack and 4 LEDs. -
Page 10: The Front Panel Control Elements
POWERPLAY PRO HA4400 4.1 The front panel control elements Fig. 4.2: Controls on the front panel The DIRECT IN stereo input is used to apply the signals coming from an external source. When using the DIRECT IN input, the MAIN signal applied on the rear panel is interrupted automatically (fig. 3.2). -
Page 11: The Elements Of The Rear Control Panel
POWERPLAY PRO HA4400 4.2 The elements of the rear control panel Fig. 4.3: The control elements of the rear panel FUSE HOLDER / VOLTAGE SELECTOR. Please make sure that your local voltage matches the volt- age indicated on the unit, before you attempt to connect and operate the POWERPLAY PRO. Blown fuses may only be replaced by fuses of the same type and rating. -
Page 12: Using The Amplifiers As Independent Power Amplifiers
Configure sub-groups or create pre-mixes using the effects and/or monitor facilities of your mixing console. Fully turn up the BALANCE control and connect the AUX inputs of the BEHRINGER POWERPLAY PRO to the corresponding monitor, sub-group or single outputs of the mixer. -
Page 13: Using The Direct In Input
5.5 Using the mute function The mute function of the individual input sources is a special feature of the BEHRINGER POWERPLAY PRO. Depending on the position of the MONO switch, it offers two highly useful routing options: 5.5.1 The mute function in mono mode... -
Page 14: Connecting Multiple Headphones
POWERPLAY PRO HA4400 5.6 Connecting multiple headphones All of the four stereo amplifiers feature one front and one rear panel headphone output connector. Multiple headphones can be connected per channel, on condition that the resulting connection impedance does not fall below 100 Ohms. -
Page 15: Specifications
3.5 kg BEHRINGER is constantly striving to maintain the highest professional standards. As a result of these efforts, modifications may be made from time to time to existing products without prior notice. Specifications and appearance may differ from those listed or shown. -
Page 16: Warranty
(user included) will void the warranty. at its sole discretion, either repair or replace the product. 6. If an inspection of the product by BEHRINGER shows that the 2. If the warranty claim proves to be justified, the product will be defect in question is not covered by the warranty, the inspection returned to the user freight prepaid.
Need help?
Do you have a question about the Powerplay Pro HA4400 and is the answer not in the manual?
Questions and answers