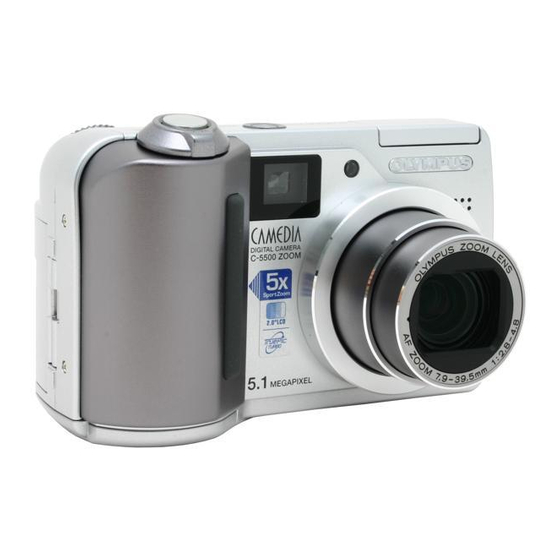
Olympus Camedia C-5500 ZOOM Basic Manual
Camedia
Hide thumbs
Also See for Camedia C-5500 ZOOM:
- Basic manual (100 pages) ,
- Quick start manual (2 pages) ,
- Advanced manual (199 pages)

Related Manuals for Olympus Camedia C-5500 ZOOM


Summary of Contents for Olympus Camedia C-5500 ZOOM
- Page 1 DIGITAL CAMERA C-5500 ZOOM C-55 ZOOM ENGLISH Shoot and Play! FRANÇAIS ESPAÑOL DEUTSCH...
-
Page 2: For Customers In Canada
- Consult your dealer or an experienced radio/TV technician for help. Only the OLYMPUS-supplied USB cable should be used to connect the camera to USB enabled personal computers (PC). Any unauthorized changes or modifications to this equipment would void the user’s authority to operate. -
Page 3: Table Of Contents
Manual Contents How to use the camera ..........4 Safety Precautions ............6 ....10 UNPACKING THE BOX CONTENTS ......12 INSERTING THE BATTERIES ..... 15 INSERTING THE MEMORY CARD ......18 TURNING THE CAMERA ON ........20 TAKING A PICTURE ........ -
Page 4: How To Use The Camera
Navigation How to use the camera Using a computer... Using the OLYMPUS Master software on your computer lets you enjoy editing, viewing, and printing the pictures downloaded from your camera. Using a card... Pictures taken with this camera are stored on an xD-Picture Card. -
Page 5: Using The Mode Dial
Using the mode dial... Use the mode dial to select a shooting or playback mode. f lets you select the optimum settings for the shooting conditions from 10 different situations. Using the arrow pad and N button... The arrow pad and N button are for selecting and setting menu options as well as viewing pictures frame by frame. -
Page 6: Safety Precautions
CAUTION: TO REDUCE THE RISK OF ELECTRICAL SHOCK, DO NOT REMOVE COVER (OR BACK). NO USER-SERVICEABLE PARTS INSIDE. REFER SERVICING TO QUALIFIED OLYMPUS SERVICE PERSONNEL. Lightning flash with an arrowhead, enclosed in a triangle, alerts you to the presence of uninsulated voltage points inside the product which could cause a serious electrical shock. - Page 7 Safety Precautions Location — To avoid damage to the product and prevent personal injury, never place this product on an unstable stand, tripod, bracket, table or cart. Mount only on a stable tripod, stand, or bracket. Follow the instructions that describe how to safely mount the product, and use only the mounting devices recommended by the manufacturer.
-
Page 8: Legal And Other Notices
Legal and other notices • Olympus makes no representations or warranties regarding any damages, or benefit expected by using this unit lawfully, or any request from a third person, which are caused by the inappropriate use of this product. -
Page 9: Copyright Notice
Olympus reserves the right to alter the features and contents of this publication or software without obligation or advance notice. -
Page 10: Unpacking The Box Contents
If you find any contents missing or damaged, contact the place of purchase. Card Digital Camera Strap USB Cable AV Cable AA (R6) alkaline batteries (four) Basic Manual (this manual) OLYMPUS Master CD-ROM Warranty Card Advanced Manual Registration Card (CD-ROM) Contents vary depending on the area where you purchased this camera. - Page 11 Be careful with the strap when you carry the camera, as it can easily catch on stray objects, causing injury or damage. Attach the strap correctly as shown above so that the camera does not fall off. If the strap is attached incorrectly and the camera falls off, Olympus is not responsible for any damages.
-
Page 12: Inserting The Batteries
INSERTING THE BATTERIES Make sure the camera is off. The lens is retracted. The monitor is off. Battery compartment cover Open the battery compartment cover. Slide the battery compartment cover lock to the ) position. Lift up the cover. Slide the cover outwards. -
Page 13: Insert The Batteries
INSERTING THE BATTERIES Insert the batteries. Lithium battery packs AA (R6) alkaline batteries Make sure the batteries are inserted correctly as shown in the diagram above. There are diagrams inside the battery compartment and on the bottom of the camera that indicates which way the batteries should be inserted. Close the battery compartment cover. - Page 14 When you use rechargeable batteries, charge the batteries with the battery charger specified by Olympus before use. For more details, refer to the instruction manual attached to the charger.
-
Page 15: Inserting The Memory Card
INSERTING THE MEMORY CARD Make sure the camera is off. The lens is retracted. The monitor is off. Card cover Open the card cover. -
Page 16: Insert The Card
INSERTING THE MEMORY CARD Insert the card. Index area Make sure that the card is oriented correctly and insert while keeping it straight, otherwise the contacts on the card may be damaged or the card may get stuck. Notch To remove the card Push the card all the way in and Grasp and remove. - Page 17 The part where the data transferred from the camera enters the card. Note This camera may not recognize a non-OLYMPUS card or a card that was formatted on another device (such as a computer, etc.). Before use, be sure to format the card on this camera.
-
Page 18: Turning The Camera On
TURNING THE CAMERA ON Set the mode dial to h and press the POWER switch. POWER switch Mode dial Battery check indicator Shooting mode The lens extends and the monitor turns on. 2592 2592 1944 1944 Press the flash button. The flash pops up. - Page 19 TURNING THE CAMERA ON Note To save battery power, the camera automatically enters the sleep mode and stops operating after about 3 minutes of non-operation. The camera activates again as soon as you operate the shutter button or zoom lever. 4 hours after the camera enters sleep mode, the camera retracts the lens and turns off automatically.
-
Page 20: Taking A Picture
TAKING A PICTURE Compose your picture. Shutter button Orange lamp AF target mark Using the monitor, place the AF target mark on your subject. 2592 1944 2592 1944 Focus on your subject. Press the shutter button halfway and hold. Green lamp # mark The green lamp on the screen lights when the focus and... -
Page 21: Take The Picture
TAKING A PICTURE Take the picture. Press the shutter button completely. The orange lamp beside the viewfinder blinks while the picture is recorded onto the card. 2592 1944 2592 1944 Memory gauge Note Press the shutter button gently. If it is pressed hard, the camera may move and pictures may come out blurred. -
Page 22: Reviewing A Picture
REVIEWING A PICTURE Press the QUICK VIEW button. QUICK VIEW button You can display the last picture you took while staying in any 100-0030 0030 shooting mode. Press the QUICK VIEW button again or press the shutter button lightly when you are ready to take another picture. -
Page 23: Turning The Camera Off
Close the flash. Push the flash into the camera. Now that you have mastered how to shoot and play, check out the Advanced Manual for more camera applications. …And for extra enjoyment, install OLYMPUS Master image editing software on the supplied CD-ROM. -
Page 24: Specifications
Image pickup device : 1/1.8" CCD solid-state image pickup, 5,260,000 pixels (gross) Lens : Olympus lens 7.9 mm to 39.5 mm, f2.8 to f4.8 (equivalent to 38 mm to 190 mm lens on a 35 mm film camera) Photometric system... - Page 25 Specifications Automatic calendar system : 2000 up to 2099 Operating environment Temperature : 0°C to 40°C (32°F to 104°F) (operation)/ -20°C to 60°C (-4°F to 140°F) (storage) Humidity : 30% to 90% (operation)/10% to 90% (storage) Power supply : 4 Alkaline AA batteries, 4 NiMH (Nickel metal hydride) batteries, 2 lithium battery packs (CR-V3).
Need help?
Do you have a question about the Camedia C-5500 ZOOM and is the answer not in the manual?
Questions and answers