Advertisement
User Manual
Electric Lawn Mower
DB6806, 120V, 12A, 16"
3092405
Warning:
Read and follow all safety rules and instructions in this manual before attempting to operate this machine.
Failure to comply with these instructions may result in personal injury. Save these instructions.
Questions, problems, missing parts?
If you have questions and need technical support, call our customer
service department at 1--800--791--9458.
1
Advertisement

Related Manuals for Lawn Devil DB6806


Summary of Contents for Lawn Devil DB6806
-
Page 1: User Manual
User Manual Electric Lawn Mower DB6806, 120V, 12A, 16” 3092405 Warning: Read and follow all safety rules and instructions in this manual before attempting to operate this machine. Failure to comply with these instructions may result in personal injury. Save these instructions. -
Page 2: Table Of Contents
Contents Contents .......................... 2 Product S pecification ...................... 2 Safety i nformation ...................... 3 -‐6 Symbols ..........................7-‐8 Know ... -
Page 3: Safety I Nformation
SAFETY I NFORMATION GENERAL O PERATION • Carefully r ead a ll i nstructions o n t he m ower a nd i n t he m anual b efore a ttempting t o a ssemble a nd o perate t he mower. ... - Page 4 OPERATING O N A S LOPE Slopes are a major factor related to accidents involving slips and falls, which can result in severe injury. Operating the mower on a slope requires extra caution. If you feel uneasy on a slope, do not mow it. For your safety, use the slope gauge that is included as part of this manual to measure slopes before operating this mower on a sloped or hilly area. ...
- Page 5 • When i t i s n ot i n u se, s tore t he m ower i ndoors i n a d ry a rea, l ocked u p o r o ut o f t he r each o f c hildren. DOUBLE ...
- Page 6 SAFETY I NFORMATION SLOPE G AUGE • Use t his p age a s a g uide i n o rder t o i dentify s lopes t hat c annot b e m owed s afely. • ...
-
Page 7: Symbols
SYMBOLS Some of the following symbols may be used on this product. Please study them and learn their meaning. Proper interpretation ... - Page 8 SYMBOLS The f ollowing s ignal w ords a nd m eanings a re i ntended t o e xplain t he l evels o f r isk a ssociated w ith t his p roduct. SYMBOL ...
-
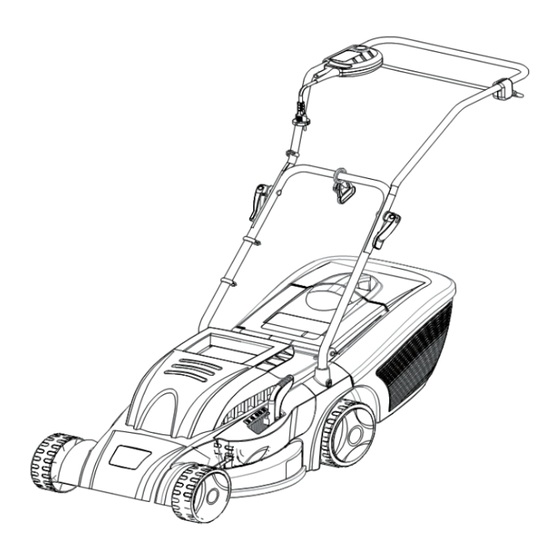
Page 9: Know Y Our L Awn M Ower
KNOW Y OUR L AWN M OWER Read t his o perator's m anual a nd s afety r ules b efore o perating y our l awn m ower. C ompare t he i llustration i n F igure 1 t o your ... -
Page 10: Assembly
ASSEMBLY I NSTRUCTIONS UNPACKING • Carefully r emove t he p roduct a nd a ny a ccessories f rom t he b ox. M ake s ure t hat a ll i tems l isted i n t he p acking l ist a re included. ... - Page 11 ASSEMBLY I NSTRUCTIONS The l awn m ower i s d elivered u nassembled. The c omplete p ush b ar a nd t he g rass c ollector m ust b e a ssembled b efore u sing t he l awnmower. Follow the operating instructions step-‐by-‐step and use the pictures provided as a visual guide to easily assemble the ...
- Page 12 ASSEMBLY I NSTRUCTIONS INSTALLING ...
- Page 13 OPERATING Y OUR L AWN M OWER CONNECTING T HE P OWER C ORD Selecting a n E xtension C ord The c hart b elow s hows t he l ength o f e xtension c ords a nd t he c orresponding a cceptable c ord r atings. For ...
- Page 14 OPERATING Y OUR L AWN M OWER STARTING/STOPPING T HE M OWER ( See F igure 6 ) To s tart t he m otor: • ...
- Page 15 OPERATING Y OUR L AWN M OWER CUTTING H EIGHT A DJUSTMENT ( See F igure 7 ) When shipped, the wheels on the mower are set to a low-‐cutting position. Before using the mower for the first time, raise ...
- Page 16 OPERATING Y OUR L AWN M OWER MOWING T HE L AWN NOTE: A s harp b lade w ill g reatly e nhance t he p erformance o f t he m ower, e specially w hen c utting h igh g rass. Be ...
-
Page 17: Maintenance
MAINTENANCE REPLACING T H E C UTTING B LADE ( See F igure 1 0 -‐ 1 1) For s afety r easons, w e r ecommend h aving t he b lade r eplaced b y a n a uthorized p rofessional. Important! ... - Page 18 CLEANING T HE M OWER W A R N I N G To r educe t he r isk o f e lectric s hock, d o n ot e xpose t he m ower t o w ater. The ...
-
Page 19: Troubleshooting
TROUBLESHOOTING PROBLEM POSSIBLE C AUSE SOLUTION The h andle i s n ot i n p osition Carriage b olts a re n ot s eated p roperly. Adjust ... -
Page 20: Warranty
WARRANTY -‐ T WO Y EAR W ARRANTY For two years from date of retail purchase within U.S.A., the manufacturer will, at its option, repair or replace, for the original purchaser, free of charge, any part or parts found to be defective in material or workmanship. This warranty covers ...
Need help?
Do you have a question about the DB6806 and is the answer not in the manual?
Questions and answers