Table of Contents
Advertisement
Advertisement
Table of Contents

Subscribe to Our Youtube Channel
Related Manuals for NAVICOM RT-300


Summary of Contents for NAVICOM RT-300
- Page 1 VHF Marine Radio RT- 00 INSTALLATION AND OPERATION GUID Navicom plaisance: Z.A. des Boutries, 78700 Conflans Ste Honorine Tel: 01.39.72.19.90 Fax: 01.39.19.28.98 Navicom Pro: 3, rue J. Cugnot, Z.A.C Petit Guelen, 29000 Quimper Tel: 02.98.94.64.70 Fax: 02.98.94.69.71...
-
Page 2: Table Of Contents
TABLE OF CONTENTS Equipment Description…………………………………..……….…..…2 Introduction….…………………………………..………..………………..2 Safety Information……………………………………………….………..3 Using The Radio…………………………………………..…….…….…3 Display...………………………………………………………….……..3 Function And Location Of The Controls……………………….…….….4 Basic Operation………………………………………..……….…..…4 Turning On/Off Your Transceiver……………………………….……….5 Adjusting Squelch…………………………………...…...…………….…5 Selecting High/Low Power or Lock keypad………………....…5 Selecting a Channel………………………………………………………5 Transmitting and Receiving………………………………………………5 Scanning Features………………………………………………………..6 Adding Channels to Memory………………………………………..7 Using the Monitor Modes………………………………………….……..7 Dual Watch…………………………………………………………..…...7... -
Page 3: Equipment Description
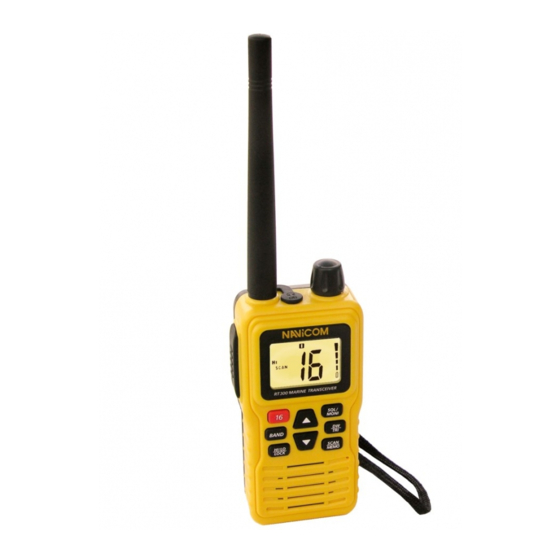
Equipment Description INTRODUCTION Your hand-held marine VHF radio RT300 represents the state- of-the-art in high-tech engineering. Designed for international operation. Thisallows you to transmit and receive on all international channels in the VHF marine band, as assigned by the in ternational Union (ITU). -
Page 4: Safety Information
Backlit LCD Display -------- allows you to operate the transceiver in dark environment. Memory Channels ---- lets you store channels as memory channels. DW/TRI ---- lets you to select DW/normal mode or TRI/normal mode. We recommend you record your radio’s serial number here. -
Page 5: Display
USING YOUR RADIO DISPLAY Your radio comes with a multifunctional display. Canada channel indicator International channel Weather station indicator indicator Weather station alarm on USA band indicator indicator ATIS on indicator Primary channel indicator Receiving indicator Scan mode indicator Transmiting indicator Memory channel indicator Dual watch mode indicator... -
Page 6: Function And Location Of The Controls
FUNCTION AND LOCATION OF THE CONTROLS Antenna Power/Volum knob PTT key CHG/Mic/Speaker jack Channel up SQL/MONI Key CH 16 Key DW/TRI Key BAND Key SCAN/MEMO Key HI/LO/LOCK Key Channel down BASIC OPERATION Before operating your radio, please install 4 "AA" size battery cells into the main unit. -
Page 7: Adjusting Squelch
Turning On/Off Your Radio Rotate Power/volume knob to turn the radio on or off with an indicating voice of click. And adjust the volume to a comfortable level. Adjusting Squelch Press and release the SQL key to enter squelch mode,press the to adjust squelch level. -
Page 8: Scanning Features
Scanning Features Your RT300 is equipped with three types of scan options: All Scan, Saved(Memory) Scan and Priority Scan. If there are no channels in memory, the default is All Scan. This function automatically searches for transmissions on the channel set being scanned. -
Page 9: Adding Channels To Memory
Adding Channels to Memory Your RT300 can store any channel (including Private Channels). The stored channels are the ones scanned in the Saved (Memory) Scan mode. To Add Channels to Memory 1. During normal operation mode, use the UP or DOWN key to select the desired channel for programming. -
Page 10: Tri Watch
Press and release the DW/TRI button to terminate Dual Watch and return to the previous working channel. Press and hold the DW/TRI button to terminate Dual Watch mode and go into Tri Watch mode. Press and release the 16 button to terminate Dual Watch mode and switch to the Priority channel. - Page 11 Using the Batteries When the battery level is low, Please replace the batteries.Before replacing the batteries, the volume control must be rotated fully counterclockwise, until a click is heard, to turn the power OFF. You can replace the old batteries just with 4 new AA size battery cells. 1.
-
Page 12: Using The Belt Clip
Note: The Ni-MH batteries and AC adapter are the optional accessories of the radio. The charging can not stop itself without prevention even when the batteries have been fully charged. Do not forget to remove the adapter from the radio when the radio is fully charged. Don't overcherge the batteries for more than 48 hrs.otherwise the batteries will be damaged. -
Page 13: Technical Specifications
TECHNICAL SPECIFICATIONS Channels…………………………………..All International Channels Frequency Method………………………….………….Phase Lock Loop Frequency Range…………………………..TX 156.025~157.425 MHz RX 156.300~162.000 MHz Power Supply……………………….. …………………..………4xAA Operating Temperature………………………..-15¡æ to +55¡æ Dimensions (HWD)………………. 123mm(H)*60mm(W)*37mm(D) Weight (without Battery)…….…..........190g TRANSMITTER Power Output……………….………0.8 or 5 Watts (Switch Selectable) Modulation Type……………………………………….…….…...…….FM Hum and Noise Attenuation……………………………….……..…40dB Audio Distortion.........………..…......5% Spurious Suppression........……………..-36dBm... -
Page 14: Frequency Charts
FREQUENCY CHARTS Unit: MHz FREQUENCY (MHz) FREQUENCY (MHz) MODE REMARK MODE REMARK 156.050 160.650 60 156.025 160.625 156.100 160.700 61 156.075 160.675 156.150 160.750 62 156.125 160.725 156.200 160.800 63 156.175 160.775 156.250 160.850 64 156.225 160.825 156.300 156.300 65 156.275 160.875 1W ATIS 156.350 160.950 66 156.325 160.925... - Page 15 DECLARATION OF CONFORMITY...
Need help?
Do you have a question about the RT-300 and is the answer not in the manual?
Questions and answers