Advertisement
Quick Links
Quick start
Guide
+
Instructions
Matsui 1409R
Your television is supplied with an approved 13AMP fused mains plug. When
replacing the fuse always use a 5AMP (BS 1362) approved type. To obtain a
replacement fuse contact your store. If the mains sockets in your home differ or
are not suitable for the type of plug supplied, then the plug should be cut from
the mains lead and a suitable type fitted. You must use a 13 AMP plug (BS
1363) and fit a 5 AMP fuse (BS 1362). If any other type of plug is used a 5
AMP fuse must be fitted, either in the plug, adaptor or at the distribution board.
Please refer to the wiring instructions.
Interference – Do not place your
place your television on a flat level
television near appliances which may
surface avoiding anywhere which
cause electromagnetic interference
may be subject to strong vibration.
(i.e. HI-FI speakers). If you do, it may
Batteries – Batteries are easily
adversely affect the working of the
swallowed by young children. Do not
unit, causing the picture or sound to
allow young children to play with the
distort.
remote control unit.
Covers – Do not remove any fixed
Temperature – Avoid extremes of
covers as this may expose dangerous
temperature, either hot or cold, place
voltages.
your television well away from heat
Weather – It is advisable to unplug
sources
such
as
radiators
the aerial during a thunderstorm. Even
gas/electric fires. Do not place
if your television is switched off, it can
candles or table lamps on or near
still be damaged if lightning strikes the
your TV.
mains and/or aerial cables.
Moisture – Do not allow your
Ventilation – The ventilation holes
television to be exposed to rain,
on the casing of your television
moisture or dust. Do not place a plant
prevent it from overheating. Do not
or flowers which may need watering
block or cover these holes - especially
on your TV. If any liquid is spilt into
with cloth or paper. If your television is
your television it can cause serious
to be built into a compartment or
damage. If you spill any liquid into
similarly enclosed, make sure that
your television switch it off at the
there is at least a gap of 10cm on
mains immediately and contact your
both sides and 20cm at the top and
store. When cleaning your TV we
back.
recommend that you do not spray
cleaning fluid directly onto the TV
Damage – Never use your television
screen.
if it is damaged in any way. Always
1
Inserting batteries into the Remote
Control
2
Connect the aerial
All connections must be made with the power disconnected.
Connect your TV to an aerial
A
B
If you do not have an external aerial,
A
connect the loop aerial (supplied) to the
aerial socket.
If you have an external aerial (not supplied )
B
connect it to the aerial socket on the back of the
TV. An external aerial will give the best picture.
or
5
Tune the channels
Press MENU on your remote control. The main control menu
will appear on your TV screen.
Press PROG/PAGE /
on your remote control to highlight
CH tuning (indicated by a flashing green square). Press ENTER
to confirm. The CH tuning on-screen display will appear.
Press PROG/PAGE /
to highlight auto. Press ENTER to
confirm. This will start the automatic tuning process.
This process will take a few minutes to complete. . .
please be patient.
When the programme on the screen stops changing and the
sound comes on, the tuning process is complete.
Press MENU twice to clear the display.
Since each programme may be picked up by your TV on more
than one frequency the auto tune process will probably store
more than one of each channel. For example there may be
three BBC 2's. This means that once the automatic tuning
process is complete you will need to allocate a channel number
to the programmes with the clearest reception. To do this go to
the next step - Sorting Channels...
OR
Connect your TV to an aerial and VCR
B
C
A
Connect an aerial lead (not supplied ) to the socket marked
A
RF IN on the back of your VCR.
Connect an RF lead to the socket marked RF OUT on your
B
VCR and the other end to the aerial socket on your TV.
If you have a scart lead we recommend that you use one.
C
Connect it to the scart socket on the back of your TV and
one of the scart sockets on the back of your VCR.
6
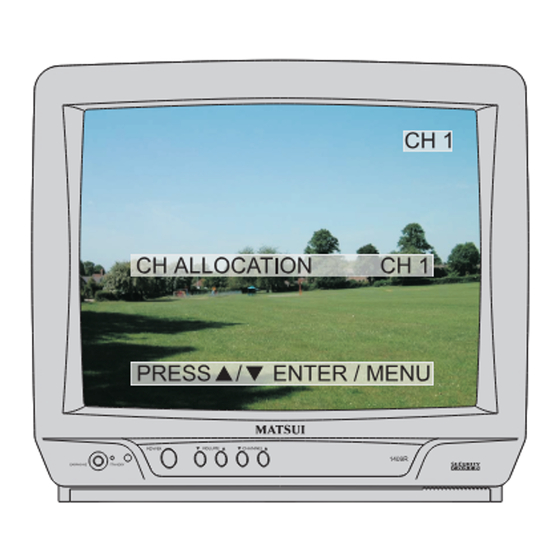
Sort the channels
Press MENU. The main control menu will appear.
Press PROG/PAGE /
on your remote control to highlight
CH tuning (indicated by a flashing green square).
Press ENTER. Th e CH tuning on screen display will appear.
Press the PROG/PAGE /
on your remote control to
highlight CH allocation (indicated by a flashing green square).
Press ENTER. The CH allocation on-screen display will appear.
The current position for the channel on the TV screen will flash
on the top right corner of the screen. Press ENTER once so that
the CH ALLOCATION number flashes in the on-screen display.
Press PROG/PAGE /
to select the programme number
that you want this channel to be stored in. For example if the TV
has automatically stored a BBC2 programme in channel number
6, you will need to press ENTER once and change the channel
allocation number using PROG/PAGE /
to 2.
(If no channel is allocated, the on screen display will disappear
after 1 minute.)
Press MENU three times to remove the tuning menu from the
screen. The channel will now have changed position.
3
4
Switch on your TV and any
other connected equipment
This feature allows you to select the language you want
Make sure that your TV and aerial are properly
to appear on your TV on-screen display.
connected.
Press MENU on the remote control. The main control
Plug your TV and any other equipment that you have
menu will appear on your TV screen.
connected to your TV into the mains and switch on at
the wall.
Press PROG/PAGE
Press the POWER switch on the front of the TV, the red
standby indicator will light.
Press ENTER to select Language screen.
Switch on your television by pressing STANDBY on the
Press PROG/PAGE
remote control. ( The standby light will go out when the
Press ENTER to store your setting.
TV is on.)
Press MENU to clear the screen.
If you have a VCR connected make sure that it is
switched on and a video tape is playing. . . your TV
screen will be fuzzy.
If you have a Satellite/Cable box system or games
console connected make sure that it is switched on.
Make sure your Satellite/Cable box has Sky News
selected. . . your TV screen will be fuzzy. Please refer to
your Satellite/Cable instruction book to see how to
select Sky News.
7
8
Adjusting the picture settings
The picture settings have been adjusted by the factory under
optimum signal reception conditions, however conditions may
The sleep function allows you to automatically switch your
not be the same in your area. After turning on your television,
television into standby after a preset amount of time (up to
allow it to warm up for a few minutes before making any
120 minutes). In addition should you fall asleep or leave your
adjustments. Should you wish to reset picture controls back to
TV unattended it will automatically switch into standby 15
factory settings press NORMAL
minutes after the end of transmissions.
Press MENU on your remote control. The on screen
To set the sleep timer press SLEEP.
display will appear.
SLEEP 120 will appear on screen.
The display will clear in five seconds and your television
Press PROG/PAGE /
on your remote control to
will switch off automatically after 120 minutes.
highlight picture (indicated by a flashing green square).
Repeated presses of SLEEP will decrease the sleep timer
Press ENTER to view brightness, contrast, colour or
in 10 minute intervals from 120 minutes to 10 minutes.
sharpness on screen displays.
1st press
Press VOL + or - to adjust the levels.
2nd press
. . .etc.
Pictures appear sharpest in the daytime by increasing
the contrast. In the evening (when surroundings are
When you have set the sleep timer your TV will return to
darker) the sharpest picture can be obtained by
a normal picture and automatically switch off after the
reducing the contrast.
preset sleep time.
Press MENU twice to remove the picture menu.
To cancel the sleep timer set the sleep timer to 0.
The display will clear in five seconds and your television
If you do not make an adjustment within 1 minute the menu
will not switch off automatically.
will disappear.
Select your language
/
to select Language menu.
/
to select desired language.
Setting the sleep function
120 minutes.
110 minutes.
. . . 100, 90, 80.
Advertisement

Related Manuals for Matsui 1409R

Summary of Contents for Matsui 1409R
-
Page 1: Quick Start
Connect your TV to an aerial Connect your TV to an aerial and VCR Instructions Matsui 1409R This feature allows you to select the language you want Make sure that your TV and aerial are properly to appear on your TV on-screen display. - Page 2 Setting your security code Fault finding guide CAUSE SOLUTION SYMPTOM In an effort to fight crime, we have equipped your TV with security protection. When activated your TV is No standby light. Is your TV plugged in ? Plug your TV into mains socket protected against unauthorised use.
Need help?
Do you have a question about the 1409R and is the answer not in the manual?
Questions and answers