Table of Contents
Advertisement
Advertisement
Table of Contents

Related Manuals for AGA DxD 910


Summary of Contents for AGA DxD 910
- Page 1 DxD 910 Refrigerator User Guide & Installation & Service Instructions U110144-03B...
-
Page 2: Table Of Contents
Contents Before You Start Cleaning and Maintenance Safety Defrosting Cleaning About Your Refrigerator Water Filter About the Fresh Food Compartment Shutting O the Refrigerator About the Freezer Compartment When Not in Use Fridge Freezer Controls The Light Dispenser Control Air Curtain Removal and Installation Control Centre Power Down (only for servicing if needed) Error Codes... -
Page 3: Before You Start
1. Before You Start Thank you for buying a AGA appliance. We hope that it • Before undertaking any routine maintenance or minor provides a stylish yet practical solution to your cooling repairs, disconnect the appliance from the electrical needs. We hope that this handbook supplies you with all the supply. -
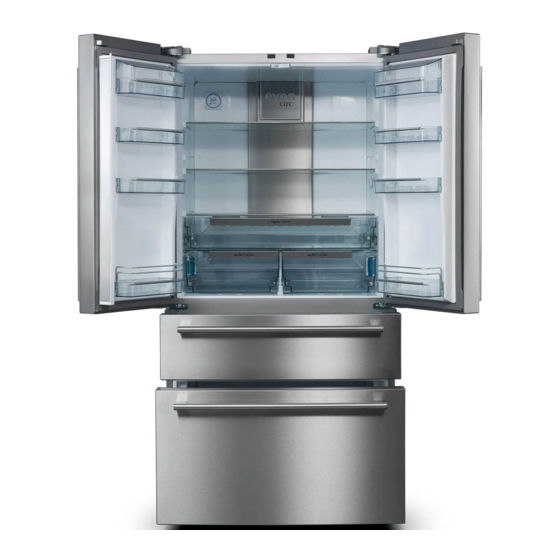
Page 4: About Your Refrigerator
2. About Your Refrigerator Fig.2-1 Air curtain vents Control panel Water lter Dairy compartment Dairy product stored here LED lights Wine/bottle rack Telescopic shelf Meat, fruit and vegetable crispers Full width pantry Bottle rack Upper freezer drawer ArtNo.600-0004 - Refrigerator layout with ice maker Lower deep freeze drawer The refrigerator is shown in Fig.2-1 and has the following... -
Page 5: About The Fresh Food Compartment
About the Fresh Food Compartment Fig.2-2 It is recommended to leave storage space between the foods for good cold air circulation. The temperatures in the refrigerator are slightly warmer near the top and colder near the base. Suggestions for storage (Fig.2-2): Eggs, butter, cheese, etc. -
Page 6: About The Freezer Compartment
Bottle Rack Height Adjustment Fig.2-6 Hold both sides of the bottle rack then lift and pull it straight out for cleaning or to change location (Fig.2-7). After cleaning, the bottle rack can be installed in the reverse manner, and the position can be adjusted according to the height of the food to be stored. -
Page 7: Fridge Freezer Controls
Fig.2-11 ArtNo.600-0015 - Fridge freezer control panel A – Quick freeze button, D – Refrigerator temperature display, G – Water lter reset button, B – Freezer temperature adjusting buttons, E – Refrigerator temperature adjusting buttons, H – Water lter indicator C –... -
Page 8: Dispenser Control
Water Filter Settings Fig.2-16 When the water lter indicator light is illuminated this means the water lter should be changed. After the water lter is changed, press the Water Filter RESET button (Fig.2-16) – the water lter indicator light will go out. reezer controls 3 Note: If the water lter illuminator light does not go out when the RESET button is pressed then try the following:... -
Page 9: Error Codes
Changing the Digital Display Mode Fig.2-21 You can change the digital display setting so that the display remains lit. To change the setting: Press the ‘ ‘ button until the lock indicator is lit ArtNo.030-0029 - DxD symbols (Fig.2-20). 88:88 Press and hold both the ‘... -
Page 10: Food Storage Tips
3. Food Storage Tips Tips on Storing Fresh Food • Melon, pineapples and bananas can go directly into the • Make sure that foods, which have been cooked and freezer after preparing, for storage over a longer period. require chilling, are at room temperature before placing them into the appliance. -
Page 11: Tips On Freezing Food
Tips on Freezing Food When storing commercially frozen foods, please follow these guidelines: • As with storing fresh foods, suitable packaging, correct temperature and food hygiene will enhance the quality • Always follow manufacturers’ guidelines for the length of time you should store food for. Do not exceed these of the food you are freezing. -
Page 12: Installation
4. Installation Positioning Your Appliance Fig.4-1 Choosing the Right Location ArtNo.600-0034 - Clearances This appliance should be installed in a room that is dry and well ventilated. To ensure adequate ventilation, the refrigerator should be at least 15 mm clear on all sides from kitchen cabinetry (Fig.4-1). -
Page 13: Adjustable Feet
Re t the cable, pipe, door and top cover in the reverse Fig.4-7 sequence. When removing the hinge and separating it from the door body make sure to support the door to stop it falling forward. Removing the Upper Freezer Drawer Open the drawer as far as possible. -
Page 14: Water Supply Connection
Water Supply Connection Fig.4-12 It is recommended to have this product installed by ArtNo.600-0045 - Fitting the water pipe 1 a quali ed technician. Cut the water pipe according to need and avoid bending the water pipe too much. Usually, the pipe length should be less than 5 m. -
Page 15: Cleaning And Maintenance
5. Cleaning and Maintenance Defrosting Fig.5-1 Defrosting is done automatically so there is no need to manually defrost this appliance. DO NOT use mechanical devices to accelerate the defrosting process. Cleaning Disconnect the appliance from the power supply before cleaning. To keep internal odours to a minimum it is best to periodically clean the inside shelves, crispers, bins and wall. -
Page 16: Shutting Off The Refrigerator
Changing the Water Filter Fig.5-2 Remove the old lter by turning the lter cartridge handle anti-clockwise (Fig.5-1). The cartridge will eject slightly from the lter housing (Fig.5-2). Air trapped in the system may cause water and the lter cartridge to eject. Use caution when removing. Pull out the cartridge from the lter housing. -
Page 17: When Not In Use
When Not in Use Fig.5-6 If you are not using the appliance for an extended length of time, it is recommended that you switch o the electrical supply, empty any food out, clean the inside of the appliance and leave the door ajar. This will save energy, and also prevent a build up of stale odours inside. -
Page 18: Troubleshooting
6. Troubleshooting Before calling for service, please rst read the following table: this could save you time and money. Problem Cause Solution The temperature is too low The temperature inside the 1.1.1 The temperature inside the 1.1.1.1 Set the temperature in the freezer slightly freezer is too low, with the fresh freezer section is set too low. - Page 19 Problem Cause Solution 3.2.1 3.2.1.1 Water droplets collect in the Humidity settings are set too It is normal for some wet air to collect inside the lower crisper drawer areas. high. enclosed crisper. To reduce the accumulation of moisture, lower the humidity setting and/or raise the fresh food compartment temperature.
- Page 20 Problem Cause Solution Cold water dispenser Cold water not dispensing. 6.1.1 The water supply pipe is not 6.1.1.1 Open the water supply line all the way. open. 6.1.2 The water lter is blocked. 6.1.2.1 Replace the water lter. 6.1.3 6.1.3.1 The water line is blocked.
- Page 21 Problem Cause Solution General The compressor does not work. 9.1.1 The refrigerator is in deep 9.1.1.1 This is normal for a refrigerator that goes into freeze cooling deep freeze automatically. The period of deep freeze cooling lasts about 30 minutes. 9.1.2 9.1.2.1 The refrigerator is not...
-
Page 22: Warranty/After Sales Service
7. Warranty/After Sales Service If consultation or technical assistance is needed, please provide the local authorised service agent with the purchase invoice and the product code/serial number. The product number/serial number is located inside the refrigerator on the top left-hand side. The 2 years free maintenance for the operation of the appliance started from the date of purchase of this product. -
Page 23: Technical Data
8. Technical Data • DocNo.600-0008 - Technical data - DxD 910 INSTALLER: Please leave these instructions with the user. DATA BADGE LOCATION: Left-hand side of the refrigerator compartment. COUNTRY OF DESTINATION: GB, IE. Dimensions Depth with open door 1050 ArtNo.600-0044 - DxD dimensions... - Page 24 Station Road, Ketley, Telford, Shropshire, TF1 5AQ, England. Tel: +44 (0) 8458 152020 Fax: +44 (0) 1952 222048 E-mail: warrantyteam@aga-web.co.uk w w w.a galiving.com...
Need help?
Do you have a question about the DxD 910 and is the answer not in the manual?
Questions and answers