Table of Contents
Advertisement
Quick Links
Advertisement
Table of Contents

Related Manuals for Hoover HVH 551


Summary of Contents for Hoover HVH 551
- Page 1 INSTRUCTIONS FOR USE AND INSTALLATION Glass Ceramic Hobs HVH 551 HVH 750...
-
Page 2: Table Of Contents
CONTENTS Safety instructions - Recommendations ..........3 Installation Important notice ................... 4 Fitting ....................4-5 Electrical connection ................. 6-7 Introduction The ceramic hob ................. 8 The cooking zones ................8 Choosing utensils ................8-9 The controls ..................10 . Switching on the ceramic hob ............11 . -
Page 3: Safety Instructions - Recommendations
SAFETY INSTRUCTIONS - RECOMMENDATIONS • It is strongly recommended to keep children away from the cooking zones while they are in operation or when they are switched off, so long as the residual heat indicator is on, in order to prevent the risks of serious burns. •... -
Page 4: Installation
However, if despite this recommendation, the consumer carries out the installation themself, HOOVER will not accept any responsibility in case of technical failure of the product whether or not it causes damage to goods and/or persons. -
Page 5: Fitting
FITTING: Fitting dimensions HVH 551 HVH 750 OPENING 10 X 10 cm Fitting the hob in a support unit Fitting the hob above a ventilated oven* (*equipped with a cooling fan for the electrical components) Opening Opening It is forbidden to fit the hob above... -
Page 6: Electrical Connection
«The installation receiving the appliance referred to must comply with the standard in force in the installation country». The HOOVER company does not accept any responsibility if this provision is not complied with. • All work in relation to the power supply cable must be carried out by the after sales service or someone with similar qualifications. - Page 7 . connect the power supply cable: . comply with the markings on the terminal board and the information of the table and install the shunts (the shunts, inserted in the terminal board, make a bridge between two terminals). . strip the end of each conductor and attach them to the terminals, complying with the information given in the table, .
-
Page 8: The Ceramic Hob
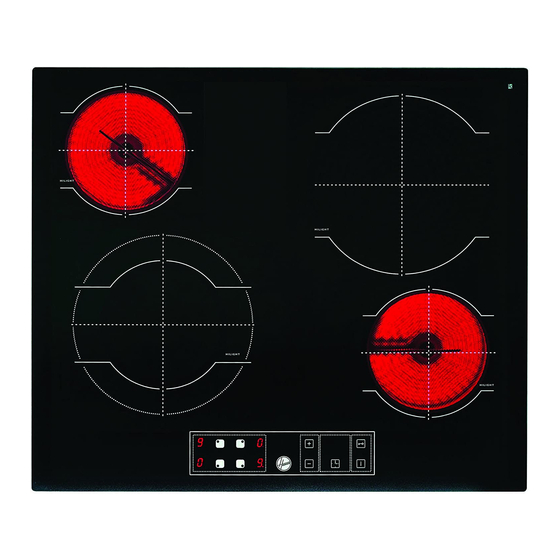
THE CERAMIC HOB HVH 551 HVH 750 HIGH LIGHT HIGH LIGHT HIGH LIGHT HIGH LIGHT 1200 W 1200 W 800 + 1500 W 2400 W HIGH LIGHT HIGH LIGHT HIGH LIGHT 1000 + HIGH LIGHT 1000 + 1200 W 1800 W... - Page 9 The following information will help you select the pans best adapted to obtain good results. e t t y l l o t t o t t t i l y t i t i l i f i n o t t i v i .
-
Page 10: The Controls
THE CONTROLS TOUCH SENSITIVE CONTROLS Hob on/off button Cooking zone selection button Heat level display “-” button “+” button Timer selection button Timer display Control locking button with indicator lamp Additional zone operational LED* 10. Cooking zone programming indicator: when displayed, it shows that the timer controls the cooking zone 11. -
Page 11: Switching On The Ceramic Hob
USING THE CERAMIC HOB • After powering up the hob, wait 8 seconds to activate the electronic controls. . Press the button , for 3 seconds. Electronic control of the hob is activated. In each display zone the heat level displayed and the control LED blinks. -
Page 12: Stopping A Cooking Zone
• STOPPING A COOKING ZONE The cooking zone must be live. In the display zone, the control LED must be on. If not, select the required zone again. . Press the button to display heat level 0. Now the zone goes off, the “0” indicator goes off after 10 seconds. -
Page 13: Programming A Cooking Zone
If the cooking zone is used without a pan or with an unsuitable pan: the display shows . The zone does not start. If no pan is detected after 10 minutes, the starting operation is cancelled. To stop the cooking zone, you must stop the hob normally, you cannot just remove the pan. -
Page 14: Locking Button Operation
• LOCKING BUTTON OPERATION The locking function holds the current settings, or prevents anyone from starting the hob. It is also used for cleaning the control strip as the controls can be locked without the hob being on. locking indicator lamp . -
Page 15: Cleaning The Ceramic Hob
CLEANING THE CERAMIC HOB • It is important to wait for the ceramic hob surface to cool completely before cleaning it. • Only use special products for cleaning ceramic surfaces, cream and scraper. You can find them easily in the shops. •... -
Page 16: Cleaning The Ceramic Hob
CLEANING THE CERAMIC HOB NOTE: . Avoid using a sponge with too much water. . Never use a steel tool like a knife or screwdriver. . A razor blade scraper cannot damage the surface if it is used at an angle of 30°. . - Page 17 All data is given for information only. In order to improve the quality of its products, HOOVER may modify its appliances with technological developments which adhere to the conditions set out in the Consumer Code. Ceramic hobs comply with the requirements of Directives 73/23/EEC and 89/336/EEC.
- Page 18 PROBLEMS AND SOLUTIONS The cooking zones do not • Only use flat-bottomed pans. If light is visible simmer or only fry gently. between the pan and the hob, the zone is not transmitting heat correctly. • The pan bottom should fully cover the diameter of the selected zone.
- Page 19 PROBLEMS AND SOLUTIONS The hob is not operating. • A big spill or object covers at least two buttons, for at least 10 seconds. Clean up the spill or remove the object. • The control panel is locked. Press the “Locking” button to release.
- Page 20 20 -...
Need help?
Do you have a question about the HVH 551 and is the answer not in the manual?
Questions and answers