Table of Contents
Advertisement
Advertisement
Table of Contents

Related Manuals for Xtreamer SideWinder


Summary of Contents for Xtreamer SideWinder
- Page 1 User Manual Ver.3.0.*. Firmware...
- Page 2 GB LAN and can be equipped with one 2.5” HDD. With Xtreamer SideWinder 2 media player you can bring your movies, music and images to your living room, get rid of that bulky DVD collection, access hundreds of internet feeds...
-
Page 3: Safety Notes
Safety Notes The following are to protect safety of user and to prevent damages to property. Use product properly after carefully reading the following contents. Violating instructions Violating instructions may lead Warning Caution may lead to serious to slight injury or damage to injury or death. - Page 4 Safety Notes The following are to protect safety of user and to prevent damages to property. Use product properly after carefully reading the following contents. Violating instructions Violating instructions may lead Warning Caution may lead to serious to slight injury or damage to injury or death.
-
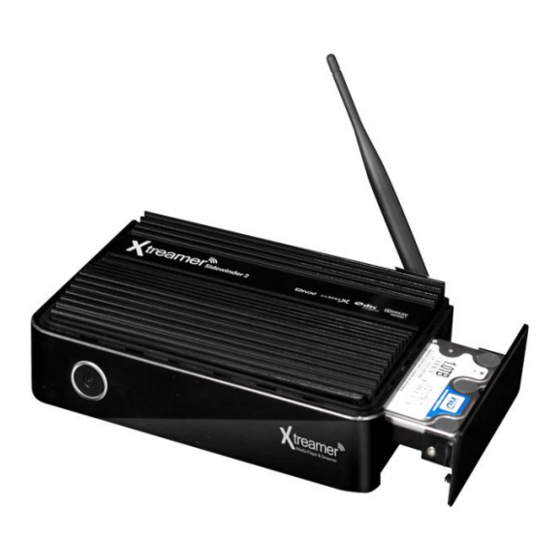
Page 6: Hard Disk Installation
Open the hard disk cover Connect the HDD guard to an HDD as shown on the picture. Fasten the screws. As shown here, slowly and carefully push the HDD guard together with the HDD into the main body of Xtreamer SideWinde 2. -
Page 7: Video & Audio Output Connections
Connections Video & Audio Output Connections ㆍHDMI cable connection Connect HDMI cable to HDMI terminal at the back of product. Connect the remaining cable terminal to HDMI terminal at the back of a digital TV. Make sure to carefully distinguish between input and output terminals. - Page 8 Connection ㆍComponent cable connection Connect the green, blue and red terminal cables to the Xtreamer SideWinder 2 and TV in accordance with the color scheme; connect white AV cable to L terminal, and red AV cable to R terminal. (Component cable is an optional item)
- Page 9 You can enjoy high-quality 5.1CH sound when connected to an amplifier or a receiver with optical cable. Connect optical cable to Optical port on Xtreamer SideWinder 2 as shown above. Then, connect to an amplifier or a receiver. ( Optical cable is optional ) ㆍCoaxial cable connection...
-
Page 10: Connect To The Network
Connection Connect to the Network ㆍWired and Wireless Network Wireless IP Sharing Router... - Page 11 Please remember to connect the cable before powering the player on. USB 3.0 Slave connection Please note. When Xtreamer is connected to a PC via Slave USB connection it stops being a media player and becomes an external storage device.
-
Page 12: Remote Control Functions
Remote Control Functions... - Page 13 General Remote Control Functions Power on / off POWER To add a selected media file to list / Eject for DVD EJECT Delete DELETE To enlarge and reduce screen/ repeatedly pressing for adjusting zooming percentage/moving to position of enlarged ZOOM output by using direction keys./ Setup the X,Y position on screen To select file in the same title or to execute shortcut to the...
- Page 14 To repeat file in play or to repeat all media files in the REPEAT corresponding folder To set zone repetition Turns On/Off LED part of Xtreamer SLEEP Can be used to set the timer to turn off the player 16:9...
- Page 15 Media Library Remote functions Button Description Up/Down Moving cursor Up (or Down). Navigation Key Left/Right Selecting among tap menus, and filtering file lists. Navigation Key - Single file playback - You can use “ENTER” button as multi selected folder after pressing Enter [ADD] button for your convenience.
- Page 16 Media Library Remote functions Button Description DELETE It deletes files and folders selected. Press once: You can see the current status of TVOUT. TVOUT Press more than twice: changes TVOUT type. VOL + / - Adjusts sound volume MUTE Mutes the sound SETUP You to the settings menu HOME...
-
Page 17: Movie Playback Function Of Media Library
Media Playback Remote functions Movie Playback Function of Media Library Usage of Remote Control key functions during playback Adjusting and viewing hidden TV screen are enabled so that you can enjoy watching the movies by visibility output. Button Description It modifies Scale, position, and Reset. 1. - Page 18 Media Playback Remote functions Movie Playback Function of Media Library Usage of Remote Control key functions during playback Button Description 1. Title: It shows movie title lists and change playback file. GOTO 2. Chapter: It provides moving to next (or previous) Chapter. 3.
- Page 19 Media Playback Remote functions Movie Playback Function of Media Library Usage of Remote Control key functions during playback Button Description It provides skip function during playback (refer to the above picture). ◀ : It goes 10 seconds backwards ▶ : It goes 30 seconds forwards. Navigation ▲...
- Page 20 Media Playback Remote functions Movie Playback Function of Media Library Usage of Remote Control key functions during playback Button Description AUDIO Use it to switch between multiple audio tracks . It supports selecting the points; Between A and B; the section is repeatedly played between the points.
- Page 21 Media Playback Remote functions Photos Function of Media Library Usage of Remote Control functions in “Photos” mode Button Description ENTER It confirms and shows photo files. PLAY It shows photo files. It displays EXIF information of photo file, which is being showed. INFO (JPEG/EXIF supported) It stops a “Slide Show”.
- Page 22 Media Playback Remote functions Music Function of Media Library Usage of Remote Control functions in “Music” mode Button Description ENTER It plays the music you put the cursor on. PLAY It plays all music. Can also be used to play all subfolders. PGUP/PGDN It plays next music file (or previous music file)..
-
Page 23: Basic Setup
Basic Setup 1. Adjusting output mode with TV output and Video output 1. Automatically adjust the TV output mode when connected via HDMI cable. Cycle through available resolutions. Remote Control Key: TVOUT // Press 2 times consecutively 2. . Connect Component / Composite cable Please note that video might suffer when connected via analogue. - Page 24 1080P 24Hz This feature allows you 1080P 24Hz output when playing Blu-ray files (BD); however, this function is only available when Xtreamer is connected using a HDMI cable to a TV that supports 24Hz frame rate. Note for 1080p 24p - TV, AV amp and media file you use must support 1080P 24Hz and your media file should be encoded 1080P 23.976fps.
- Page 25 Settings Video Aspect Ratio You will be able to select Aspect Ratio type of movie screen for playback. 16:9 Ratio converted to 4:3 Ratio is referred to as high definition TV. It will reduce PanScan 4:3 scan lines to 4:3. 16:9 Ratio converted to 4:3 Ratio is referred to as your TV.
- Page 26 Settings Audio HDMI Output Select a desired configuration for your digital audio output. SPDIF output Select a desired configuration for your optical audio output. Night Mode Outputting raw sound. It provides high-definition audio that is identical to, and every bit as spectacular as, the master recording.
- Page 27 On the Settings -> Network screen you can setup your Xtreamer SideWinder 2 to connect to your home network. You can use Wired or Wireless connection and give your Xtreamer a specific name under which it will appear on your Network.
-
Page 28: System Configuration
Time zone selected time zone of Xtreamer. Select your time zone. Day Light Saving Enable Day Light Saving option to synch the internal Xtreamer clock to your country. HDD Format This feature supports internal HDD format function. Formatted file system is divided into Linux Swap partition and NTFS partition. -
Page 29: Factory Default
Settings System configuration Screen Saver Timing This is to set the time for automatic changing images on your screen during periods of user inactivity. Screensaver is designed to prevent phosphor burn-in on the LCD TV when the properties of the exposed areas of phosphor-coating on the inside of the screen gradually and permanently change, eventually leading to ghost image on the screen. -
Page 30: System Service
FTP Server You will be able to set up “FTP Server” in order to improve optimizing its function of network application. Xtreamer has a built-in FTP service that you will be able to manage and copy files to and from it through FTP connection. -
Page 31: Firmware Upgrade
Or you can download the firmware file from our main site and install it Manually. IMPORTANT Every Xtreamer media player has its own specific firmware. Please make sure you download the correct file before running the upgrade procedure. -
Page 32: Look And Feel
. If you are not using Unicode encoded files, select your preferred language. Resume Play You can begin playing Xtreamer from the point where you previously stopped it. Your system saves a record of the scene that was playing when you stopped playback so it knows where to resume playing. - Page 33 Settings Search and Indexing Easily find your Media files Scan your local storage for media files in order to be able to find them easily in the Media Library. Use Automatic scan or press Rescan Storage to manually update the database.
- Page 34 Settings Jukebox Default Display Mode Choose a default view for your movie files when using Xtreamer Jukebox.
- Page 35 Choose a site Xtreamer Jukebox will use to provide information about your movie files. Movie Picture Scrapper Plugin Choose a site Xtreamer Jukebox will use to look for posters and cover arts for your movie files. Scrapping Method You can ask the Jukebox to fetch all the required information from the Internet or use a local database if you have one.
-
Page 36: Parental Control
Settings Parental Control Folder Lock Password This option allows you to provide password only access to designated files on your network. Locked folder will be accessible only by a password [Default PWD: 0000]. Make sure to change the password if you are planning to use this option. Hide Locked Folders You can also hide Locked Folders to protect your personal files. -
Page 37: Setting Up Wired Network
Settings Up Network on Xtreamer 1. Setting up Wired Network DHCP IP (AUTO) The Dynamic Host Configuration Protocol DHCP is a networking protocol used to automatically retrieve IP address assignments through Wired LAN. This feature is set as a default value so that IP address is automatically assigned by RJ45 connecting and rebooting. -
Page 38: Wireless Lan Setup
Settings Up Network on Xtreamer 2. Wireless LAN Setup 1. Choose Wireless Network option. 2. Select [Infrastructure (AP)]. 3. Select SSID type (available wireless network), you want to use. 4. Enter correct passkey, and then press [OK]. Note - Only “Web hex character codes” is supported. - Page 39 Settings Up Network on Xtreamer 2. Wireless LAN Setup 5. Navigate to OK button and press ENTER to test the connection. Device Name Use this option to give your Xtreamer a unique name under which it will appear on your local Network.
Need help?
Do you have a question about the SideWinder and is the answer not in the manual?
Questions and answers