La Crosse Technology Weather Station Instruction Manual
Hide thumbs
Also See for Weather Station:
- Instruction manual (181 pages) ,
- Faqs (11 pages) ,
- User manual (1 page)
Table of Contents
Advertisement
Quick Links
« Instant Transmission+» is the up and coming state-of-the-art new wireless transmission technology,
exclusively designed and developed by LA CROSSE TECHNOLOGY.
"IT +" offers you an immediate update of all your outdoor data measured from the transmitters: follow your
climatic variations in real-time!
INTRODUCTION:
Congratulations on purchasing this state-of-the-art weather station as an example of innovative design and quality piece of
engineering. Providing radio controlled time, date, calendar, Moon phase, indoor and outdoor temperature, indoor and outdoor
relative humidity, and air pressure history information. This unit will never keep you guessing on current and future weather
conditions. Operation of this product is simple and straightforward. By reading this operating manual, the user will receive a better
understanding of the Weather Station together with the optimum benefit of all its features.
FEATURES:
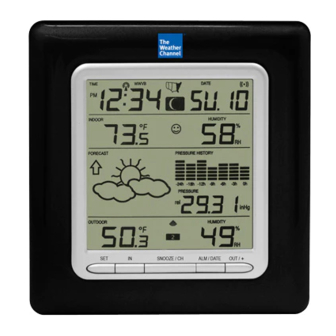
The Weather Station
LCD Display
DCF Radio controlled time with manual setting option
Time reception ON/OFF (user selectable)
12/24 hour time display
Time zone option ±12 hours
Weekday and day calendar display (year and month only in setting mode)
Alarm setting with snooze function
WEATHER STATION
Instruction Manual
Battery compartment
18
Function keys
Hanging hole
Stands
Advertisement
Table of Contents

Related Manuals for La Crosse Technology Weather Station


Summary of Contents for La Crosse Technology Weather Station
- Page 1 INTRODUCTION: Congratulations on purchasing this state-of-the-art weather station as an example of innovative design and quality piece of engineering. Providing radio controlled time, date, calendar, Moon phase, indoor and outdoor temperature, indoor and outdoor relative humidity, and air pressure history information. This unit will never keep you guessing on current and future weather conditions.
-
Page 2: To Install And Replace Batteries In The Weather Station
Low battery indicator Table standing or wall mounting The Outdoor Thermo-hygro Transmitter Remote transmission of outdoor temperature and humidity to Weather Station by 868 MHz Display alternately the outdoor temperature and humidity readings on LCD Shower proof casing Wall mounting case (Mounting at a sheltered place. Avoid direct rain and sunshine) -
Page 3: Battery Change
The outdoor temperature and humidity from the second transmitter and the "channel 2" icon should then be displayed on the Weather Station. If this does not happen after 2 minutes, the batteries will need to be removed from all the units and reset from step 1. -
Page 4: Dcf Radio Controlled Time
Unsuccessful 868MHz signal reception. Malfunction on the units. Batteries replacement. For resetting, remove all batteries from the units. Wait at least for 1 minute before powering up the Weather station again. Proceed from step 1 in “Setting Up”. DCF RADIO CONTROLLED TIME The time base for the radio controlled time is a Cesium Atomic Clock operated by the Physikalisch Technische Bundesanstalt Braunschweig which has a time deviation of less than one second in one million years. -
Page 5: Function Keys
FUNCTION KEYS: Weather Station: The Weather Station has 5 easy to use function keys: OUT/+ key SET key ALM/DATE key IN key SNOOZE/CH key SET key Press and hold the key to enter manual setting modes: LCD contrast, time zone, time reception ON/OFF, 12/24 hour display, manual time setting, calendar, temperature °... -
Page 6: Manual Settings
Transmitter identification number (if more than 1 transmitter is used) * When the signal is successfully received by the Weather Station, the outdoor transmission icon will be switched on. (If not successful, the icon will not be shown on LCD). The user can then easily see whether the last reception was successful (icon on) or not (icon off). -
Page 7: Time Zone Setting
Confirm with the SET key and enter the Manual time setting. MANUAL TIME SETTING: In case the Weather Station cannot detect the DCF-signal (for example due to disturbances, transmitting distance, etc.), the time can be manually set. The clock will then work as a normal Quartz clock. -
Page 8: Calendar Setting
Month and date (12hr time format) The date default of the Weather station is 1. 1. 2006. Once the radio-controlled time signals are received, the date is automatically updated. However, if the signals are not received, the date can also be set manually. -
Page 9: To Exit The Manual Setting Mode
Use the OUT/+ key to toggle between “hPa” or “inHg” unit Confirm with the SET key and enter the Relative air pressure value setting. Note: Units of weather icon sensitivity and air pressure history are not affected. They are always expressed in hPa. RELATIVE AIR PRESSURE VALUE SETTING The default relative pressure value is 1013 hPa (29.92 inHg). -
Page 10: Moon Phases Symbol
To stop the alarm, press any key during alarm ringing, except the SNOOZE/CH key. MOON PHASES SYMBOL The Moon icon of the Weather station will also display all 12 Moon phases throughout the year according to the set calendar. Large Waxing... -
Page 11: Weather Tendency Indicator
If the icons do not change, then it means either the air pressure has not changed or the change has been too slow for the Weather station to register. However, if the icon displayed is a sun or raining cloud, there will be no change of icon if the weather gets any better (with sunny icon) or worse (with rainy icon) since the icons are already at their extremes. -
Page 12: Air Pressure History (Electronic Barometer With Barometric Pressure Trend)
Note: For accurate barometric pressure trends, the Weather Station should operate at the same altitude for example, it should not be moved from the ground to the second floor of the house. Should the unit be moved to a new location, discard readings for the next 12-24 hours. -
Page 13: About The Outdoor Transmitter
Note: When the 868MHz signal is received correctly, do not re-open the battery cover of either the transmitter or Weather station, as the batteries may spring free from the contacts and force a false reset. Should this happen accidentally then reset all units (see “Setting up”... -
Page 14: Care And Maintenance
The foldout table stand leg is located on the backside. Pull the stand out from the bottom center edge of the weather station, below the battery compartment. Once the foldout table stand is extended, place the weather station in an appropriate location. -
Page 15: Liability Disclaimer
Outdoor temperature and humidity data checking interval: Every 4 seconds Transmission range : up to 100 meters (open space) Power consumption: (alkaline batteries recommended) Weather station 2 x C, IEC LR14, 1.5V Thermo-hygro transmitter : 2 x AA, IEC LR6, 1.5V Battery life...
Need help?
Do you have a question about the Weather Station and is the answer not in the manual?
Questions and answers