Phonak CP1 User Manual
Dect
Hide thumbs
Also See for CP1:
- User manual (45 pages) ,
- Quick setup manual (16 pages) ,
- Quick setup manual (14 pages)

Related Manuals for Phonak CP1


Summary of Contents for Phonak CP1
- Page 1 Cordless phone User Guide Manufacturer: Phonak AG Laubisrütistrasse 28 CH-8712 Stäfa Switzerland EU Representative: Phonak GmbH D-70736 Fellbach-Oeffingen Germany www.phonak.com...
-
Page 2: Table Of Contents
5.1 Making and ending a call 2. Getting to know the phone 5.2 Muting the handset microphone 2.1 Check the package content 5.3 Making a call with a Phonak hearing aid 2.2 How the phone works 5.4 Set the volume 2.3 Descriptions of the device 5.5 Setting ringtones... - Page 3 Contents 6.4 Other handset settings 10. Service warranty 6.5 Alarm clock function 10.1 Local warranty 6.6 Fitting the belt clip 10.2 International warranty 6.7 Reception strength indicator 10.3 Warranty limitation 6.8 Eco-mode 11. Compliance information 6.9 Battery status display 6.10 Multiple handsets for one base 12.
-
Page 4: Welcome
1. Welcome 2. Getting to know the phone The cordless phone DECT CP1 is a quality product 2.1 Check the package content developed by Phonak, one of the world’s leading Power supply with companies in the field of hearing technology. -
Page 5: How The Phone Works
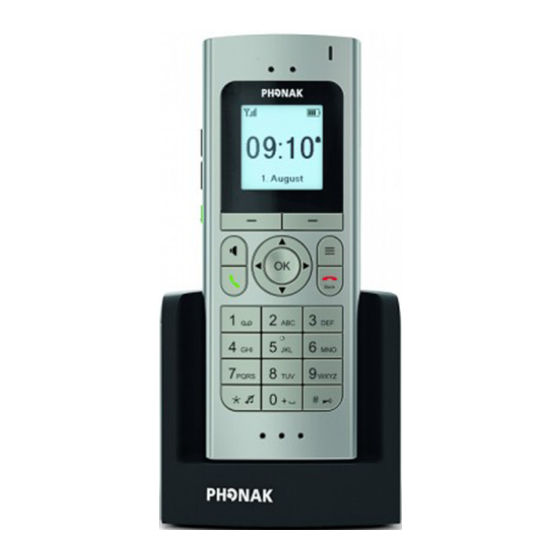
The base is connected to the telephone line and is also integrated wireless Phonak the charger for the handset. transmission technology makes telephoning with Phonak hearing aids much easier. a Charging contacts The phone signal is sent wirelessly to both hearing aids in digital b Power supply input quality. - Page 6 2. Getting to know the phone The handset a Receiver b Volume up / down c Volume boost Press 2 sec. = Hearing aid connectivity test (demo mode) d Hands-free on / off e Talk / repeat call f Press 2 sec.
-
Page 7: Hearing Aid Compatibility
2.4 Hearing aid compatibility a Context dependent functions b Elapsed time of call This product uses a dedicated wireless link to the Phonak c Phone number or name hearing aids. Please ask your hearing care professional d Active call indicator about the compatibility to your hearing aids. -
Page 8: Important Safety Information
3. Important safety information Please read the information on the following pages DECT CP1 EU version may NOT be used in the US and before using your Phonak DECT CP1. Canada as it causes and suffers from interference with US and Canada cellular networks, and for that These devices may only be repaired by an authorized reason is deemed illegal to use by the FCC and IC. - Page 9 Only insert a rechargeable battery that meets the specification in the Phonak DECT CP1 data sheet as The mini-USB port is to be used for the described inserting wrong batteries can damage the device purpose only.
-
Page 10: Getting Started
4. Getting started 3. Important safety information Please do not use a faulty base, or have it repaired 4.1 Setting up the power supplys by the Service Department, since it may disrupt other radio services. 1. Select the power adapter that corresponds to your country. -
Page 11: Connecting The Base
4.2 Connecting the base 4.3 Inserting the battery Put the base on a non-slip, flat surface in a central Only use the lithium ion battery provided by Phonak, place. as otherwise significant personal injury and damage to property may occur. -
Page 12: Charging The Handset
4. Getting started 4.4 Charging the handset 4.5 Changing the display language The handset must only be charged in its base. In order to function properly, the language, Language country, time and date need to be set. English You may place the handset into Deutsch the base after each call in order When you use the handset for the first... -
Page 13: Setting Date And Time
4. Getting started After setting the language for the first time, you The date and time are always saved in the base. Following a power cut, you must re-enter the date can do a test with your hearing aid. Please follow the and time. -
Page 14: Testing The Connection To The Hearing Aid
4. Getting started In this sub menu, you can also enter the Country area As soon as Playing demo … code, National area code International area appears on the display, bring code max. 25 cm / 10“ if these are not automatically shown correctly. the handset towards your hearing aids (max. -
Page 15: Transferring Existing Contacts
Then look for the contacts in your existing handset and transfer them to the base. Your contacts can stay on the Phonak base or they can be transferred to the Phonak handset ( Chapter 6.3). You can read more about phone settings in Chapter 6.4... -
Page 16: Everyday Use
5. Everyday use 5.1 Making and ending a call To accept a call In addition to the ringtone an incoming call is signaled by Making a call the flashing indicator light and vibration when enabled. S Enter the phone number you would like to dial on the number keypad. -
Page 17: Muting The Handset Microphone
Phonak hearing aids. will be disabled. No special configuration is needed for the hearing aid If your hearing aid does not work with wireless Phonak or the phone. However, your hearing care professional technology, you can still use it with an existing can fine tune the telephone program. -
Page 18: Set The Volume
5. Everyday use Holding the handset correctly 5.4 Setting the volume The microphone openings in the handset pick up your voice. So max. 25 cm / 10“ Use the volume keys on the side to set you need to hold the handset the volume during a conversation. -
Page 19: Setting Ringtones
5. Everyday use By pressing the Boost key again, the handset Now you can choose your settings: Tune switches back to the normal volume range and the Choose a ringtone from the list of 1–12, that you can volume Boost symbol disappears. hear clearly without your hearing aids. -
Page 20: Switching On / Off The Handset / Idle Mode
S To switch on, briefly press the End key or simply recommend always saving them in the same contact place the handset onto the base. list. The Phonak start logo will appear in the display and you will hear the Phonak start melody. - Page 21 5. Everyday use Recommendation: If you only use one handset on the If you store the numbers in the handset, you can also Contacts Handset. If you use different Tune Volume base, choose set the and the of the ringtone for this Default handsets on the base ( Chapter 6.10), choose contact...
-
Page 22: Looking Up Contacts
5. Everyday use 5.8 Looking up contacts If you have a lot of contacts, it is easier to look for a name directly, e.g. Mike, by first pressing key (for Speed dial „M“). Then the letter M and all names beginning with Use the number / letter keypad to go directly to the first „M“... -
Page 23: Using The Caller Id List
5. Everyday use 5.10 Using the caller list You can edit entries using the display keys: S Delete: Deletes the current entry from the caller list (of You can review the last 150 incoming, outgoing course, it won’t be deleted from the contact list). Calls Option Save: Saves the current entry to the contact... -
Page 24: Answerphone "Voice Box
5. Everyday use 5.12 Answerphone „Voice box“ Everyday use of the voice box If there’s a message waiting for you, there will Setting up the voice box be a signal from your network operator with the Voice box is the answerphone on your symbol and number of messages received. -
Page 25: Additional Features When Using The Phone
5. Everyday use 5.13 Additional features when using the phone Using a headset You can make calls using a headphone, or a headset with Hands-free a microphone, plugged into your handset with a 3.5 mm To go hands-free, switch on the loudspeaker stereo jack. -
Page 26: Handset Settings
6. Handset settings 6.1 Switching the key lock feature on / off 6.2 Switching on / off ring tones DECT 1 Key lock prevents unwanted or accidental use of the You can mute the phone for all calls 09:10 handset. (internal and external) with just one key if you do not want to be disturbed. -
Page 27: Other Contact List Functions
Only the first letter is capitalized Even Phonak will not be able to retrieve them. All letters are capitalized Lower case To add a space, use the... -
Page 28: Other Handset Settings
S Deactivated: This setting means the function key has If illumination is not completely switched off, it no purpose assigned to it. Line selection: This function is not available with the reduces battery time out of the base by about 10%. DECT CP1 base. -
Page 29: Alarm Clock Function
6. Handset settings Switching indicator tones on or off 6.5 Alarm clock function As well as the different ringtones, your handset also has Audio settings indicator tones for different events. Using You can set up 4 different alarm times on your handset. Indicator tones, you can switch these on or off: Programming one of the 4 alarms... - Page 30 6. Handset settings S Time: Use the number keypad to set the alarm time Alarm symbol on the display in hh:mm format. Change your entries with In sleep mode and when at least one alarm is active, the S Name: This name will appear in the alarm list later symbol will appear.
-
Page 31: Fitting The Belt Clip
6. Handset settings 6.6 Fitting the belt clip 6.7 Reception strength indicator To fit the belt clip to your handset, you need a small The antenna symbol shows the strength of reception Phillips-head screwdriver to attach the fixing screws. between the base and the handset. This depends on the distance and any furniture or walls between them. -
Page 32: Eco-Mode
6. Handset settings 6.8 Eco-mode When Eco-mode is switched on, call setup is delayed by about 2 seconds. Eco-mode can only be activated in Europe. Battery use in standby mode is around 50% higher The Eco-mode menu is only available when the when Eco mode is switched on. -
Page 33: Multiple Handsets For One Base
6.10 Multiple handsets for one base More than one cordless phone must be logged in to the base for the following functions! Up to 6 Phonak DECT CP1 handsets can be logged into Setting the handset name the base. As soon as more than one handset is logged into the The handset and the base that come together in one same base, the internal name of the handset, e.g. -
Page 34: Using An Existing Base
„DECT 5“, the external caller „Mike“ is put on hold and does not hear the conversation. If you already have another GAP-compatible DECT base, DECT 5 0:10 you can log the Phonak DECT CP1 handset into it. Brokering during a call Brokering Use the display key Option... -
Page 35: Changing The Battery
7. PIN-codes and resetting 6. Handset settings your settings 6.12 Changing the battery 7.1 Changing PIN codes If battery performance decreases noticeably over time, you can change the battery. As all telephone systems are programmed in the factory So that your phone functions properly, it is extremely with the PIN code „0000“, you can change this yourself important to only use an original battery (Li-Ion 3.7V, later to improve security:... -
Page 36: Resetting Your Settings
8. Troubleshooting 7. PIN-codes and resetting your settings 7.2 Resetting your settings Most probable cause Remedy The display is still dark You can reset all original settings for the base or the S Battery is not inserted S Insert battery handset, apart from the PIN code and the telephone book, S Battery is fully discharged S Put handset in charger... - Page 37 S Volume too low S Increase volume You can see other questions and answers (FAQs) on our website Phone does not ring www.phonak.com/dect. S Ringtones are switched off S Switch on ringtones or S Ringtones are too quiet S Increase volume...
-
Page 38: Information On Product Safety
9. Information on product safety Protect the device connectors, plugs, charging slot Special medical or dental examination including and power supply from dirt and debris. radiation described below, may adversely affect the correct functioning of your device. Remove and Never immerse the devices in water! Protect them keep it outside the examination room / area before from excessive moisture. -
Page 39: Service Warranty
10.3 Warranty limitation Please ask the hearing care professional, where you This warranty does not cover damage from improper purchased your Phonak DECT CP1, about the terms of the handling or care, exposure to chemicals, immersion in local warranty. water or undue stress. Damage caused by third parties or non-authorized service centers renders the warranty 10.2 International warranty... -
Page 40: Compliance Information
Phonak representative whose address can be for details. taken from the list on http://www.phonak.com (Phonak 3. If this equipment Phonak DECT CP1 causes harm to worldwide locations). the telephone network, the telephone company will notify you in advance that temporary discontinuance US and Canada: of service may be required. - Page 41 11. Compliance information 5. If trouble is experienced with this equipment Phonak 8. If your home has specially wired alarm equipment DECT CP1, for repair or warranty information, Service connected to the telephone line, ensure the can be facilitated through our office at: installation of this 1.9 GHz DECT Product for PSTN...
- Page 42 Changes or modifications made to this device not RENs on a telephone line may result in the devices expressly approved by Phonak may void the FCC not ringing in response to an incoming call. In most authorization to operate this device.
- Page 43 11. Compliance information Note: Specific Absorption Rate (SAR) information This device has been tested and found to comply SAR tests are conducted using standard operating with the limits for a Class B digital device, pursuant positions accepted by the FCC with the phone to Part 15 of the FCC Rules.
- Page 44 11. Compliance information Non-compliance with the above restrictions may result Under Industry Canada regulations, this radio transmitter in violation of RF exposure guidelines. may only operate using an antenna of a type and maximum (or lesser) gain approved for the transmitter by Privacy of communications may not be ensured when Industry Canada.
-
Page 45: Information And Explanation Of Symbols
12. Information and explanation of symbols The CE symbol is a confirmation by Important information for handling Phonak AG that this Phonak product and product safety. meets the requirements of the R&TTE Directive 1999/5/EC on Radio Operating The product is designed such that... - Page 46 12. Information and explanation of symbols The symbol with the crossed-out garbage bin is to make you aware that this device may not be thrown away as normal household waste. Please dispose of old or unused devices, at waste disposal sites intended for electronic waste, or give it to your hearing care professional for disposal.
Need help?
Do you have a question about the CP1 and is the answer not in the manual?
Questions and answers