Table of Contents
Advertisement
Quick Links
Advertisement
Table of Contents

Related Manuals for BAYweb BW-WT1


Summary of Contents for BAYweb BW-WT1
- Page 1 Owner's Manual [ S/N LABEL HERE ] Document # BW-WT4-1DOC...
- Page 2 BAYweb Thermostat Model BW-WT1 Owner's Manual Copyright © 2009-2010 Bay Controls, LLC Part Number: BW-WT4-1DOC Revision: 1.1 November 5, 2010 BAYweb is a registered trademark of Bay Controls, LLC. Patent pending technologies are used in the BAYweb Thermostat.
-
Page 3: Table Of Contents
Table of Contents Introduction......................1 About This Manual....................1 Safety Precautions....................1 Limited Warranty....................3 Limitation on Liability..................3 Unauthorized Repair...................3 Installation.......................4 Overview......................4 Identify Wiring.....................6 Install Control Module..................7 Install Thermostat Keypad................10 Test Operation....................12 Connect to the Internet..................13 Operation......................14 Using the Thermostat Keypad................14 Using the Web Portal..................15 Using Your Mobile Phone.................15 Occupancy Sensing..................15 Implementing Occupancy Sensing...............15... -
Page 5: Introduction
Introduction section, and those included at relevant points in other sections of this manual. Note that this manual is for the standard model thermostat (part number BW-WT1) with the generation control module (part number BW-BCU4-1). this manual is updated periodically. - Page 6 Bay Controls, LLC. expressly disclaims responsibility or liability for any injury or damage caused by failure to observe specified or other common safety precautions or failure to exercise ordinary caution, common sense, and due care required in installing and operating the thermostat even though not specified herein.
-
Page 7: Limited Warranty
Limited Warranty Subject to the limitations contained below, and except as otherwise expressly provided herein, Seller warrants to the Buyer that all tangible articles supplied by Seller or services provided by Seller will be free of defects in materials or workmanship under normal use and care until the expiration of the applicable warranty period. -
Page 8: Installation
Most conventional thermostats, probably including the one you are replacing, use a single wall mounted enclosure. The BAYweb thermostat uses two modules: the Thermostat Keypad and the Control Module. This design eliminates the use of batteries and potential need to pull new wire out to the wall, and results in a more compact and elegant design. - Page 9 The cable contains from 2 to 5 wires of different colors. Your BAYweb Thermostat installation is shown below. The Control Module is mounted near the furnace or air conditioner and is wired into the existing thermostat cable. The control module is powered from a standard outlet.
-
Page 10: Identify Wiring
Identify Wiring The objective of this step is to identify how your thermostat wiring is connected to your furnace or air conditioner, and to confirm that you have the correct model of the BAYweb Thermostat for your equipment. A) Turn off all power to your furnace and air conditioner. -
Page 11: Install Control Module
Install Control Module A) Find your thermostat cable where it goes into the furnace or air conditioner. This is the same cable identified in Step 1 and should be the same color and thickness as that cable. CAUTION: There may be other cables of similar color connecting other devices such as a humidifier. - Page 12 D) Confirm that the terminal screws are tight, the wires will not pull out of the terminals, and that there are not any shorts between terminals. CAUTION: It is very important to connect the thermostat cable to the correct connectors on the Control Module. If you connect the control module “Thermostat”...
- Page 13 The Control Module is mounted near the furnace where the thermostat cable is routed. You will connect the module to your network using standard Ethernet cable, or using the power line Ethernet adapters. Orient the Control Module so the Furnace/AC connector is on the side that goes to the furnace, mounting it “upside down”...
-
Page 14: Install Thermostat Keypad
Install Thermostat Keypad A) Remove the wires from your existing thermostat, taking care that the wires do not fall back into the wall. B) Remove the existing thermostat and any associated mounting hardware. C) Fill in any holes from the previous thermostat mounting and paint the wall if needed. D) Hold the Thermostat Keypad in the desired position and mark the location of the top mounting screw. - Page 15 Wall mounting location with the existing thermostat cable prepared to install the new Thermostat Keypad. If the ends of the existing wiring are worn or broken. Cut off the ends and strip about ¼ inch of insulation from the end of each wire. Now is a good time to touch up the paint if needed.
-
Page 16: Test Operation
Test Operation A) Plug the Control Module into the power outlet. B) Turn the power back on to the furnace/air conditioner. C) Verify that the “Power” and “Thermostat” lights are illuminated on the control module. If either one is not on, refer to the Troubleshooting section of this manual. D) Verify that the Thermostat Keypad is showing the temperature. -
Page 17: Connect To The Internet
Connect to the Internet Now that you have the thermostat in and working, it is time to connect it to the Internet to enable it's advanced capabilities. A) Connect the Control Module to the Internet. Plug one end of an Ethernet cable into the LAN port on the bottom of the Control Module and the other end into a port on a router or switch on your home network. -
Page 18: Operation
C) The BAYweb Thermostat does not require any configuration or programming of your networking equipment. You do not need to change security settings. Just plug it in and you are all set to go. D) In less than a minute the “Uplink” light should illuminate on the control module. If it does, your thermostat is on line and ready to go. -
Page 19: Using The Web Portal
Using the Web Portal The real power of the BAYweb Thermostat is realized by using the BAYweb Portal to access your thermostat. This portal can be accessed anytime from anywhere via web browser and Internet enabled mobile phone. Unlimited use of the portal is included at no charge. -
Page 20: Testing Occupancy Sensing
The thermostat can use wireless (X10 wireless protocol) or wired occupancy sensors. Bay sells a low cost wireless occupancy sensor that is ready to use with the BAYweb Thermostat. Just put in a couple of batteries and mount it in a location that typically sees activity when you are home. -
Page 21: Alerting
When the BAYweb Thermostat senses an alert condition it immediately sends a message to the BAYweb portal servers, which in turn emails the alert message to the list of recipients you may specify. Typically you will enter an email address that will deliver the alert message to your mobile phone via text messaging (SMS). -
Page 22: Reference
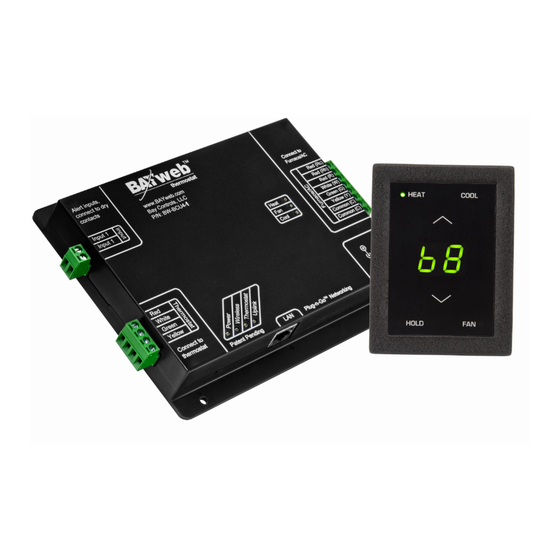
Reference Thermostat Keypad The Thermostat Keypad module senses the current temperature and provides an interface for manual control. Normally the displayed number (68 in this case) indicates the current temperature. To change the set point, press the up or down arrows. The display will switch to the current set point. -
Page 23: Control Module
Indicates that the temperature sensor in the keypad module has failed Indicates that DHCP (Dynamic Host Configuration Protocol) is not functioning on your home network Indicates that the control module has lost communication with the BAYweb portal Indicates that the non-volatile memory was corrupted or lost Control Module... -
Page 24: Thermostat Connector
Power Supply The power supply connector is used to power the BAYweb Thermostat if your furnace/AC does not provide the common power wire (“C” or “X” terminal). See installation Step 1D. Ideally the power supply should be plugged into the same circuit that powers the furnace/AC. -
Page 25: Troubleshooting
Our support email address is support@bayweb.com. If you need to speak to a support Representative, refer to the Obtaining Support section of this manual for contact information. - Page 26 Problem Solution Fan control does not function. ✔ Verify on the Thermostat Keypad that the Fan is selected ON. ✔ Verify on the Control Module that the Fan light is ON. ✔ Check the red and green wires between the Furnace/AC connector on the Control Module and your Furnace/AC.
- Page 27 Problem Solution Thermostat Keypad shows error code “E1”: ✔ Check the wiring and connections between the Thermostat Keypad and The Thermostat Keypad is not communicating Control module . Make sure all 4 with the Control Module. wires are connected. ✔ Try wiring the Thermostat Keypad directly to the Thermostat connector of the Control module.
-
Page 28: Emergency Operation
Problem Solution Wireless occupancy sensor not working. ✔ Verify the X10 ID settings – see the settings page on the thermostat applet. ✔ Verify the X10 ID settings of the sensor, refer to the instructions provided with the sensor. ✔ Check that the Wireless light on the Control Module turns ON when the sensor is activated. -
Page 29: Obtaining Support
419-891-4390 (Monday - Friday 8:00 AM – 12:00PM and 1:00PM – 5:00 PM EST) Thermostat Connections The following table shows all standard thermostat terminals and associated functions. Note that the BAYweb Thermostat uses the R, Rh, Rc, W, G, Y, and C terminals only. The others are shown here for reference. Terminal... -
Page 30: Specifications
Specifications Part Numbers: Thermostat package BW-WT1 (specify color) Thermostat Keypad: BW-T100 or BW-T110 (specify color) Control Module: BW-BCU4-1 System Types: Gas, oil, or electric heat with air conditioning Control Types: 1 stage heat, 1 stage cool Fan Control: Auto, On, auto with minimum circulation...
Need help?
Do you have a question about the BW-WT1 and is the answer not in the manual?
Questions and answers