Table of Contents
Advertisement
Advertisement
Table of Contents

Related Manuals for Gen IV Technology G4-XLAHD Series


Summary of Contents for Gen IV Technology G4-XLAHD Series
- Page 1 G4-XLAHD DVR User Manual...
-
Page 2: Table Of Contents
Welcome ..............................1 Important Safeguards and Warnings .....................1 Electrical Safety..........................1 Shipping Instructions ..........................1 Installation ............................1 DVR Repairs............................1 Environment ............................1 Accessories ............................1 Hardware Installation ..........................1 Inspect the DVR Packaging and Check Contents ................1 Accessory Kit Contents ........................2 HDD Installation..........................2 Rack Installation ..........................2 DVR Identification ..........................3 Front Panel ............................3 Back Panel ............................5... -
Page 3: Welcome
Welcome Thank you for purchasing the G4-XLAHD series DVR. This manual will help you to become familiar with your DVR in a short period of time. Topics include hardware installation, cabling connections, web operations and general operating instructions such as system setup, record setup, backup operations, alarm setup and PTZ operations. -
Page 4: Accessory Kit Contents
Accessory Kit Contents One (1) power cable One (1) Ethernet cable Four (4) SATA II data cables One (1) external audio extension cable One (1) remote control One (1) USB mouse One (1) CD containing the DVR manual, client software and software tools One (1) package of HDD installation screws, rack mounting brackets, etc Note: The contents of the accessory kit are subject to change without notice HDD Installation... -
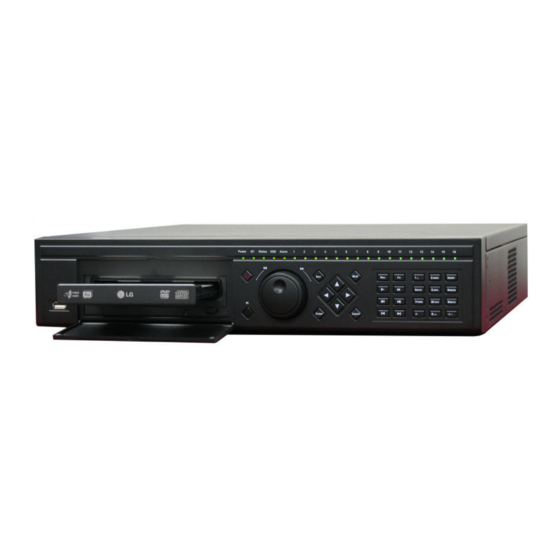
Page 5: Dvr Identification
DVR Identification Front Panel The front panel of the DVR is displayed below. Please refer to the following table for front panel button and indicator information. Button/Indicator Icon/Label Function USB Port USB connection for mouse or external storage device. Power Indicator Power Power indication light. - Page 6 In playback mode, return to monitor mode. • In monitor mode, brings up menu mode. • In menu mode, selects the current menu option. • Enter Enter In playback mode, executes the search using the • current parameters. In monitor mode, the right arrow will move forward one •...
-
Page 7: Back Panel
corresponding channel for time period matching the search result. Use with -/-- to change to channels 10- When entering text, enters the numbers or text shown • on the buttons. When entering text, cycle between lower case text, upper case Shift text, numbers and special characters. -
Page 8: Connection Sample
RS-232 port USB port for mouse or external storage device HDMI video output port VGA video output port Alarm/RS-485 connection block Composite video output port Composite video matrix output port Connection Sample The following is a sample of devices that may be connected to your DVR. Alarm/RS-485 Connection Block The Alarm/RS-485 Connection Block is displayed below. -
Page 9: Overview Of Navigation And Controls
Please refer to the following table for Alarm/RS-485 Connection Block information. Connection Label Description 1 – 16 Positive input lead from external alarm device. Device common ground. NO1/C1 – NO5/C5 Normally open alarm output ports 1 through 5. Normally closed alarm output port. CTRL 12V 12 Volt power output for external alarm device. -
Page 10: Main Menu
Main Menu After logging in, the system main menu is shown as below. There are a total of six icons: Search, Info, Setting, Backup, Advanced and Shutdown. You can move the cursor to highlight the icon and press Enter or left click the mouse to enter the sub-menu. Logout There are two ways for you to log out. -
Page 11: Recording Operation
Recording Operation Live Viewing After powering the DVR on, the system will be in live viewing mode by default. The system date, time and channel names will be displayed by default. If you want to change system date and time, you can refer to general settings (Main Menu ->... -
Page 12: Manual Record Menu
Highlight the icon to select the corresponding function. After completing the setup click the save button and the system will return to the previous menu. At the bottom of the Schedule menu, a color bar is shown for your reference. A green bar represents regular (continuous) recording, yellow represents motion detection recording and red represents alarm recording. -
Page 13: Snapshot
Resolution: The G4-HD series DVR supports various resolutions that you can select from the dropdown list. Supported resolutions are D1/CIF/QCIF. Please note that the resolution options may vary based upon channel number. Frame Rate(FPS): You may select the value for Frames Per Second. Frames per second values may vary based upon channel number and resolution. -
Page 14: Snapshot Image Storage
Activation Mode: Activation mode will create snapshots based upon motion detection or alarm events. In the General interface configure the upload interval to define how often snapshots are uploaded to the FTP server. In the Detect menu enable the snapshot function for specified channels. -
Page 15: Basic Operation
• A: external alarm triggered recording file. • M: motion detection triggered recording file • The G4-XLAHD and G4-RTAHD series DVRs support all channel concurrent playback windows. Please refer to the following table for control reference. Number Function Play Reverse... - Page 16 Select the file name from the search results in the file list portion of the screen and press the enter button or double click on the file name to view file content. Playback Starting from Exact Time To begin playback from an exact time, Input the time (h/m/s) in the search parameters column and then click the play button.
-
Page 17: Network Setup
Manual playback Click pause button in normal playback mode, play button ► to go to │ and │ frame by frame. you can use to view frame by frame. normal playback. Note: All of the operations here such as playback speed, channel, time and progress are related to the DVR hardware version. -
Page 18: Pan/Tilt/Zoom
Pan/Tilt/Zoom Please note the following regarding pan/tilt/zoom (PTZ) setup and operation: Slight differences may be found in the user interface, due to various protocols. RS-485 cables must be connected to the “A” (positive) and “B” (negative) ports of the alarm block in order to have PTZ control. - Page 19 Speed: value ranges from 1 to 8. Zoom Focus Iris Click the icons to adjust zoom, focus and iris. Click the directional arrows to control PTZ position. There are a total of 8 directional arrows. If you use remote control, you can only use four directions, up, down, left and right. You can click the Set button (or click REC button in the front panel) to set preset, tour, and pattern for the PTZ.
-
Page 20: Web Client Operation
Web Client Operation Slight difference may be found in the interface due to different model DVRs or different firmware versions. Network Connection Before attempting to connect to the DVR with the web client, check the following items: The DVR and PC are connected to the network and can see traffic. The light on the network interface port of the DVR and PC should be flashing.
Need help?
Do you have a question about the G4-XLAHD Series and is the answer not in the manual?
Questions and answers
my gen IV g4-atx-16 wont record