Table of Contents
Advertisement
Advertisement
Table of Contents
Troubleshooting

Related Manuals for Zounds ITC Kit

Summary of Contents for Zounds ITC Kit
- Page 1 ITC Kit User Manual...
-
Page 2: Table Of Contents
Table of Contents Welcome Kit Contents Descriptions Hearing aid • Remote control • Charging station • Getting Started Selecting two hearing aids • Initial charging • Selecting a foam sleeve • Inserting hearing aid in your ear • Removing hearing aid from your ear •... -
Page 3: Welcome
2 year warranty for any defects due to workmanship or materials. Please read this manual carefully to benefit from all the features of your new Zounds ITC Kit. Ask your Zounds Hearing Professional if you have any questions. -
Page 4: Kit Contents
Kit Contents Hearing Aid Pouch In-The-Canal (ITC) Hearing Aid(s) Remote Control Materials Folder Charging Station Travel Case Foam Sleeves... -
Page 5: Kit Contents
Kit Contents The following items are included with your Zounds ITC Kit: In-The-Canal (ITC) Hearing Aid(s) • Remote Control • Charging Station • Foam Sleeves • Hearing Aid Pouches • Materials Folder • Travel Case •... -
Page 6: Descriptions
Descriptions In this Section: Z1 Hearing Aid • Remote Control • Charging Station •... - Page 7 Descriptions Z1 ITC Hearing Aid (Side 1) Z1 ITC Hearing Aid (Side 2) Speaker Serial Number Foam Sleeve Face Plate Left/Right Indicator Directional Microphone Model Number Removal Cord Safety Tab = Right Year = Left Directional Microphone...
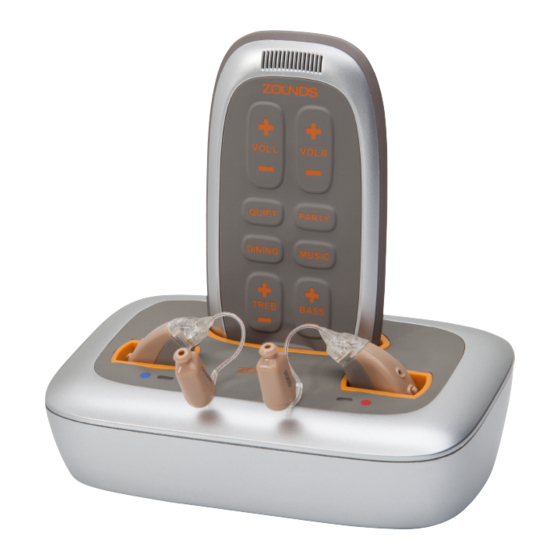
- Page 8 Descriptions Remote Control Speaker Volume Control Volume Control Left Hearing Aid Right Hearing Aid Presets Presets Treble Control Bass Control Reset...
- Page 9 Descriptions Power Cord Remote Control Pocket Remote Control Charging Status Light Left Hearing Right Hearing Aid Pocket Aid Pocket Right Hearing Aid Left Hearing Aid Charging Status Light Charging Status Light Left Hearing Aid Right Hearing Aid Indicator Indicator...
-
Page 10: Getting Started
Getting Started In this Section: Selecting two hearing aids • Initial charging • Selecting a foam sleeve • Inserting hearing aid in your ear • Removing hearing aid from your ear • Getting acquainted with your hearing aids •... - Page 11 Contrary to other brands, Zounds’ pricing makes it more affordable to buy two hearing aids. Wearing two Zounds hearing aids may help you: Understand More in Difficult Listening Situations Hearing with two ears improves your ability to discern wanted and unwanted sounds.
- Page 12 Getting Started When charging a device, the status light will be orange. If the status light does not light, make sure the device is properly and securely placed in the correct pocket of the charging station. When fully charged, the status light will turn green. 6) Note: Putting a device into the charging station will automatically turn the device OFF.
- Page 13 Only use Zounds foam sleeves. Sleeves from other manufacturers will not yield the • best performance or proper fit. Never insert Zounds hearing aids into your ear without a foam sleeve attached to the hearing aid. • Do not pull the safety tab to remove foam sleeve from hearing aid.
- Page 14 Getting Started Inserting hearing aid in your ear Check to see if the hearing aid already has a foam sleeve attached. If not, do not place hearing aid in ear. Ensure that you are using the proper left and right hearing aids. Your hearing aids are identified as follows: = Right hearing aid = Left hearing aid...
- Page 15 Getting Started Squeeze the foam sleeve with your thumb and fingers. The foam sleeve will momentarily be smaller in diameter. As the foam sleeve is in its smaller/squeezed state, hold the hearing aid between your thumb and forefinger. With your opposite hand, tug gently on your ear lobe and insert the hearing aid in your ear canal.
- Page 16 Pull hearing aid straight out of ear. Do not twist hearing aid out of ear. • Zounds foam sleeve is designed to securely attach to the hearing aid while inserting • and removing the hearing aid from the ear canal.
- Page 17 If you have worn hearing aids before, Zounds’ state-of-the-art technology will undoubtedly sound different as well.
-
Page 18: Daily Operation
Daily Operation In this Section: Using the remote control • Using the phone • Managing your rechargeable battery • Caring for your hearing aids & accessories •... -
Page 19: Using The Remote Control
Zounds hearing aids automatically adapt to different listening environments by adjusting the noise cancellation, feedback cancellation, and directional microphones. This is achieved with your initial programming by your Zounds Hearing Professional. However, Zounds remote control gives you the opportunity to fine-tune your hearing aids throughout the day or night. - Page 20 Zounds remote control fine-tunes each hearing aid individually. The remote control is designed to be used within 12 inches of each ear. Communication between the remote control and Zounds hearing aids will function best if you hold the remote control in your hand up to each shoulder.
- Page 21 Daily Operation Increase/Decrease Treble Press the TREB + button to increase the treble in your right or left hearing aid. Press the TREB – button to decrease the treble in your right or left hearing aid. Each individual press of the button increases or decreases the treble by individual increments.
- Page 22 Daily Operation Adjust Preset Zounds remote control allows you to select between 4 presets. Each preset adjusts the hearing aid algorithms to give you an optimal listening experience in specific environments. However, some prefer to stay in a specific preset throughout the day and night.
-
Page 23: Using The Phone
Most hearing aids require you to hold and/or tilt the phone receiver two or three inches from the ear or use a telecoil to prevent feedback or squealing. Because of Zounds revolutionary feedback cancellation technology, you can once again place the phone up against your ear. - Page 24 If power outlets are not easily accessible, the charging station is portable and can be • connected to an automobile power inverter. Automobile power inverters are available at most consumer electronic stores. Your Zounds kit also comes with a travel case to safely and easily transport your • accessories with you. Warnings: Only a Zounds Hearing Professional can replace the rechargeable battery.
-
Page 25: Caring For Your Hearing Aids & Accessories
Daily Operation Caring For Your Hearing Aids & Accessories Your hearing aids and accessories are sophisticated electronic devices. To ensure that you obtain the most from your hearing aids and accessories, you need to protect them from the effects that might damage or degrade their performance. The following describes the things that you can do to ensure maximum performance: Hearing Aids •... - Page 26 Daily Operation Charging Station • We strongly recommend that you store your charging station on a bedside table or dresser. Placing the charging station along with your hearing aids and remote control in the bathroom during bathing or showering increases the possibility of damage caused by moisture. •...
-
Page 27: Trouble Shooting
Trouble Shooting In this Section: Guide to symptoms, problems, solutions •... -
Page 28: Trouble Shooting
• • Charging Indicator Bring charger, remote, and Charger, remote, or hearing Lights Blinking aid malfunction hearing aid to a Zounds store • • No Lights On Plug in charging station to outlet Charging station not plugged in Charging Station... -
Page 29: Manufacturer's Warranty & Service
Manufacturer’s Warranty & Service In this Section: Warranty & Terms • Repair Information •... - Page 30 A claim for warranty service of a Covered Product must be made by contacting Zounds at the phone number listed below for referral to a Zounds retail location or Zounds Service Center. Unauthorized service on the Covered Product will void the warranty and Zounds makes no representation that a Covered Product may be repaired following unauthorized service.
-
Page 31: Warnings
Warnings In this Section: Warning to Hearing Aid Dispensers • Notice to Perspective Hearing Aid Wearers • Children with Hearing Loss • Other •... - Page 32 Warnings Warning to Hearing Aid Dispensers A hearing aid dispenser should advise a prospective hearing aid user to consult promptly with a licensed Physician before dispensing a hearing aid if the hearing aid dispenser determines through inquiry, actual observation, or review of any other available information concerning the prospective user, that the prospective user has any of the following conditions: •...
- Page 33 • Do not use your hearing aid in potentially explosive environments. • The rechargeable batteries and other internal parts of the hearing aid, remote control and charger are only serviceable by Zounds service personnel. Do not open the hearing aid or attempt to change the rechargeable batteries. Opening the product will void the manufacturer’s warranty.
- Page 34 Warnings • If you experience dizziness, drainage or bleeding from the ear, or sudden hearing loss, see your Physician immediately. • A hearing aid may cause an accelerated accumulation of cerumen (earwax). • Never put a hearing aid in your mouth as they could be swallowed. Keep hearing aids out of the reach of children, pets, and individuals with diminished metal capacity.
-
Page 35: Other Information
Zounds. The information contained in Zounds owner’s manuals is believed to be correct at the time of printing. Zounds reserves the right to change or modify any information or specifications without notice. The contents of Zounds user’s manuals are provided “as is”. - Page 36 www.ZoundsHearing.com ZoundsHearing.com P/N: 40016-000 Rev. A...
Need help?
Do you have a question about the ITC Kit and is the answer not in the manual?
Questions and answers