Table of Contents
Advertisement
Quick Links
MR45 OWNER'S MANUAL
CD/MP3/WMA Player
Sirius Ready
AM/FM Stereo Radio
Supports DMD (DMD - Digital Music Device
like iPod®, MP3 or Smartphone devices)
Play USB Music
Front and Back AUX-In
Flip Down Front Panel System
MR45C only)
(for MR45S and MR45C only)
(for MR45S and MR45D only)
(for MR45S and
Advertisement
Table of Contents

Related Manuals for poly-planar MR45

Summary of Contents for poly-planar MR45
- Page 1 MR45 OWNER’S MANUAL CD/MP3/WMA Player (for MR45S and MR45C only) Sirius Ready (for MR45S and MR45D only) AM/FM Stereo Radio Supports DMD (DMD - Digital Music Device like iPod®, MP3 or Smartphone devices) Play USB Music ...
-
Page 2: Table Of Contents
T A B L E O F C O N T E N T S Installation………………………………………………………………………..3 Wiring Diagram…………………………………………………………………..5 Button Description………………………………………………………………7 Basic Operation………………………………………………………………….8 Radio Operation…………………………………………………………………9 Sirius Operation………………………………………………………………..10 CD/MP3/WMA Operation……………………………………………………...12 iPod ® Operation……………………………………………………………….15 Auxiliary Operation……………………………………………………………16 USB Operation………………………………………………………………….16 Optional Accessories………………………………………………………….17 Troubleshooting………………………………………………………………..17 Technical Specifications……………………………………………………...18 Warranty Information………………………………………………………….20 Warranty Registration…………………………………………………………23... -
Page 3: Installation
I N S T A L L AT I O N IMPORTANT! Before mounting be sure there is sufficient room to accommodate the unit and that there is sufficient ventilation. Before installing the unit, connect the wiring temporarily making sure the system works properly. - Page 4 S t e p 2 ) 54mm S t e p 3 ) S t e p 4 )
-
Page 5: Wiring Diagram
S t e p 5 ) T o s u p p o r t t h e u n i t hex nut M5 mounting surface lock washer plain washer plain washer mounting sleeve mounting surface unit rear support strap tapping screw W I R I N G D I A G R A M (optional) - Page 6 Wiring Details: Use the wired plug end (Pigtail) provided to make power and speaker connections according to the diagram below. Using this connector will make it easy to disconnect the radio for adding additional features or service. Removing the factory plug end will void warranty. REM/ANT Trigger Wire Color Function...
-
Page 7: Button Description
Blue Wire - This wire outputs a 12V signal when the MR45 turns on. It is used to remotely turn on external amplifiers. Notes: Use the included plug/wire bundle to connect to the power source and speakers. The Yellow, Red and Black power wires should be 14AWG or larger depending on the length to the battery. -
Page 8: Basic Operation
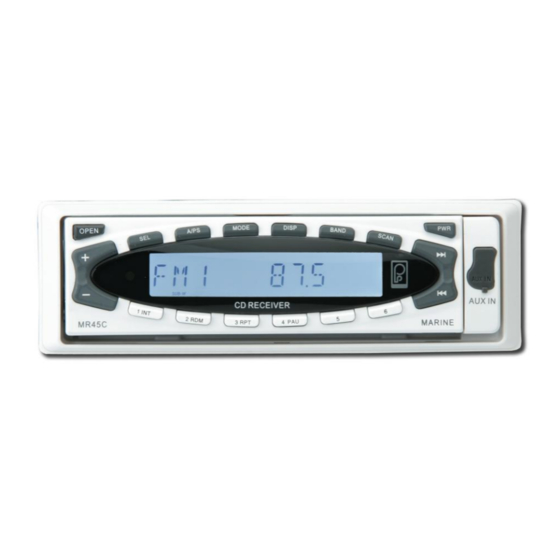
MUTE/OPEN - Mute Button (for MR45Donly) / Open Button (for MR45S/MR45C only) LCD Display SEL - Function Select Button A/PS - Auto Store and Preset Scan Button MODE - Mode Button DISP - Display Button BAND - Band Button SCAN – Scan Button PWR - Power Button 10. -
Page 9: Radio Operation
ZONE/STEREO/MONO/P-VOL FUNCTION Press and hold SEL button for 5 seconds to enter menu select function then press + or - button to adjust desired setting. Press SEL button again to select different functions. Unit will return to normal previous display if left untouched for 5 seconds. -
Page 10: Sirius Operation
SELECTING A STATION Press button to select a station. To use manual tuning, press and hold button. AUTOMATIC MEMORY STORING & PRESET SCAN (A/PS) The PRESET buttons can be used to store 6 stations in each band (FM 1, FM 2, FM 3 and AM1, AM2) for convenient access to your favorite stations. ... - Page 11 Press MODE button to change to SIRIUS mode. If there is no SIRIUS TUNER connected this mode will be skipped. Please connect your SIRIUS Tuner to the SIRIUS port located at the back of the unit. Then press MODE button to change to SIRIUS mode. SELECTING A CHANNEL Press button to select a channel.
-
Page 12: Cd/Mp3/Wma Operation
3. Repeat steps 1 and 2 to program additional channels. PARENTAL CONTROL You can lock any Sirius channels you do not want others to have access without your permission. The default code is "5220". In case you forget your code please disconnect the unit completely from the power. GUIDE ON HOW TO ENTER THE CODE USING THE PRESET BUTTONS Press preset 1INT button five times to enter 5, press preset... - Page 13 up. The CD will be drawn inside and will play automatically once inserted. If a CD is already inserted in the driver: Press MODE button to change to CD mode. SELECTING SONGS Press button to select a song. Press and Hold button to fast forward or rewind a song.
- Page 14 resume play. EJECTING A DISC To remove a disc, open the disc cover and press button. Remove CD from the driver and close disc cover. DISC NOTES A. Notes on discs: Attempting to use non-standard shape discs (e.g. square, heart) may damage the unit.
-
Page 15: Ipod ® Operation
I P O D ® O P E R AT I O N SWITCHING TO IPOD® MODE Please Note: You need iPC4580 cable (sold separately) before you can connect your iPod® to this unit. If an iPod® device is already connected: Press MODE button to change to IPOD®... -
Page 16: Auxiliary Operation
A U X O P E R AT I O N SWITCHING TO AUX MODE This unit can be connected to any portable devices such as an iPod®, MP3 Players, TV or DVD through the AUX IN jack on the front or at the back of the unit. -
Page 17: Optional Accessories
COMPATIBLE ACCESSORIES (sold separately) MR45R Wired Remote Control – connect to the back of the unit labeled ―TO MR45R‖. You can add up to 2 MR45R in conjunction with CMR-Y7. MRR21 IR Wireless Remote Control - the IR eye is located next to the volume button and must be in line of site for the remote to operate. - Page 18 Unit not playing CD CD is extremely dirty or Clean the CD or try damage CD, laser to play a new one, head is dirty, CD was clean the laser head, inserted in reverse insert the CD with the direction or the ambient label facing upward, is too high allow to cool the unit...
-
Page 19: Technical Specifications
T E C H N I C A L S P E C I F I C AT I O N S CD Player SPECIFICATION Signal to Noise Ratio >80dB Frequency response 20Hz-20KHz Channel Separation >65dB A/D converter 16Bit Electronic anti shocking CD 20S/MP3 60S TUNER(AM) Frequency Range... -
Page 20: Warranty Information
LIMITS OF LIABILITY Proof of date of purchase is required for warranty service of this unit. Poly-Planar will consider this warranty void if unit has been tampered or has had serial number altered, defaced or removed. Poly-Planar warranty does not cover damage occurred in transit, accident, abuse, misuse, negligence, fire, flood, lightning, or unauthorized service. - Page 21 NOTES:...
- Page 22 NOTES:...
Need help?
Do you have a question about the MR45 and is the answer not in the manual?
Questions and answers