Table of Contents
Advertisement
J
J
TECHNOLOGY
T
T
G
G
T
G
W I N
W I N
W I N
E A R
E A R
E A R
™
E
WITH
XCLUSIVE
HEAVY DUTY
INSTRUCTIONS
WARRANTY
OWNERSHIP REGISTRATION
IMPORTANT SAFETY INSTRUCTIONS
SAVE THIS MANUAL-KEEP IT HANDY FOR QUICK REFERENCE
N e w M o d e l !
A Green Power
C
O M P L E T E
G
G
REEN
REEN
E
E
UICE
UICE
OPERATION MANUAL
Juice Extractor
®
G
T
U I D E
O
S
S
TAR
TAR
XTRACTOR
XTRACTOR
DO'S AND DON'TS
WHEN YOU NEED SERVICE
RECIPES
Advertisement
Table of Contents

Subscribe to Our Youtube Channel
Related Manuals for Green Star JUICE EXTRACTOR


Summary of Contents for Green Star JUICE EXTRACTOR
-
Page 1: Juice Extractor
N e w M o d e l ! A Green Power Juice Extractor ® O M P L E T E U I D E REEN REEN UICE XTRACTOR UICE XTRACTOR TECHNOLOGY W I N W I N W I N... - Page 2 – from carrots and apples, to wheatgrass and pine needles, all without having to stop and change any parts! You can also use your Green Star Juice Extractor to make other delicious foods such as pastas, baby foods, breadsticks, nut butters, pâtés, frozen fruit sorbets, and much more!
-
Page 3: Table Of Contents
Warranty Warranty Registration Card Insert When You Need Service Important Safety Instructions Do’s and Dont’s Green Star Juice Extractor Features Standard Parts Parts Order Form Assembly and Disassembly Setting Up Your Green Star Screens and Plastic Plunger To juice Wheatgrass To make Pasta, Rice Cake (mochi), Bread Sticks, Bagels, etc. - Page 4 We warrant to you, the end-user customer who has properly registered after purchasing the Green Star Juice Extractor (hereinafter referred to as “GS”) for a valuable consideration, that the plastic parts, motor and the Twin Gears of this GS will be free from defects in materials and workmanship for a period of five (5) years from the date of purchase.
- Page 5 Please initial here if you would not like us to send you important product updates and announcements: If you have comments or suggestions about our product, please write to: Green Star Customer Relations, P.O. Box 4089, Cerritos, CA 90703...
-
Page 6: Warranty
® GP-E1503 ® Off-White ® Ivory Phone c. Serial# OPTIONAL SURVEY Occupation: How did you learn of Green Star? (Please check only one.) ® Homemaker ® Clerical or Service Worker ® Professional/Technical ® Received as Gift. ® Consumer Magazine ® Tradesman/Machine... -
Page 7: When You Need Service
Returns will NOT be accepted without an RMA number clearly written on the box. l Pack your Green Star securely in the original shipping box. Make sure all affected parts are enclosed. -
Page 8: Important Safety Instructions
17. Do not disassemble any parts other than those necessary for normal operation or cleaning of your juice extractor (such as housing, twin gears, screen). 18. Your Green Star Juice Extractor must be grounded electrically for proper, safe operation. Use only the 3-prong plug provided. Or use a proper plug or adapter according to the electrical safety code in your country. -
Page 9: Do's And Dont's
DO’S AND DON’TS DO : DON’T : Very important! When combining Do not lift your Green Star Juice Do not keep the juice extractor the Twin Gears for assembly Extractor with wet hands because where children can reach it. make sure to align the locating... -
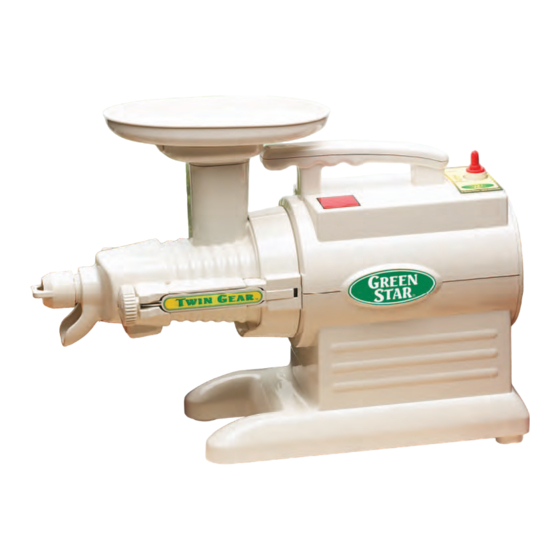
Page 10: Green Star Juice Extractor Features
GREEN STAR JUICE EXTRACTOR Outlet Adjusting Knob Screen Pulp Outlet Juice Outlet Pulp Discharge Casing Standard Parts for GS-1000: Homogenizing Fine Screen Juice Pitcher Cleaning Brush Plastic Plunger Wooden Drive Gear Free Wheel Blank Plunger Gear (Open Blank) CJST1-032A CJST1-034A... - Page 11 FEATURES AND PARTS Safety Tray Convenience Handle Power Switch Feeding Chute Twin Gear Housing Drive Gear Main Body (Motor Unit) Free Wheel Gear Power Cord Storage Latching Arm Knob Compartment Speed Reducer Cover Latching Arm GS-2000 includes GS-1000 parts, plus: Coarse Screen S/S Strainer Drip Tray...
-
Page 12: Parts Order Form
Call (714) 879-7150 for pricing information and send this order form along with your method of payment in a stamped envelope to the nearest Green Star Service Center or to: Tribest Corp., P.O. Box 4089, Cerritos, CA 90703. DO NOT SEND CASH! -
Page 13: Assembly And Disassembly
GREEN STAR ASSEMBLY Safety Reminder: Make sure to unplug the machine before assembling. 1. Slide the Twin Gear Housing onto the main body with the Latching Arm Knobs loosened and the Latching Arms open. Insert the Feeding Chute into the Twin Gear Housing “neck”, with the small... - Page 14 GREEN STAR ASSEMBLY (Cont’d) 3. Slide the desired Screen or Blank over the Twin Gears and into the Twin Gear Housing. 4. Slide the Pulp Discharge Casing over the Twin Gear Housing. 5. Close each Latching Arm and tighten by turning both Latching Arm Knobs clockwise.
- Page 15 GREEN STAR DISASSEMBLY Safety Reminder: Make sure to unplug from the outlet before disassembly 1. Remove the Safety Tray by lifting it vertically from the Feeding Chute. 2. Turn the Outlet Adjusting Knob counter- clockwise until it separates from its threads;...
- Page 16 GREEN STAR DISASSEMBLY (Cont’d) 5. Remove the Screen. The Twin Gears may come out with it. Be careful not to drop the Twin Gears. 6. Slide the Twin Gears out. 7. Remove the Twin Gear Housing by gently pulling it away from the body of the machine.
-
Page 17: Screens And Plastic Plunger
Juicing Wheatgrass (Also Barley Grass, Alfalfa & Others) 1. Assemble Green Star with the Fine Screen for maximum juice extraction and pulp separation. 2. Tighten the Outlet Adjusting Knob completely. -
Page 18: Bread Sticks, Bagels, Etc
Pasta Guide Pasta Screen Making Breadsticks, Bagels, Rice Cakes (Mochi), etc. 1. Assemble Green Star with the Bread Stick Blank instead of the fine screen. 2. Attach the Pulp Discharge Casing to the Twin Gear Housing, thus locking the Bread Stick Blank into position. -
Page 19: Cleaning And Maintenance
Make sure the machine is switched off and unplugged from the wall. Store the cord in the Cord Storage Compartment. Because your Green Star Juicer extracts calcium and other minerals from the fruits and vegetables, it is essential to wash your juicer parts immediately after use;... -
Page 20: Troubleshooting
1. Unplug the juicer and store the cord in the Cord Storage Compartment. 2. Locate the square plate on the bottom of the GS Juice Extractor. Using a small Phillips Head screwdriver, remove the two screws that hold the plate in position. Remove the square plate. -
Page 21: Helpful Hints
HELPFUL HINTS NOISES Even though the Green Star juicer is very quiet, some noises are normal during operation. If you are unsure whether the noises you are hearing are normal: 1. Completely disassemble your Green Star and turn on the motor. You will hear a normal humming motor sound. - Page 22 HELPFUL HINTS CLEAN UP Keeping your juicer clean is extremely important for both your health and the peak performance of the machine. We recommend cleaning the juicer immediately after each use, before food particles have a chance to dry out. However, if you want to juice throughout the day in multiple sessions without disassembling the machine, completely remove the Outlet Adjusting Knob, place a large bowl under both the Juice Outlet and the Pulp Discharge Outlet, and pour about 16 ounces of water through the feeding chute...
- Page 23 4. Other Helpful Hints - Use the narrow, pointed end of the cleaning brush to push food through out through the pulp discharge outlet. - Dried fruits and nuts can be very sticky on the inside surfaces of the juicer. To remove the residue more easily run a couple of stalks of celery through before disassembling the machine.
-
Page 24: Recipe Index
RECIPE INDEX JUICE AND DRINKS Citrus Blend Apple Lemonade Wheatgrass Delight Ambrosia Nectar Watermelon Quench Mellow Melon Punch Snappy Apple Dr. Wallker’s Choice(#61) Green Tang Oriental Express RYE BREAD STICKS AND MOCHI(RICE CAKE) PASTA AND NOODLES PÂTÉ AND CROQUETTE Cashew, Curry Croquettes Pecan Pleasers SOUP Beef Borscht... -
Page 25: Juices And Drinks
JUICES AND DRINKS MACHINE SETUP FOR ALL JUICES AND DRINK RECIPES: 1. Place the Twin Gears in position 2. Use the Fine Screen 3. Tighten the Latching Arm Knobs snugly. 4. Tighten the Outlet Adjusting Knob completely. 5. Put glass Juice Pitcher under the Juice Outlet. 6. -
Page 26: Ambrosia Nectar
JUICES AND DRINKS (Cont’d) (See page 15 for machine set-up) Ambrosia Nectar BUNCHES GRAPES APPLES (FUJI, GRANNY SMITH, OR PIPPIN - cut into 6 pieces) KIWI (peeled and cut into 2 pieces) SLICE HONEYDEW (cut into cubes) SLICE PINEAPPLE (cut into cubes) WHOLE LEMON (peeled and cut into 4 pieces) CRANBERRIES... -
Page 27: Mellow Melon Punch
JUICES AND DRINKS (Cont’d) (See page 15 for machine set-up) Mellow Melon Punch CANTALOUPE (cut into cubes) HONEY DEW (cut into cubes) SLICES WATERMELON (cut into cubes) Juice all together and enjoy Snappy Apple APPLES (FUJI, GRANNY SMITH, YELLOW DELICIOUS - cut into 4 to 6 pieces) JALAPEÑO LIME... -
Page 28: Green Tang
JUICES AND DRINKS (Cont’d) (See page 15 for machine set-up) Green Tang PINEAPPLE WEDGES (cut into smaller pieces) SPRIG MINT HANDFULS WHEATGRASS LEMON SLICE GINGER FOR FLAVOR 1. Juice wheatgrass 2. Juice mint 3. Juice lemon 4. Juice pineapple cubes Note: A Pineapple wedge is a 1”... -
Page 29: Bread Sticks And Mochi (Rice Cakes)
BREADSTICKS AND MOCHI (RICE CAKE) MACHINE SETUP: 1. Place the Twin Gears in position 2. Use the Rice Cake Blank (Closed Blank) instead of Screens 3. Put the Pulp Discharge Casing into position 4. Tighten the Latching Arm Knobs snugly 5. -
Page 30: Pasta And Noodles
PASTA AND NOODLES MACHINE SETUP: 1. Attach the Twin Gear Housing to the main body 2. Insert the Pasta Screw onto the motor drive shaft (left side as you are looking into the body) 3. Place the Pasta Guide over the Pasta Screw, making sure the long side of the Pasta Guide is on the left 4. -
Page 31: Pâté And Croquettes
PATÉ AND CROQUETTES MACHINE SETUP: 1. Place the Twin Gears in position 2. Instead of the Juicing Screen, use the Homogenizing Blank 3. Tighten the Latching Arm Knobs snugly 4. Tighten the Outlet Adjusting Knob 5. Place a bowl under the Juice Outlet Cashew-Curry Croquettes CUPS CASHEWS... -
Page 32: Soups
SOUP MACHINE SETUP: A. To Juice Carrots, Lemon, And Apple 1. Place the Twin Gears into position 2. Use the Fine Screen 3. Tighten the Latching Arm Knobs snugly B. To Grind Beets And Scallions 1. Place the Twin Gears into position 2. -
Page 33: Desserts
DESSERT MACHINE SETUP: 1. Place the Twin Gears in position 2. Use the Homogenizing Blank 3. Put the Pulp Discharge Casing into position 4. Tighten the Latching Arm Knobs snugly 5. Tighten the Outlet Adjusting Knob 6. Place a bowl under the Juice Outlet Cashew Poppy SPROUTED WHEAT BERRIES (soak for 12 hours until small sprout tips emerge) - Page 34 PRODUCT STANDARD ITEM VEGETABLE JUICER MODEL GREEN STAR ® USA Models : 120Vac, 60Hz, 180W ELECTRICITY RATING EUROPE/ASIA : 220~240Vac, 50/60Hz, 120~140W SIZE 476mm x 165mm x 306mm WEIGHT 8.7kg...
- Page 35 V0711GS Updated in July 2011.. This version supersedes all former manuals issued before this date.
Need help?
Do you have a question about the JUICE EXTRACTOR and is the answer not in the manual?
Questions and answers
Juice comes out with a lot of foam
The Green Star Juice Extractor can produce juice with a lot of foam when juicing wheatgrass, as certain batches of wheatgrass may naturally generate more foam than others. If excess foam is observed, it may be necessary to find a different source of wheatgrass. Additionally, alternating wheatgrass with carrots while juicing can help minimize foam production.
This answer is automatically generated