Table of Contents
Advertisement
Quick Links
Advertisement
Table of Contents

Related Manuals for Nokia PT-3


Summary of Contents for Nokia PT-3
- Page 1 Nokia Fun Camera PT-3 User Guide 9356921 Issue 2...
- Page 2 Nokia reserves the right to revise this document or withdraw it at any time without prior notice The availability of particular products may vary by region.
-
Page 3: Table Of Contents
2. Using the camera....................9 Taking a picture ............................9 Using the flash ............................10 Transferring pictures to a compatible phone ..................10 Using the keys and display settings .....................12 Care and maintenance ..................14 Battery information ....................15 © Copyright 2003 Nokia. All rights reserved. -
Page 4: Introduction
Introduction The stand-alone Nokia Fun Camera PT-3 enables you to take pictures while on the move. To view pictures taken with the Nokia Fun Camera PT-3, you need a compatible mobile phone with a Pop-Port connector, such as the Nokia 3100, Nokia 6100, Nokia 6610, Nokia 6800 or Nokia 7210. -
Page 5: Getting Started
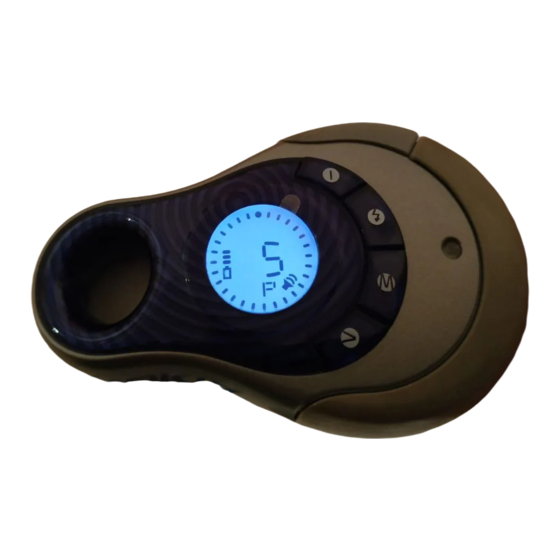
1. Getting started ■ Overview The Nokia Fun Camera PT-3 consists of the following parts: 1. Viewfinder hole 2. Trigger and menu selection confirmation 3. Power key 4. Flash key 5. Menu key 6. Arrow key 7. Display with backlight 8. -
Page 6: Optical Viewfinder And Strap
To use the strap, thread the strap through the holes as in the picture above and tighten it. ■ Inserting batteries The Nokia Fun Camera PT-3 uses 2 AAA batteries as its power source. See also Battery information on page 15. -
Page 7: Display
4. Close the battery door. 5. Close the lid. ■ Display The Nokia Fun Camera PT-3 has a display with a backlight. When the camera is switched on, the display shows the memory and battery capacity and preselections with icons. The default settings on the display are shown in the picture. - Page 8 • The LED is red and blinking, there is an error in the camera. Note that the icon corresponding to where the error is also blinks. • The LED is red and continuously on, you have taken a picture with low battery capacity. © Copyright 2003 Nokia. All rights reserved.
-
Page 9: Using The Camera
12 photo quality pictures . See Using the keys and display settings on page 12. Note that when taking pictures, the camera must not be connected to a compatible phone. © Copyright 2003 Nokia. All rights reserved. -
Page 10: Using The Flash
■ Using the flash The Nokia Fun Camera PT-3 has a key for its flash, . When you switch the power on, the flash is switched on by default. The letter A is shown next to the flash icon . In Auto mode, the flash checks the current light conditions and uses the flash when needed. - Page 11 Depending on your phone, you can send the picture to a computer by e- mail or transfer it using either a data cable, Bluetooth or an infrared connection and a PC Suite (the PC Suite may be provided on a CD ROM with the phone). © Copyright 2003 Nokia. All rights reserved.
-
Page 12: Using The Keys And Display Settings
After picture transfer, disconnect the camera from your phone and close the connector lid. ■ Using the keys and display settings The Nokia Fun Camera PT-3 has the following keys: • menu key to view and scroll through the menu settings. The different settings are indicated by icons on the display. - Page 13 On or Off. If Off is selected, all sounds are switched off. • Send activated and available only when the camera is connected to a compatible phone. Shows the number of pictures to be transferred. © Copyright 2003 Nokia. All rights reserved.
-
Page 14: Care And Maintenance
• Use a soft, clean, dry cloth to clean any lenses. If your device is not working properly, take it to your nearest authorized service facility for service. Only qualified personnel may install or repair this device. © Copyright 2003 Nokia. All rights reserved. -
Page 15: Battery Information
Short-circuiting the terminals may damage the battery or the connecting object. Do not dispose of batteries in a fire! Dispose of batteries according to local regulations. Please recycle when possible. Do not dispose of as household waste. © Copyright 2003 Nokia. All rights reserved. - Page 16 Product (”Customer”). It shall neither exclude nor limit i) any mandatory statutory rights (iii) the Product was not returned to Nokia or its of the Customer or ii) any of the Customer’s rights authorized service company within thirty (30) days against the seller/dealer of the Product.
-
Page 17: Warranty Card
WARRANTY CARD FILL IN WITH BLOCK LETTERS Purchaser’s Name: _____________________________________________________ Address: _____________________________________________________________ _____________________________________________________________ Country: _____________________________________________________________ Phone: ______________________________________________________________ Date of Purchase (dd/mm/yy): Product Type (on phone type label under battery): – Product Model (on phone type label under battery): Phone Serial No (on phone type label under battery): Place of Purchase: _____________________________________________________ Store Name: __________________________________________________________ Store Address: ________________________________________________________...
Need help?
Do you have a question about the PT-3 and is the answer not in the manual?
Questions and answers