Table of Contents
Advertisement
Advertisement
Table of Contents

Related Manuals for Samsung SNB-3000P


Summary of Contents for Samsung SNB-3000P
-
Page 1: Network Camera
NETWORK CAMERA User Manual SNB-3000(P) - Page 2 overview CAUTION RISK OF ELECTRIC SHOCK. DO NOT OPEN CAUTION TO REDUCE THE RISK OF ELECTRIC SHOCK, DO NOT REMOVE COVER (OR BACK) NO USER SERVICEABLE PARTS INSIDE. REFER SERVICING TO QUALIFIED SERVICE PERSONNEL. This symbol indicates that dangerous voltage consisting a risk of electric shock is present within this unit.
- Page 3 fi re or electric shock. If this product fails to operate normally, contact the nearest service center. Never disassemble or modify this product in any way. (SAMSUNG is not liable for problems caused by unauthorized modifi cations or attempted repair.) When cleaning, do not spray water directly onto parts of the product.
- Page 4 overview CAUTION Do not drop objects on the product or apply strong blows to it. Keep away from a location subject to excessive vibration or magnetic interference. Do not install in a location subject to high temperature (over 50°C), low temperature (below -10°C), or high humidity.
-
Page 5: Fcc Statement
FCC STATEMENT This device complies with part 15 of the FCC Rules. Operation is subject to the following two conditions : 1) This device may not cause harmful interference, and 2) This device must accept any interference received including interference that may cause undesired operation. -
Page 6: Important Safety Instructions
overview IMPORTANT SAFETY INSTRUCTIONS Read these instructions. Keep these instructions. Heed all warnings. Follow all instructions. Do not use this apparatus near water. Clean only with dry cloth. Do not block any ventilation openings. Install in accordance with the manufacturer’s instructions. -
Page 7: Table Of Contents
CONTENTS Important Safety Instructions OVERVIEW Product Features Precautions – Installation and Recommended PC Specifi cations What’s Included At a Glance Mounting the lens INSTALLATION & Inserting/Removing an SD CONNECTION Memory Card Memory Card Information (not included) Connecting with other Device How to use the menu key CAMERA SETUP Main Menu... -
Page 8: Overview
overview WEB VIEWER Connecting to the Camera Login Installing ActiveX Using the Live Screen Backup Using the SD Search Viewer Screen Accessing the Setup Screen SETUP SCREEN Default Setup System Setup Overlay Setup Event Setup Network Setup Profi le APPENDIX Terminology Specifi... -
Page 9: Product Features
PRODUCT FEATURES Support various communication protocols Supports TCP/IP, UDP, RTP/RTSP, SMTP for email, and FTP protocols as well as various internet protocols such as ARP, HTTP, HTTPS and DHCP. Web Browser-based Monitoring Using the Internet web browser to display the image in a local network environment. Automatic Local IP Setup Even a network novice can install it with minimum operations. -
Page 10: What's Included
overview Web Browser : Internet Explorer 6.0 or higher Video Card : Radeon, Nvidia Video Memory: 128MB DirectX 8.1 or higher Compatible Broadband Routers Linksys / D-Link / Netgear Compatible PoE Switches Linksys SRW224G4P / D-Link DES-1316 / SMC SMCPWR-INJ3 WHAT’S INCLUDED Please check if your camera and accessories are all included in the product package. -
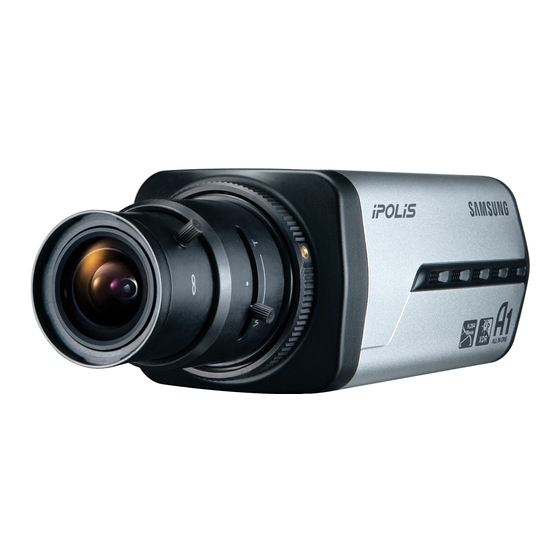
Page 11: At A Glance
AT A GLANCE Front Side Item Description Camera Holder Used when you mount the camera onto the bracket by fixing the camera (Mount) Holes holder (mount) adaptor with the bracket. Auto Iris Lens Installed on the lens adaptor. (Optional) Auto Iris Lens Used to supply power and output signal to control the iris of the lens. - Page 12 overview Rear Side AUDIO OUT AUDIO IN SD CARD SD SYSTEM POWER VIDEO RESET NETWORK 1 2 3 4 5 1,2 : ALARM IN 1,2 LINK AC 24V 3 : GND DC 12V 4,5 : ALARM OUT 1,2 Item Description SD Memory Card Compartment for the SD memory card.
- Page 13 Resets the camera settings to the default. Press and hold it for about 3 Reset Button seconds to turn off the system indicator and restart the system. Power Port Used to plug the power cable. Used for earth-grounding. Network Port Used to connect to the Network cable.
-
Page 14: Installation & Connection
installation & connection MOUNTING THE LENS Disconnect the power before proceeding. Mounting the CS lens Turn the optional CS lens clockwise to insert it. CS Lens Mounting the C lens Turn the C mount adaptor clockwise to insert it and do the same with the C lens. C Lens 14_ installation &... -
Page 15: Inserting/Removing An Sd Memory Card
Connecting the Auto Iris Lens connector Insert the lens connector into the corresponding hole of the camera. Focusing Turn the lens left or right to control the zoom and focus the lens so that you can view a clear, sharp object. INSERTING/REMOVING AN SD MEMORY CARD Inserting an SD Memory Card Push the SD memory card in the direction of the arrow shown in the diagram. -
Page 16: Memory Card Information (Not Included)
installation & connection Removing an SD Memory Card Gently press down on the exposed end of the memory card as shown in the diagram to eject the memory card from the slot. Pressing too hard on the SD memory card can cause the card to shoot out uncontrollably from the slot when released. - Page 17 Memory Card Use SD and SDHC memory cards feature a switch that disables writing data on to the media. Having this switch to the Lock position will prevent accidental deletion of data stored in the memory card but at the same time will also prevent you from writing data on to the media. ❖...
-
Page 18: Connecting With Other Device
installation & connection CONNECTING WITH OTHER DEVICE Monitor AUDIO OUT AUDIO IN SD CARD SD SYSTEM POWER VIDEO RESET NETWORK 1 2 3 4 5 1,2 : ALARM IN 1,2 LINK AC 24V 3 : GND DC 12V 4,5 : ALARM OUT 1,2 Power Network Connecting to the monitor... -
Page 19: Connecting To Audio Input/Output
Connecting to Audio Input/Output Microphone LINE-OUT LINE-IN Speaker Pre-Amp Pre-Amp Microphone Connect the AUDIO IN port of the camera with the microphone directly or LINE OUT port of the amplifi er that the microphone is connected to. Direct Mic Connection : Set Audio Input Gain high (10). (Refer to page 51) Line Out Connection : Set Audio Input Gain low (1). - Page 20 installation & connection Audio I/O Block Diagram Network Microphone Microphone Speaker Pre-Amp Pre-Amp Audio Codec G.711 PCM. μ-law 64kbps 8kHz sampling Full duplex Audio Audio in Used for mono signal line input (Max.2.4 Vpp) Audio out Used for mono signal line output (Max.2.4 Vpp) Line out impedance 600—...
- Page 21 Connecting to the I/O port box Connect the Alarm I/O signal to the corresponding port of the rear port box. AUDIO OUT AUDIO IN 1 2 3 4 5 SD CARD SD SYSTEM POWER VIDEO RESET NETWORK 1 2 3 4 5 1,2 : ALARM IN 1,2 1,2 : ALARM IN 1,2 LINK...
- Page 22 camera setup You can configure the camera settings using the Web Viewer. For accessing the Web Viewer, refer to "Network Connection and Setup". (page 31) HOW TO USE THE MENU KEY Follow the steps below if you run the Web Viewer for setting the menus. Launch the Web Viewer.
-
Page 23: Main Menu
MAIN MENU You can configure the camera settings to your preference. PROFILE MAIN MENU MAIN MENU ** ** ** ** You can select a mode that is appropriate to the PROFILE camera installation environment. CAMERA SET CAMERA SET PRIVACY ZONE PRIVACY ZONE CAMERA SET OTHER SET... -
Page 24: Camera Setup
camera setup CAMERA SETUP You can configure the general settings of the camera module. For selecting and saving each menu item, refer to "How to use the menu key". (page 22) CAMERA ID Provide the ID and position for a camera that displays on the screen. Select <CAMERA SET>... - Page 25 MOTION CAMERA SET ◄ ► You can specify a level of AGC for controlling the CAMERA ID CAMERA ID IRIS IRIS camera motion. MOTION MOTION (F.FAST) (F.FAST)--- Select F.FAST if you want to monitor a very fast moving object in a low contrast scene, and S.SLOW SHUTTER SHUTTER SENS-UP...
-
Page 26: White Bal
camera setup DAY/NIGHT You can specify a recording mode according to the scene. Select <CAMERA SET> - <DAY/NIGHT>. AUTO AUTO Select a screen transition mode according to BURST the illumination, and set options as appropriate. DAY NIGHT NIGHT BRIGHTNESS BRIGHTNESS DAY : Fixed to DAY mode, regardless of the DWELL TIME DWELL TIME... -
Page 27: Digital Zoom
According to the specifi ed recording mode, WHITE BAL WHITE BAL select a WHITE BAL mode with necessary options. DAY/NIGHT DAY/NIGHT NIGHT NIGHT BRIGHTNESS BRIGHTNESS BRIGHTNESS : Specify a brightness level MODE [ [ 00 00 ] ] ---- ---- I I ---- ---- triggering the switch from DAY to NIGHT [ [ 00... -
Page 28: Privacy Zone
camera setup PRIVACY ZONE You can set up to 12 privacy zones that will be hided for privacy of the subject when recording. For selecting and saving each menu item, refer to "How to use the menu key". (page 22) ZONE SETUP Select <MAIN MENU>... -
Page 29: Others
OTHERS You can reset the camera, or select the OSD font color to your preference. For selecting and saving each menu item, refer to "How to use the menu key". (page 22) LANGUAGE You can slect a preferred language for the screen OTHER SET ◄... -
Page 30: System Info
camera setup SYSTEM INFO You can check the system information. For selecting and saving each menu item, refer to "How to use the menu key". (page 22) Select <MAIN MENU> - <SYSTEM INFO>. SYSTEM INFO ◄ ► The current system information is displayed. 3 _ _ IPV IPV _ _ P P TYPE... -
Page 31: Network Connection And Setup
You can set up the network settings according to your network configurations. Before installing or while using this program, visit the Samsung website www.samsungsecurity.com and download and upgrade with the latest S/W version available. CONNECTING THE CAMERA TO AN BROADBAND ROUTER WITH THE XDSL/CABLE MODEM This is for a small network environment such as homes, SOHO and ordinary shops. -
Page 32: Connecting The Camera To An Broadband Router With Local Area Networking
network connection and setup ex3) If the address (LAN IP) of the Broadband Router is 192.168.xxx.1 IP address: 192.168.xxx.100 Subnet Mask: 255.255.255.0 Default Gateway: 192.168.xxx.1 For the address of the Broadband Router, refer to the product’s documentation. Checking if the Broadband Router is connected to the xDSL/Cable modem properly Select <Status>... -
Page 33: Connecting The Camera Directly To A Dhcp-Based Xdsl/Cable Modem
Select : <Network Neighborhood> <Properties> <Local Area Connection> <Properties> <General> <Internet Protocol (TCP/IP)> <Properties> <Obtain an IP address automatically> or <Use the following IP address>. Follow the instructions below if you select <Use the following IP address>: ex1) If the address (LAN IP) of the Broadband Router is 192.168.1.1 IP address: 192.168.1.100 Subnet Mask: 255.255.255.0 Default Gateway: 192.168.1.1... -
Page 34: Connecting The Camera Directly To Local Area Networking
network connection and setup When the Broadband Router is connected, the login window appears and prompts you to enter the password. For the login IP and the password, refer to the Broadband Router’s documentation. When done, you will see the setup window of the Broadband Router. In the setup menu, select “Automatic Confi... -
Page 35: Ip Address Setup
IP ADDRESS SETUP Buttons used in IP Installer Item Description Model name of the connected camera. Device Name Click the column to sort the list by model name. However, search will be stopped if clicked during the search. Displays either <Static> or <Dynamic> for the current network connection Mode status. -
Page 36: Static Ip Setup
network connection and setup IPv4 Scans for cameras with the IPv4 setting. IPv6 Scans for cameras with the IPv6 setting. Scans for cameras that are currently connected to the network. Search However, this button will be grayed out if neither IPv4 nor IPv6 is checked. Auto Set <IP Installer>... - Page 37 If using an Broadband Router : IP Address : Enter an address falling in the Broadband Range provided by the Broadband Router. ex) 192.168.1.2~254, 192.168.0.2~254, 192.168.XXX.2~254 Subnet Mask : The <Subnet Mask> of the Broadband Router will be the <Subnet Mask> of the camera. Gateway : The <Local IP Address>...
-
Page 38: Auto Network Setup
network connection and setup If the Broadband Router has more than one camera connected Configure the IP related settings and the Port related settings distinctly with each other. Category Camera #1 Camera #2 IP Address 192.168.1.200 192.168.1.201 IP related settings Subnet Mask 255.255.255.0 255.255.255.0... -
Page 39: Dynamic Ip Setup
Enter the password. This is the login password for the "admin" user who accesses the camera. The default password is "4321". Click [OK]. Auto network setup will be completed. The camera will automatically complete the network setting and restart. DYNAMIC IP SETUP Dynamic IP Environment Setup Example of the dynamic IP environment If an Broadband Router, with cameras connected, is assigned an IP address by... -
Page 40: Port Range Forward
network connection and setup PORT RANGE FORWARD (PORT MAPPING) SETUP If you have installed an Broadband Router with a camera connected, you must set the port range forwarding on the Broadband Router so that a remote PC can access the camera in it. Manual Port Range Forwarding From the Setup menu of the Broadband Router, select <Applications &... -
Page 41: Connecting To The Camera From A Shared Local Pc
CONNECTING TO THE CAMERA FROM A SHARED LOCAL Launch <IP Installer>. It will scan for connected cameras and display a list of them. Double-click a camera to access. The Internet browser starts and connects to the camera. You can also access the camera in such way you type the IP address of the found camera in the address bar of the Internet browser. -
Page 42: Web Viewer
web viewer CONNECTING TO THE CAMERA Normally, you would Launch the Internet browser. Type the IP address of the camera in the address bar. ex) • IP address (IPv4) : 192.168.1.200 http://192.168.1.200 - the Login dialog should appear. • IP address (IPv6) : 2001:230:abcd: ffff:0000:0000:ffff:1111 http://[2001:230:abcd:ffff:0000 :0000:ffff:1111]... -
Page 43: Login
To check the DDNS address The DDNS address consists of: <one of the lower-case letters: c, m, p> + <the last 6 digits of the MAC (Ethernet) address> + <websamsung.net> The small letter will be <c> if the first 6 digits of the MAC (Ethernet) address is <00:00:f0>, or <m>... -
Page 44: Installing Activex
web viewer INSTALLING ACTIVEX If connecting to a camera for the first time, you will see the installation message. Then, install the required ActiveX to access the camera and control the video from it in real time. For Windows XP Service Pack 2 users Click the installation message that pops up when you fi... -
Page 45: Using The Live Screen
USING THE LIVE SCREEN Item Description SD Search Moves to the screen for searching event images from the SD card. Setup Move to the Setup screen. About You can check the firmware version, serial number and manufacturer information. Reset Alarm Resets the Alarm icon. -
Page 46: Backup
Samsung\SNB-3000\SnapShot\Live If you want to change the path, click [Set path ( )] and specify a path. Windows Vista, Windows 7 : C:\users\[UserID]\Documents\Samsung\SNB-3000\ SnapShot\Live On the Windows Vista, Windows 7 system, the path to save is fi xed. The screenshot fi le will be named automatically in the format of <IP address_Port number_YYYYMMDD_hhmmss_index>. - Page 47 To print out the screenshot Click [ ] on the scene to print out. The Print setup dialog appears. Specify the name of the printer connected, and click [OK]. To record a video Click [ ] on the scene to record. You will see the Save AVI dialog;...
- Page 48 Windows XP : C:\Program Files\Samsung\SNB-3000\VideoClip\Live If you want to change the path, click [Set path ( )] and specify a path. Windows Vista, Windows 7 : C:\users\[UserID]\Documents\Samsung\ SNB-3000\VideoClip\Live On the Windows Vista, Windows 7 system, the path to save is fi xed.
-
Page 49: Using The Sd Search Viewer Screen
USING THE SD SEARCH VIEWER SCREEN Click <SD search> tab in the Live screen. The SD Search Screen appears. SD Search Viewer Screen layout Name Function and description Thumbnail Size The thumbnail images are displayed based on the selected size. Date You can select the desired date to search for events generated. -
Page 50: Accessing The Setup Screen
setup screen ACCESSING THE SETUP SCREEN You can configure the default setting, system, overlay, event and network related settings, and change them as necessary. In the Live screen, click the <Setup> tab. The Setup screen appears. DEFAULT SETUP To configure the video & audio settings You can set the video resolution, quality, CODEC and audio input/output settings. - Page 51 Target bitrate : Transfers video signal at a specifi ed bit rate. Compression : Adjust the compression rate from 5 through 100 by 5. Encode priority : Set the video transfer method to Frame rate or Quality. GOP* size : Select a GOP size between 5 and 15. Deblock : This will soften the edges between macro blocks.
- Page 52 Upload port (TCP) : Used to upgrade the software fi rmware, defaulted to 60004(TCP). IPv6 confi guration : Obtains the IPv6 address to access the IPv6 network. VNP confi guration : Set a port used to transfer video signals with the Samsung protocols.
- Page 53 To set the user account Click <Basic> - <User>. The User setup window appears. Login authentication : You can set to authenticate the login by the user. If you select <Enable>, the user should have gone through the login authentication; if selecting <Disable>, every user can access the system without the login authentication, having the ordinary user permissions.
- Page 54 setup screen To edit a registered user account From the User setup window, select a user ID to change. From the User setup window, click [Modify]. The Modify user window appears. Change the <User ID>, <Password>, <Confi rm password>, and <Level> as you wish.
-
Page 55: System Setup
SYSTEM SETUP To set the date/time You can obtain the current system time from the NTP server or your PC for your time setting. Select <System> - <Date & Time>. The Date & Time setup window appears. If you select Manual, input the date and time manually. -
Page 56: To Update The Software
setup screen To check the log information Select <System> - <Log>. The Log information list appears. System log list : Shows the log information about the system changes along with time and IP address. System started: When the camera turns on User login: When the user logs in to the camera System reset: When the camera restarts... -
Page 57: To Reset The System
When the software update is completed, you will be prompted to restart the system. Click [OK] to restart the system. Since the current connection is disconnected, you have to connect to the system again. If the network is disconnected, the power supply fails, or the PC abnormally operates during the update, the system does not work at all. -
Page 58: Overlay Setup
setup screen To access the camera using HTTPS mode, you have to type the IP address for the camera in the form of “https://<Camera_IP>”. When done, click [Apply]. The web viewer will switch to the set secure connection system. To Set IP Filtering Click <System>... -
Page 59: Event Setup
Show time : Set to display the time information on the bottom screen. Output Format : Select a display format of the time information. 24hr : Displays the time in the 24-hour format. 12hr : Displays the time in the 12-hour format. Text color : Select black or white for the text color. - Page 60 setup screen Use passive mode : Select this option when the passive mode connection is inevitable due to the fi rewall or FTP server setting. FTP server address : Enter the IP address of a FTP server to which an alarm image will be transferred.
- Page 61 To setup the record Click <Event> - <Record setup>. The Record setup window appears. To complete the setting, click the [Apply] button. The settings are saved. SD card : Enables you to verify data saved on the SD memory card and format the memory card itself.
- Page 62 setup screen Post-alarm duration : The post alarm duration can be one among 5 seconds, 10 seconds, 15 seconds, and 30 seconds. You can send a post-alarm image of up to 30 seconds after the alarm is triggered. (The max time differs, depending on the frame rate) ...
-
Page 63: To Set The Motion Detection
To set the Motion Detection Select a motion detection mode. Specify the use of motion detection. Select a sensitivity level of the motion detection. Place the cursor at a point in the video and drag it to whatever you need. ... - Page 64 setup screen To set the Intelligent Video Analysis Select an Intelligent Video Analysis mode. Set whether to use the Intelligent Video Analysis function. Set whether you want to use the overlay or not. Select a sensitivity level of the camera’s object detection.
- Page 65 Overlay : If <Enable> is selected, confi gured event rules and motion frame are displayed on the Live screen. Selecting <Disable> will not display overlay information. Motion frame is displayed in two types on the Live screen. Green frame – indicates the moving object Red frame –...
- Page 66 setup screen <Event Types> Appearing: An object that has not been existed until the previous frame appears in the area. Disappearing: An object that has been existed until the previous frame disappears from the area. Scene Change: This event is generated by a complete scene change, such as camera veiled by hand or changed camera’s aiming, etc.
- Page 67 To set the scheduled transfer You can set to transfer the JPEG image to the FTP/SMTP server saved in the SD memory card at a specific interval. Select <Event> - <Schedule>. The Schedule Transfer setup window appears. Schedule transfer function : If selecting <Enable>, the schedule transfer function will be activated;...
-
Page 68: Network Setup
When done, click [Apply]. Your settings will be saved. VNP streaming : You can set the Samsung Protocol (VNP) for the streaming service. Protocol : Select a video transfer protocol from TCP*, UDP (Unicast)*, and UDP (Multicast)*. Speaking to the camera unit through microphone is not supported. -
Page 69: Appendix
appendix PROFILE CAMERA SETUP MENU STANDARD BACKLIGHT DAY/NIGHT GAMING BANK Parent Menu Sub-menus IRIS LENS LEVEL BACKLIGHT (F.FAST) (F.FAST) (F.FAST) (F.FAST) MOTION NORM SLOW SHUTTER AUTO 1/250 SENSE UP AUTO X4 AUTO X2 AUTO X4 AUTO X4 AUTO X4 AUTO X4 AUTO AUTO AUTO... -
Page 70: Terminology
appendix TERMINOLOGY GOP : You can set between 5 and 15 for the MPEG4 and H.264 CODEC. The default is 15, and if set to 15, one I-Frame will be output per 15 frames as one I-Frame and 14 P-Frames constitute the GOP. The lower the GOP size is, the better the quality is;... - Page 71 Filtering range The filtering range is calculated based on IP address and subnet mask provided by user as follows: The subnet value defi nes the number of masked bits, which will mask the IP address that is converted into 32-bit binary; rest of masked out bits are ignored to produce the range as shown below.
-
Page 72: Specifications
appendix SPECIFICATIONS Description Item NTSC Camera Color/BW Color Type Device 1/3" Super-HAD PS CCD Image Total 811 x 508 795 x 596 Pixels Effective 768 x 494 752 x 582 System Progressive Scanning Horizontal Frequency 15.734 Hz 15.625 Hz Vertical Frequency 59.94 Hz 50 Hz Sens off : 0.12 Lux(15 IRE), 0.2 Lux(30 IRE),... - Page 73 Description Item NTSC Horizontal 600 TV Lines Resolution Vertical 350 TV Lines Video Output Video Output VBS 1.0Vp-p S/N Ratio S/N Ratio about 52 dB Lens Drive Type MANUAL/AI(VIDEO/DC) Lens Mount Type CS/C Embedded Linux Flash memory 32M byte 256M byte Network Board Hardware...
- Page 74 Viewer UI Language E/F/G/S/I/C/K (Default) S/W upgrade Support Video Player RTP/RTSP streaming Quicktime, VLC player Video Samsung iPOLiS Management Video Management System 3rd Party S/W appliction Software Application IP Installation IP Installer Application for All Samsung IP Devices 74_ appendix...
- Page 75 Description Item NTSC Provides functionality to control cameras and set/retrieve internal parameter values. HTTP API CGI Command Get JPEG image or MJPEG stream Alarm In/Out control RTP/RTSP API RTP Header, RTSP Command Document ActiveX ActiveX API for viewing data streams from IP camera. AC24V±10%(60Hz±0.3Hz)/ DC12V+10%/-5% / Power PoE (Power over Ethernet)
-
Page 76: Frame Rate (Ntsc)
appendix FRAME RATE (NTSC) Test Condition: MJPEG - Resolution(CIF), Quality(1), Frame rate(1) H.264 - Bitrate control(CBR), Compression(40), Encode Priority(Frame rate), GOP size(15), Deblock(ON), Profi le(Baseline), Entropy coding(CAVLC), Motion estimation(HPel) MPEG4 - Bitrate control(CBR), Compression(40), Encode Priority(Frame rate), GOP size(15) ❖... - Page 77 ❖ H.264 (4CIF) Frame Rate 30 FPS 15 FPS 8 FPS 3 FPS 1 FPS Quality 2298 Kbps 1229 Kbps 737 Kbps 369 Kbps 147 Kbps LEVEL10 19 FPS 10 FPS 6 FPS 3 FPS 1 FPS 1751 Kbps 1198 Kbps 645 Kbps 369 Kbps 111 Kbps...
- Page 78 appendix ❖ MPEG4 (VGA) Frame Rate 30 FPS 15 FPS 8 FPS 3 FPS 1 FPS Quality 4055 Kbps 2580 Kbps 1290 Kbps 737 Kbps 221 Kbps LEVEL10 22 FPS 14 FPS 7 FPS 4 FPS 1 FPS 3533 Kbps 2304 Kbps 1075 Kbps 614 Kbps...
- Page 79 ❖ H.264 (VGA) Frame Rate 30 FPS 15 FPS 8 FPS 3 FPS 1 FPS Quality 2089 Kbps 1229 Kbps 737 Kbps 369 Kbps 147 Kbps LEVEL10 17 FPS 10 FPS 6 FPS 3 FPS 1 FPS 1659 Kbps 1014 Kbps 553 Kbps 276 Kbps 111 Kbps...
- Page 80 appendix ❖ MPEG4 (CIF) Frame Rate 30 FPS 15 FPS 8 FPS 3 FPS 1 FPS Quality 1382 Kbps 691 Kbps 369 Kbps 184 Kbps 55 Kbps LEVEL10 30 FPS 15 FPS 8 FPS 4 FPS 1 FPS 1152 Kbps 576 Kbps 307 Kbps 154 Kbps...
- Page 81 ❖ H.264 (CIF) Frame Rate 30 FPS 15 FPS 8 FPS 3 FPS 1 FPS Quality 922 Kbps 461 Kbps 215 Kbps 123 Kbps 37 Kbps LEVEL10 30 FPS 15 FPS 7 FPS 4 FPS 1 FPS 691 Kbps 346 Kbps 184 Kbps 92 Kbps 28 Kbps...
-
Page 82: Frame Rate (Pal)
appendix FRAME RATE (PAL) Test Condition: MJPEG - Resolution(CIF), Quality(1), Frame rate(1) H.264 - Bitrate control(CBR), Compression(40), Encode Priority(Frame rate), GOP size(15), Deblock(ON), Profi le(Baseline), Entropy coding(CAVLC), Motion estimation(HPel) MPEG4 - Bitrate control(CBR), Compression(40), Encode Priority(Frame rate), GOP size(15) ❖... - Page 83 ❖ H.264 (4CIF) Frame Rate 25 FPS 13 FPS 6 FPS 3 FPS 1 FPS Quality 2359 Kbps 1180 Kbps 737 Kbps 442 Kbps 147 Kbps LEVEL10 16 FPS 8 FPS 5 FPS 3 FPS 1 FPS 1991 Kbps 1106 Kbps 664 Kbps 332 Kbps 111 Kbps...
- Page 84 appendix ❖ MPEG4 (VGA) Frame Rate 25 FPS 13 FPS 6 FPS 3 FPS 1 FPS Quality 4424 Kbps 2654 Kbps 1327 Kbps 664 Kbps 221 Kbps LEVEL10 20 FPS 12 FPS 6 FPS 3 FPS 1 FPS 3871 Kbps 2212 Kbps 1106 Kbps 553 Kbps...
- Page 85 ❖ H.264 (VGA) Frame Rate 25 FPS 13 FPS 6 FPS 3 FPS 1 FPS Quality 2507 Kbps 1327 Kbps 737 Kbps 442 Kbps 147 Kbps LEVEL10 17 FPS 9 FPS 5 FPS 3 FPS 1 FPS 1991 Kbps 1217 Kbps 664 Kbps 332 Kbps 111 Kbps...
- Page 86 appendix ❖ MPEG4 (CIF) Frame Rate 25 FPS 13 FPS 6 FPS 3 FPS 1 FPS Quality 1382 Kbps 664 Kbps 332 Kbps 166 Kbps 55 Kbps LEVEL10 25 FPS 12 FPS 6 FPS 3 FPS 1 FPS 1152 Kbps 553 Kbps 276 Kbps 138 Kbps...
- Page 87 ❖ H.264 (CIF) Frame Rate 25 FPS 13 FPS 6 FPS 3 FPS 1 FPS Quality 922 Kbps 442 Kbps 221 Kbps 111 Kbps 37 Kbps LEVEL10 25 FPS 12 FPS 6 FPS 3 FPS 1 FPS 691 Kbps 332 Kbps 166 Kbps 83 Kbps 28 Kbps...
-
Page 88: Troubleshooting
appendix TROUBLESHOOTING PROBLEM SOLUTION Check to make sure that the camera’s Network settings are appropriate. Check to make sure that all network cables have been connected properly. If connected using DHCP, verify that the camera is able to acquire I can’t access the camera from a dynamic IP addresses without any problem. - Page 89 PROBLEM SOLUTION Verify the settings in the following sequence: No JPEG file is transferred via FTP/ A. NTP must be properly configured. SMTP on occurrence of intelligent video analysis event of camera B. The <Intelligent Video Analysis> should be set to <Enable>. even when the <Intelligent Video C.
-
Page 90: Gpl/Lgpl Software License
GPL/LGPL. You may obtain the complete Corresponding Source code from us for a period of three years after our last shipment of this product by sending email to help.cctv@samsung.com If you want to obtain the complete Corresponding Source code in the physical medium such as CD-ROM, the cost of physically performing source distribution might be charged. - Page 91 original authors' reputations. you receive it, in any medium, provided that you conspicuously and appropriately Finally, any free program is threatened publish on each copy an appropriate constantly by software patents. We wish copyright notice and disclaimer of to avoid the danger that redistributors of a warranty;...
- Page 92 based on the Program is not required performing source distribution, a to print an announcement.) complete machinereadable copy of the corresponding source code, These requirements apply to the modifi ed to be distributed under the terms work as a whole. If identifi able sections of Sections 1 and 2 above on a of that work are not derived from medium customarily used for software...
- Page 93 However, parties who have received then the only way you could satisfy both copies, or rights, from you under this it and this License would be to refrain License will not have their licenses entirely from distribution of the Program. terminated so long as such parties If any portion of this section is held invalid remain in full compliance.
-
Page 94: End Of Terms And Conditions
a version number of this License which TO IN WRITING WILL ANY applies to it and "any later version", you COPYRIGHT HOLDER, OR ANY have the option of following the terms and OTHER PARTY WHO MAY MODIFY conditions either of that version or of any AND/OR REDISTRIBUTE DAMAGES, later version published by the Free Software INCLUDING ANY GENERAL, SPECIAL,... - Page 95 WARRANTY ; without even the implied program is a subroutine library, you may warranty of MERCHANTABILITY or consider it more useful to permit linking FITNESS FOR A PARTICULAR PURPOSE. proprietary applications with the library. If See the GNU General Public License for this is what you want to do, use the GNU more details.
- Page 96 or asking you to surrender the rights. development and use of software on Therefore, you have certain responsibilities general-purpose computers, but in those if you distribute copies of the software, or if that do, we wish to avoid the special danger you modify it: responsibilities to respect the that patents applied to a free program freedom of others.
- Page 97 An interactive user interface displays performing those activities but which are not “Appropriate Legal Notices” to the extent part of the work. For example, Corresponding that it includes a convenient and prominently Source includes interface defi nition fi les visible feature that (1) displays an appropriate associated with source fi...
- Page 98 3. Protecting Users' Legal Rights From c) You must license the entire work, as a Anti-Circumvention Law. whole, under this License to anyone who comes into possession of a copy. This No covered work shall be deemed part of an License will therefore apply, along with effective technological measure under any any applicable section 7 additional terms,...
- Page 99 model, to give anyone who possesses A “User Product” is either (1) a “consumer the object code either (1) a copy of the product”, which means any tangible personal Corresponding Source for all the software property which is normally used for personal, in the product that is covered by this family, or household purposes, or (2) anything License, on a durable physical medium...
- Page 100 or installed by the recipient, or for the User works containing it; or Product in which it has been modifi ed or c) Prohibiting misrepresentation of the origin installed. Access to a network may be of that material, or requiring that modifi ed denied when the modifi...
- Page 101 or modify it is void, and will automatically from the original licensors, to run, modify terminate your rights under this License and propagate that work, subject to this (including any patent licenses granted under License. You are not responsible for enforcing the third paragraph of section 11).
- Page 102 Each contributor grants you a non-exclusive, prohibits the exercise of, or is conditioned worldwide, royalty-free patent license under on the non-exercise of one or more of the the contributor's essential patent claims, to rights that are specifi cally granted under this make, use, sell, offer for sale, import and License.
- Page 103 work, and to convey the resulting work. TO, THE IMPLIED WARRANTIES OF The terms of this License will continue to MERCHANTABILITY AND FITNESS FOR A apply to the part which is the covered work, PARTICULAR PURPOSE. THE ENTIRE RISK but the special requirements of the GNU AS TO THE QUALITY AND PERFORMANCE Affero General Public License, section 13, OF THE PROGRAM IS WITH YOU.
- Page 104 USA Everyone is permitted to copy and we gave you. You must make sure that distribute verbatim copies of this license they, too, receive or can get the source document, but changing it is not allowed. code. If you link other code with the library, you must provide complete object fi...
- Page 105 Public License therefore permits such a “work that uses the library”. The former linking only if the entire combination fi ts contains code derived from the library, its criteria of freedom. The Lesser General whereas the latter must be combined with Public License permits more lax criteria for the library in order to run.
- Page 106 is covered only if its contents constitute a well-defi ned independent of the application. work based on the Library (independent of Therefore, Subsection 2d requires that any the use of the Library in a tool for writing it). application-supplied function or table used Whether that is true depends on what the by this function must be optional: if the Library does and what the program that...
- Page 107 it is irreversible for that copy, so the ordinary though the source code is not. Whether this GNU General Public License applies to all is true is especially signifi cant if the work subsequent copies and derivative works can be linked without the Library, or if the made from that copy.
- Page 108 1 and 2 above); and, if the work is either source or binary form) with the major an executable linked with the Library, components (compiler, kernel, and so with the complete machine readable “ on) of the operating system on which the work that uses the Library”, as object executable runs, unless that component code and/or source code, so that the...
- Page 109 it. However, nothing else grants you is intended to apply, and the section permission to modify or distribute the as a whole is intended to apply in other Library or its derivative works. These circumstances. actions are prohibited by law if you do It is not the purpose of this section to not accept this License.
-
Page 110: How To Apply These Terms To Your New Libraries
later version published by the Free Software PERMITTED ABOVE, BE LIABLE TO Foundation. If the Library does not specify YOU FOR DAMAGES, INCLUDING a license version number, you may choose ANY GENERAL, SPECIAL, any version ever published by the Free INCIDENTAL OR CONSEQUENTIAL Software Foundation. -
Page 111: Openssl License
WARRANTY; without even the implied use in the OpenSSL Toolkit. (http://www. warranty of MERCHANTABILITY or openssl.org/)” FITNESS FOR A PARTICULAR PURPOSE. 4. The names “OpenSSL Toolkit” and See the GNU Lesser General Public “OpenSSL Project” must not be used to License for more details. - Page 112 Original SSLeay License 4. If you include any Windows specifi c code (or a derivative thereof) from the apps Copyright (C) 1995-1998 Eric Young (eay@ directory (application code) you must cryptsoft. com) All rights reserved. This include an acknowledgement: “This package is an SSL implementation written product includes software written by Tim by Eric Young (eay@cryptsoft.
- Page 113 Samsung Techwin cares for the environment at all product manufacturing stages, and is taking measures to provide customers with more environmentally friendly products. The Eco mark represents Samsung Techwin’s devotion to creating environmentally friendly products, and indicates that the product satisfies the EU RoHS Directive.
- Page 114 SAMSUNG TECHWIN AMERICA Inc. SAMSUNG TECHWIN EUROPE LTD. 100 Challenger Rd. Suite 700 Ridgefi eld Park, NJ 07660 Samsung House, 1000 Hillswood Drive, Hillswood Business Toll Free : +1-877-213-1222 Direct : +1-201-325-6920 Park Chertsey, Surrey, UNITED KINGDOM KT16 OPS Fax : +1-201-373-0124 TEL : +44-1932-45-5300 FAX : +44-1932-45-5325 www.samsungcctvusa.com...
Need help?
Do you have a question about the SNB-3000P and is the answer not in the manual?
Questions and answers