Table of Contents
Advertisement
Advertisement
Table of Contents

Related Manuals for ALLEN & HEATH XONE:4D


Summary of Contents for ALLEN & HEATH XONE:4D
- Page 1 USER GUIDE Publication AP7265 Allen & Heath XONE:4D User Guide...
-
Page 2: Warranty
EMC standards. Customers requiring more information about EMC and safety issues can contact Allen & Heath. XONE:4D User Guide AP7265 Copyright © 2008 Allen & Heath Limited. All rights reserved Allen & Heath Limited Kernick Industrial Estate, Penryn, Cornwall, TR10 9LU, UK http://www.allen-heath.com http://www.xone.co.uk... -
Page 3: Table Of Contents
CONTENTS Congratulations on purchasing the Allen & Heath Xone:4D performance DJ mixer. To ensure that you get the maximum benefit from the unit please spare a few minutes familiarising yourself with the controls and setup procedures outlined in this user guide. For further information please refer to the additional information available on our web site, or contact our technical support team. -
Page 4: Packed Items
Spare knobs and buttons Rack Ears + fixings. For mounting the 4D in a 19” rack. Type A-B USB Lead 6x M4x10mm screws To connect the Xone:4D to your computer. Allen & Heath XONE:4D User Guide... -
Page 5: Software Installation Pc
SOFTWARE INSTALLATION PC STOP! BEFORE YOU DO ANYTHING WITH YOUR XONE:4D, PLEASE READ THE FOLLOWING CAREFULLY TO ENSURE YOUR PC IS CORRECTLY SET UP TO BE USED WITH THE DEVICE. PLEASE DOWNLOAD THE LATEST DRIVERS FROM: www.xone.co.uk/4d Software Installation (Windows 2000, XP and Vista) Follow the procedure described below to install the USB audio and MIDI drivers: 1—... - Page 6 8— Once the driver installation is complete you will be prompted to reboot your computer. Note: Always use the same USB port with your Xone:4D. When installing on a MS Windows system, the drivers will be associated with the USB port that you are currently plugged into.
-
Page 7: Checking The Windows Driver Installation
CHECKING THE DRIVER INSTALLATION—WINDOWS Checking the Driver Installation Once the driver installation is complete, you will need to check that the Xone:4D is being recog- nised. To do this, connect the Xone:4D to your PC/laptop and then right click on My Comput- er to open the System Properties window. -
Page 8: Software Installation Mac
SOFTWARE INSTALLATION—APPLE MAC STOP! BEFORE YOU DO ANYTHING WITH YOUR XONE:4D, PLEASE READ THE FOLLOWING CAREFULLY TO ENSURE YOUR PC IS CORRECTLY SET UP TO BE USED WITH THE MIXER. Mac OSX Open the Xone_4D_Driver_x.x.x.dmg to reveal the window shown. - Page 9 SOFTWARE INSTALLATION—APPLE MAC Enter your system password. Click on “Continue Installation”. Restart your Mac. Allen & Heath XONE:4D User Guide...
-
Page 10: Checking The Mac Driver Installation
CHECKING THE DRIVER INSTALLATION—APPLE MAC Checking the Driver Installation Once the driver installation is complete, you will need to check that the Xone:4D is being recog- nised. To do this, connect the Xone:4D to your Mac and then select: Mackintosh HD... -
Page 11: Midi Channel Setup
At the end of the start up sequence, when the illuminated switches have flashed three times, release the switch on the encoder. The illuminated switches on the Xone:4D will display the current MIDI channel number in binary format as shown below. Hot Setup You may also enter setup mode by holding down the encoder shown above and then pressing the same encoder on the right hand MIDI pod. -
Page 12: Midi Map And Light Pipe Setup
Once the MIDI channel number has been stored, the illuminated switch to the far right of the unit will flash indicating that the MIDI map may now be selected. The following examples are in relation to the left-hand MIDI pod on the Xone:4D. Map 1 (Traktor default) The first switch (far left) is used to select MIDI Map 1. -
Page 13: Soundcard Architecture
DIGITAL OUTPUTS: The SPDIF digital outputs are sent directly to the digital output sockets on the rear of the Xone:4D. The digital output will be present on both the COAX and Optical output connectors simultaneously. The digital outputs are sent directly from software on soundcard outputs 9/10. -
Page 14: Soundcard Software Description
9-10 (Digital Out 3-4) 9/10 (Stereo) OUT 8-Allen&Heath Xone:4D 9 (Mono) & 10 (Mono) OUT 9-Allen&Heath Xone:4D Supported Buffer Sizes The Xone:4D supports the following buffer sizes: 64, 96, 128, 192, 256, 384, 512, 768, 1024 etc. Allen & Heath XONE:4D User Guide... -
Page 15: Ableton Setup
ABLETON SET UP Turn on your Xone:4D, launch your Ableton software and open the Preferences window. 1— In the Preferences window select the Audio tab. Change the driver type to ASIO and set the Au- dio Device to Xone:4D USB ASIO driver In the Settings section click on the Input Config but- ton. -
Page 16: Traktor Setup
TRAKTOR SET UP Turn on your Xone:4D, launch your Traktor software and open the Preferences window. 1— In the Preferences window, expand the Audio Setup section and select Soundcard. Set the Audio Device to Xone:4D USB ASIO driv- er’ Now select Input Routing. -
Page 17: Panel Drawings
RIGHT T500mAL 250V 20mm OPTICAL FUSE TO PC IN OUT SE R IAL No: 100 - 240V~ 47-63Hz ~ 30W MAX MADE IN THE UK BY ALLE N & HE ATH LIMITE D PHONES Allen & Heath XONE:4D User Guide... -
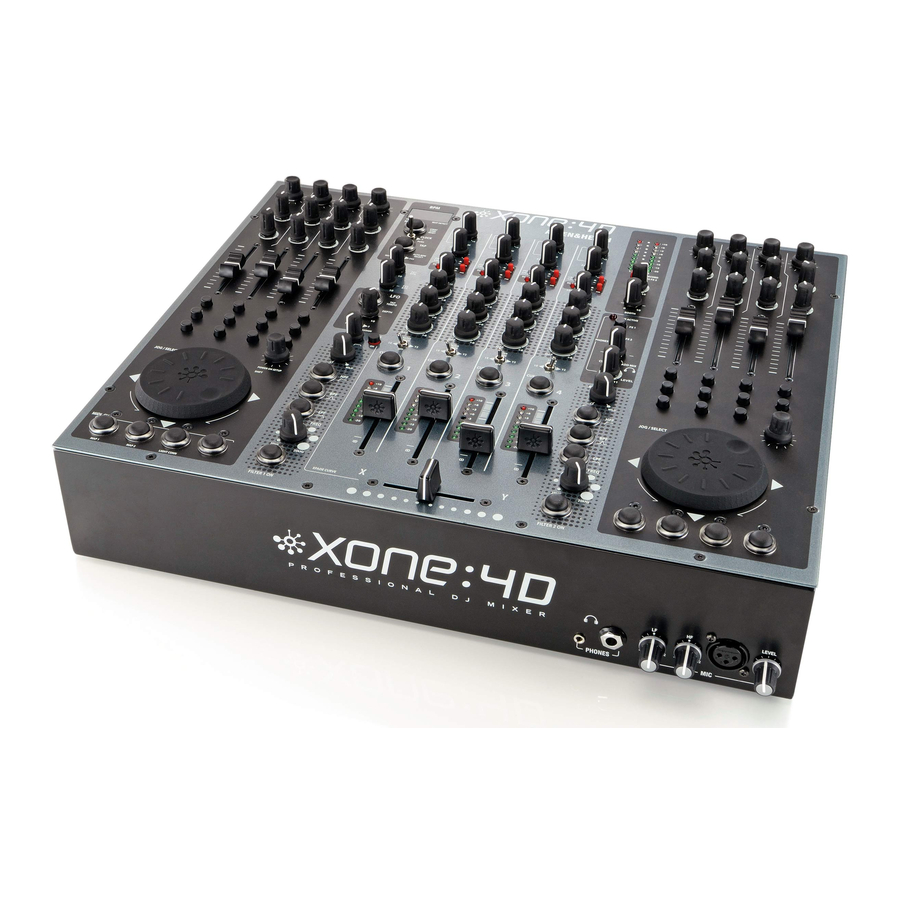
Page 18: Introduction
INTRODUCTION TO THE XONE:4D Welcome to the Allen & Heath Xone:4D digital DJ workstation. This system has been designed with the help of some of the world’s most cutting edge DJs to provide a seamless integration of traditional and computer-based audio replay systems. -
Page 19: Description
PUSH/PULL lever. UV REACTIVE PAINT The white artwork on the front panel of the Xone:4D uses a UV reactive layer and will therefore glow under UV light to improve visibility in low level light conditions. -
Page 20: Midi Control
& Heath. There are 4 stereo (8 mono) analogue and 1 stereo (2 mono) digital inputs to the PC/Mac from the Xone:4D, and 4 stereo (8 mono) analogue and 1 stereo (2 mono) digital outputs from the PC/Mac to the Xone:4D. -
Page 21: Soundcard Input Block Diagram
From this, the soundcard input LEVEL can only be routed back to + 12 + 12 software when the pre/ PHONES post switch is set to post. Allen & Heath XONE:4D User Guide... -
Page 22: Soundcard Output / Midi Block Diagram
MIDI OUT MIDI OUT LEFT BANK GAME/MIDI CV IN MAPPING RIGHT BANK FOOTSWITCH MAP1 CV IN MIXER PHONES MIC IN MIDI IN MAP2 MIDI IN Allen & Heath XONE:4D User Guide LEFT BANK CV IN RIGHT BANK FOOTSWITCH CV IN MIXER... -
Page 23: Channel Input
Switch 1 Switch 2 Mic / Channel Pre / Post fader FX2 / Channel Pre / Post fader FX1 / Channel Pre / Post fader Mix / Channel Pre / Post fader Allen & Heath XONE:4D User Guide... - Page 24 +6dB. Turn LEVEL down if the +10 peak meter starts flashing. Channel Equalizer/Isolator The Xone:4D is equipped with a very powerful 3 band EQ stage providing a controlled +6dB of boost when fully clockwise but full isolation (cut) of each band for dramatic effect when fully anti- clockwise.
- Page 25 ‘+6’. Turn down the level control if the +10 peak indicator lights. Channel Fader A high quality, smooth travel dual-rail fader adjusts the channel signal level from fully off to fully on. Allen & Heath XONE:4D User Guide...
-
Page 26: Mix And Monitor
Press these switches to select either of the stereo FX mixes as the headphones and meter source. Note that this does not affect the main mix or monitor outputs. Allen & Heath XONE:4D User Guide... - Page 27 Warning ! To avoid damage ! to your hearing do not operate the headphones or sound system at excessively high volume. Continued exposure to high volume sound can cause frequency selective wide range hearing loss. Allen & Heath XONE:4D User Guide...
-
Page 28: Filters And Lfo
This control sets the –3dB cut-off frequency of the filter. It ranges from very low frequency (20Hz) to very high (20kHz). Filter On Switch Switches the filter on and off. The light ring around the button illuminates when the filter is active. Allen & Heath XONE:4D User Guide... -
Page 29: Fx Returns And Crossfader
Xfade on switch Press this switch to activate the crossfader. XFade Curve Control This control adjusts the crossfader curve between dipped response, ideal for seamless beat mixing and fast-attack, suitable for scratch or cut mixing. Allen & Heath XONE:4D User Guide... -
Page 30: Front Controls And Connectors
0dB operating level. When the Mic channel is not in use, always turn the level control fully anti-clockwise to prevent unwanted noise from this sensitive input entering the main Mix. Allen & Heath XONE:4D User Guide... -
Page 31: Rear Connectors
I N S T R U C T I O N S s h e e t other instruments. included with the Xone:4D and connect turntables which require printed on the rear panel. RIAA equalisation. Alternatively, Check that the correct mains lead... - Page 32 These outputs could be fed to an additional mixer or processor before being brought back into the mix. Depending on the soundcard operating mode, signals are available on sockets 1-6 or 1-4. Allen & Heath XONE:4D User Guide...
- Page 33 LFO and Stop/Start. interface using general purpose switches You can connect the MIDI OUT of and potentiometers. We recommend 10k one Xone:4D to the MIDI IN of or 20k ohm linear law pots. A simple another. schematic is shown here.
-
Page 34: Bpm Counter
Pressing and holding this switch for approximately 5sec will turn off the Xone:4D’s internal MIDI clock and the BPM display will change to OFF. Pressing and holding the STOP/START button again until the three dashes are displayed will reset the... - Page 35 This selects the audio source for the auto beat detection circuit. If MIX is selected, all music played through the main outputs of the Xone:4D will be analysed. This can be used to ensure that a mix compilation or DJ set is held at a strict tempo.
-
Page 36: Lfo
In its left position Filter 1 only is modulated, in the right hand position Filter 2 only is modulated. In the centre position both Filter 1 and Filter 2 will be modulated by equal amounts. Allen & Heath XONE:4D User Guide... -
Page 37: The Lfo Editor
The LFO Editor allows real-time manipulation of the LFO waveform using the linear faders on the left and right MIDI pods of the Xone:4D. The LFO tempo can be set using the LFO Tap Tempo button or by synchronising the LFO tempo to the displayed BPM (see page 36). -
Page 38: Midi Control Section
Momentary action switches with red light ring indicators. Pressing a switch will send a “note on” MIDI message and turn on the indicator. Pressing the switch again will send another “note on” message and switch off the indicator. Allen & Heath XONE:4D User Guide... -
Page 39: Midi Messages
LIGHT PIPE SETUP sections on pages 11 and 12. MIDI Shift Mode All of the controls on the Xone:4D (with the exception of the crossfader, can be mapped a second time using the MIDI shift mode. To enter MIDI SHIFT MODE, hold down the encoder above the jog wheel on the left MIDI pod for approximately half a second. -
Page 40: Midi Implementation Chart
Filter 2 Freq 8-45 Dedicated Controls Program Change System Exclusive System Common Song Position Song Select Tune Request System Real Time Clock Commands Aux Messages Local On/Off All Notes Off Active Sensing System Reset Allen & Heath XONE:4D User Guide... -
Page 41: Midi Note Chart
MIDI NOTE CHART Note No. Note No. Note No. Note No. (Hex) (Decimal) (Hex) (Decimal) Note Name Note Name C#-2 D#-2 F#-2 G#-2 A#-2 C#-1 D#-1 F#-1 G#-1 Allen & Heath XONE:4D User Guide... -
Page 42: Filter Reference
The vertical scale shows the amount of cut or boost around the normal 0dB operating level. The horizontal scale shows the change in frequency from low (bass) to high (treble). 1kHz Allen & Heath XONE:4D User Guide... -
Page 43: Operating Levels
! As the session wears on ear fatigue may set in, and the speaker cones may become hot so reducing the effectiveness of the system and listeners to gain any benefit from increased volume. Allen & Heath XONE:4D User Guide... -
Page 44: Earthing
Use good quality cables and connectors and check for correct wiring and reliable solder joints. Allow sufficient cable loop to prevent damage through stretching. If you are not sure ... Contact your service agent or local Allen & Heath dealer for advice. Allen & Heath XONE:4D User Guide... -
Page 45: Cables And Connectors
UNBALANCED UNBALANCED XLR MALE CABLE I SPDIF OPTICAL - TOSLINK CABLE J MIDI - 5-pin DIN CABLE K SPDIF RCA - 75 ohm coax CABLE L USB TYPE A MAX 2M USB TYPE B Allen & Heath XONE:4D User Guide... -
Page 46: User Options
USER OPTIONS Internal Link Options The Xone:4D offers several internal option settings: FX1 and FX2 Return Routing— The FX1 and FX2 Returns are set, by default, to route to the main LR Mix. Link options allow the return to be routed through either Filter 1 or Filter 2. -
Page 47: Specifications
The rack ears are fixed in place using the 6x M4 screws provided. Ensure that air vents are not obstructed. 465 rack ear fixings 483 with rack ears fitted Allen & Heath XONE:4D User Guide... -
Page 48: Product Registration
Alternatively, you may either copy or cut off this section of the page, fill in the details, and return it by mail to: Allen & Heath Ltd, Kernick Industrial Estate, Penryn, Cornwall TR10 9LU, UK Allen & Heath XONE:4D User Guide...
Need help?
Do you have a question about the XONE:4D and is the answer not in the manual?
Questions and answers