Table of Contents
Advertisement
Quick Links
NEED HELP WITH INSTALLATION,
MAINTENANCE OR SERVICE?
Nintendo Customer Service
WWW.NINTENDO.COM
or call 1-800-255-3700
NINTENDO OF AMERICA INC.
TTY Hearing Impaired: 1-800-422-4281
P.O. BOX 957, REDMOND, WA
98073-0957 U.S.A.
¿ NECESITAS AYUDA DE INSTALACION,
BESOIN D'AIDE POUR L'INSTALLATION,
L'ENTRETIEN OU LA RÉPARATION?
MANTENIMIENTO O SERVICIO?
Service à la Clientèle de Nintendo
Servicio al Cliente de Nintendo
WWW.NINTENDO.COM
WWW.NINTENDO.COM
ou appelez le
o llame al 1-800-255-3700
1-800-255-3700
Número de TTY de Servicio al Cliente para individuos
Service à la clientèle ATS : 1-800-422-4281
con impedimento auditivo: 1-800-422-4281
61914C
PRINTED IN CHINA
Wii Operations Manual
System Setup
Advertisement
Table of Contents

Related Manuals for Nintendo Wii


Summary of Contents for Nintendo Wii
- Page 1 NEED HELP WITH INSTALLATION, BESOIN D’AIDE POUR L’INSTALLATION, System Setup MAINTENANCE OR SERVICE? L’ENTRETIEN OU LA RÉPARATION? MANTENIMIENTO O SERVICIO? Nintendo Customer Service Service à la Clientèle de Nintendo Servicio al Cliente de Nintendo WWW.NINTENDO.COM WWW.NINTENDO.COM WWW.NINTENDO.COM or call 1-800-255-3700 ou appelez le...
-
Page 2: Table Of Contents
Wii logo are trademarks of Nintendo. © 2006 Nintendo. All Rights Reserved. does not play CD or DVD discs. This Wii console is for use only in the United States, Nintendo of Canada Ltd., Authorized User in Canada. Elements of the Wii console and the Wii Canada, Mexico or Latin America. -
Page 3: Wii Remote
Laser Type: Semiconductor laser Laser wave length: 662nm (typ.)(647nm~687nm) • Do not use the Wii during a lightning storm. There may be a risk of electric shock Parents should watch their children play video games. Stop playing and consult a Laser power: Max. - Page 4 For access to CR Coin Lithium battery (CR2032). Perchlorate Material – special handling may apply. GameCube Disc. More information can be found at http://www.dtsc.ca.gov/HazardousWaste/Perchlorate/index.cfm. Do not remove battery cover unless instructed to do so by a Nintendo Customer Service representative.
-
Page 5: Nunchuk
Wii Remote. Speaker 1 Button External Extension NOTE: If the Control Stick is moved out of neutral position when the Wii power is To avoid this from occurring, do not move the Contol Stick when: Wrist Strap Connector... -
Page 6: Ac Adapter
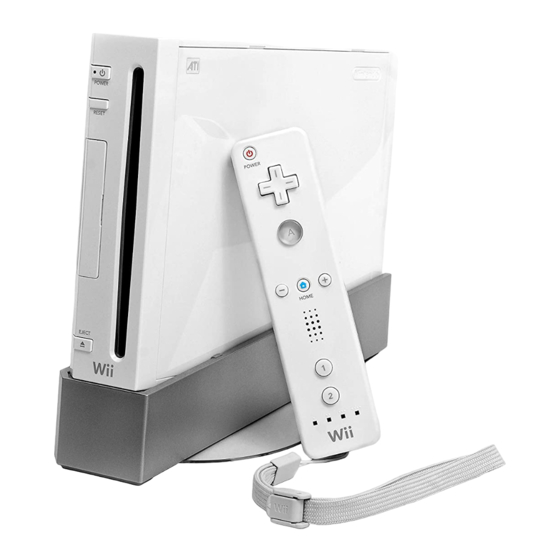
Wii Console Stand AC Plug DC Plug Connects to a 120V AC wall Connects to the DC Input connector outlet. on the back of the Wii console. Wii AV Cable Wii Stand Plate Video Audio (Left) Audio (Right) AV Multi Out Plug... - Page 7 • Do not store the Wii console in a humid place, on the floor, or in any location stand rather than sliding it in from the where it may collect dirt, dust, lint, etc.
-
Page 8: Sensor Bar
Sensor Bar mounted above the screen. below the screen. IMPORANT: The Wii console will not work with any AV cable other than the CAUTION - TV Screen Damage model supplied with your Wii system or the component video cable listed below. - Page 9 S y s t e m S e t u p Mounting the Sensor Bar Above the Screen Mounting the Sensor Bar Below the Screen 1. Remove the protective film from the foam pads 2. For additional stability, you can add adhesive 3.
-
Page 10: Ac Adapter
Sensor Bar. Communication between the Wii Remote and the Sensor Bar may be improved in some situations by mounting the Sensor Bar on the Sensor Bar stand; for example, if the TV is 1. Insert the DC plug on the Wii AC Adapter cord into the DC input connector on the sitting on the floor. -
Page 11: Tv And Audio/Video Settings
To avoid battery leakage: uses the wrist strap properly. 3. The Wii Menu should appear on the TV screen. See the Channel section of the • Wearing the wrist strap will prevent you from accidentally dropping or throwing the Operations Manual for more information on this feature. - Page 12 2. Select the Wii Remote Settings option shows the player 3. Open the SD Card Slot cover on the front of the Wii console and press the SYNC. from the Home Button menu, then There are two different modes of synchronizing (syncing).
-
Page 13: Using Game Discs
TV. • When not using discs, store them in their cases to prevent them from getting Insert your Game Disc into the Game Disc slot on the front of the console. The Wii scratched, dirty or damaged. - Page 14 Point the remote at a specific place on Wave the remote back and forth from The remote can be used by itself, or in different configurations when connected up to other Wii accessories. These configurations can be used right or left handed. the TV screen.
- Page 15 Press the Lock/Release Levers on the sides of the Nunchuk plug and pull the plug CAUTION - Use the Wrist Strap straight out of the External Extension Connector on the bottom of the Wii Remote. Wii gameplay with the Wii Remote and Nunchuk can involve rapid or vigorous motion.
- Page 16 Press here 1. Stand the Wii console upright as shown and squeeze gently until you feel a 2. Remove the cover by pulling straight up out of the console. slight click. 3. The cover can be replaced by reinserting the cover straight down into the console until it clicks into place.
- Page 17 If you think any of these conditions are affecting the operation of the remote, try removing or reducing the source of interference. If purchasing a new SD Card, a list of cards that have been tested to work with the Wii console can be found at the following URL: http://support.nintendo.com...
-
Page 18: Troubleshooting
• Make sure the disc is inserted correctly. The label side of the disc must face to the right Consumer Service at 1-800-255-3700 for assistance. if the Wii console is set up vertically, or must face up if the Wii console is set up Unable to proceed passed the Language Select screen The user may find the following booklet prepared by the Federal Communications Commission... - Page 19 GAME & ACCESSORY WARRANTY Nintendo warrants to the original purchaser that the product (games and accessories) shall be free from defects in material and workmanship for a period of three (3) months from the date of purchase. If a defect covered by this warranty occurs during this three (3) month warranty period, Nintendo will repair or replace the defective product, free of charge.
Need help?
Do you have a question about the Wii and is the answer not in the manual?
Questions and answers