Table of Contents
Advertisement
Advertisement
Table of Contents

Summary of Contents for Antex electronics XM-100
- Page 1 XM-100 Commercial XM Satellite Radio Owner’s Manual...
-
Page 2: Table Of Contents
XM-100 Commercial Satellite Audio Receiver Welcome! ................5 Installing XM-100 ..............5 Parts List ..............6 Connections ..............6 Positioning the Antenna ..........7 Optimizing Signal Strength ........... 9 Activating the XM-100............10 Operating the XM-100............10 Display and Indicators ..........11 Tuning Modes .............. -
Page 3: Important Safety Instructions
XM-100 Commercial Satellite Audio Receiver Antex Electronics Corporation 1125 W. 190 Street Gardena, California 90248 www.antex.com Copyright © 2005 Antex Electronics Corporation. All Rights Reserved. No portion of this manual may be reproduced without prior written consent from Antex Electronics. Part number 9000-2480-7006 Rev NC. - Page 4 XM-100 Commercial Satellite Audio Receiver Power Lines – An outside antenna system should not be located in the vicinity of overhead power lines or electric light or power circuits, or where they can fall into such power lines or circuits. When installing an outside antenna system, extreme care should be taken to keep from touching such power lines or circuits as contact with them might be fatal.
-
Page 5: Welcome
1-800-XM-RADIO (or 1-800-967-2346). Installing XM-100 Antex Electronics recommends that the XM-100 unit and its antenna be installed by a professional installer. Brief instructions are presented here for reference purposes. The installation process consists of three steps: 1. -
Page 6: Parts List
Antenna RCA audio cable Remote control Connections House the XM-100 unit in a component rack or other suitable location that provides adequate ventilation. The maximum ambient temperature should never exceed 120 degrees Fahrenheit. The unit’s front user interface and various... -
Page 7: Positioning The Antenna
The provided XM antenna requires exposure to the south/southeastern sky for proper signal reception. To position your antenna, first connect the XM-100 to your audio system as described above, then follow these instructions. 1. Power on the receiver, verify the power indicator is illuminated and the display backlight is on. - Page 8 4. If the system is working, you will hear XM programming on channel 1 and can proceed to activating the XM-100. If there is a problem with the antenna connection, the XM- 100’s front panel display will read “Check Antenna.” If the...
-
Page 9: Optimizing Signal Strength
XM-100 Commercial Satellite Audio Receiver front panel display will read “NO SIGNAL”. Reposition the antenna until signal strength is optimized and you hear audio. 5. Activate the unit following the “Activating XM-100” instructions. Optimizing Signal Strength For robust operation, signal strength received from the antenna must be optimized. -
Page 10: Activating The Xm-100
0 on the radio. Operating the XM-100 XM-100 provides intuitive control of its various functions via its front panel buttons as shown on the next page, the remote control, and the RS232 port (for local and remote operation). -
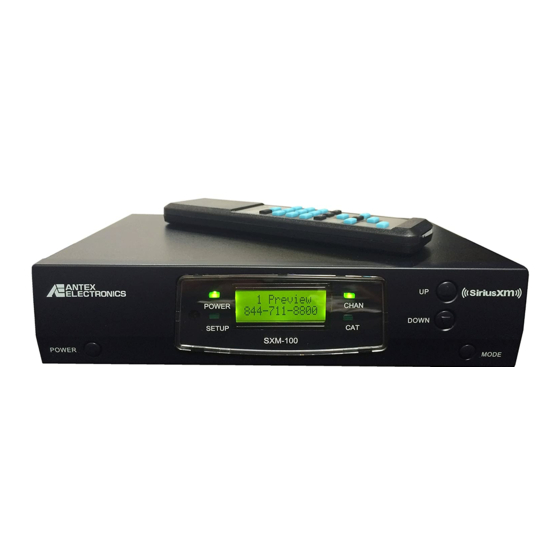
Page 11: Display And Indicators
The display backlight is illuminated and text appears after the power button has been pressed, indicating the unit is on. The XM-100 has four indicators and four buttons as follows (Modes are described below): Power Indicator – illuminated whenever power present Setup Indicator –... -
Page 12: Tuning Modes
XM-100 Commercial Satellite Audio Receiver Tuning Modes The XM-100 supports three Modes of channel selection: Channel (default), Category and Category/Channel. Examples of categories are Rock, Classical, etc. Channel Mode allows you to scroll through and select any channel in the entire XM lineup regardless of what category the channel belongs to. -
Page 13: Changing Categories
Category Mode. Setting and Recalling Presets The XM-100 can store up to 10 channel presets (numbered 0 to 9). To assign a preset, first tune to a desired channel, in this example 44. Then press and hold the PRESET button on the remote for 4 seconds. -
Page 14: Setting Options Via Menus
XM-100 Commercial Satellite Audio Receiver Setting Options Via Menus The XM-100 SETUP Mode allows you to configure options such as forced tuning, blocking, skipping, etc. To enter the SETUP Mode, press and hold the MODE button on the front of the unit for 4 seconds or depress the SETUP button on the remote. - Page 15 XM-100 Commercial Satellite Audio Receiver Setup Menus Setup Menus Mode to Exit Mode to Exit Setup Setup Signal Qual Signal Qual Setup Setup Line Level Line Level Setup Setup Front Lock Front Lock Setup Setup Timezone Timezone Setup Setup Dlt Savings...
-
Page 16: Signal Quality
XM-100 Commercial Satellite Audio Receiver Signal Quality When Setup – Signal Quality is displayed, pressing the Mode button brings up the following menu: CN1 CN2 TBER #.# #.# This menu may also be displayed by holding the power button for 4 seconds when at the main display. Pressing the Mode button returns up one menu level. -
Page 17: Front Lock
Front Lock? Locked The buttons on the front of the XM-100 unit may be locked or unlocked using this feature. Locking the unit may be useful if a store manager or parent wishes to ensure the desired channel is not altered. -
Page 18: Daylight Savings Observation
XM-100 Commercial Satellite Audio Receiver Daylight Savings Observation When Setup – DLT Savings is displayed, pressing the Mode button brings up the following menu: Daylight Savings? Use the up/down keys to set whether the unit resides in an area that observes daylight savings. Press the Mode key to ascend back up one menu level. -
Page 19: Forced Tuning
XM-100 Commercial Satellite Audio Receiver Skip ###? PWR Toggles In the course of using the XM-100 you may find that there are specific channels you prefer not to listen to and would rather skip over. Using XM-100’s SKIP feature, you can program the unit to skip over these channels when scrolling using the up/down buttons or remote control. - Page 20 Up to 100 events may be programmed in the XM-100. Use of the provided remote control is required to review or program Forced Tune events. This functionality cannot be accessed from the front panel.
- Page 21 XM-100 Commercial Satellite Audio Receiver Channel number. Use direct numeric Channel number. Use direct numeric entry with remote, or up and down entry with remote, or up and down Force Tune Event Force Tune Event arrows on remote. Down arrow arrows on remote.
-
Page 22: Using The Remote Control
XM-100 Commercial Satellite Audio Receiver Using the Remote Control The XM-100’s remote control provides identical functionality to the buttons on the front panel. CATEGORY CATEGORY CHANNEL CHANNEL (LEFT/RIGHT) (LEFT/RIGHT) (UP/DOWN) (UP/DOWN) Tune to Tune to Tune to Tune to specific audio... -
Page 23: Integration With Distributed Audio Control Systems
XM-100 Commercial Satellite Audio Receiver Integration with Distributed Audio Control Systems The XM-100 has been designed for easy integration into distributed audio systems by professional installers using the RS232 control port. Antex strongly recommends that the RS232 connection be used only by experienced professional installers. - Page 24 XM-100 Commercial Satellite Audio Receiver defect(s), and transportation prepaid to the Company at the address shown below. This Warranty does not extend to the elimination of externally generated static or noise, to correction of antenna problems, to costs incurred for installation, removal or reinstallation of the product, or damage to other components.
Need help?
Do you have a question about the XM-100 and is the answer not in the manual?
Questions and answers