
Subscribe to Our Youtube Channel
Related Manuals for EnGenius EUB12OOAC


Summary of Contents for EnGenius EUB12OOAC
-
Page 1: User Manual
User Manual EUB12OOAC version 1.0 Dual Band Wireless ACI200 USB Adapter USB 3.0 and Wireless AC for intense media streaming... - Page 2 IMPORTANT To install this USB Adapter, please refer to the Quick Start Guide included in the product packaging.
-
Page 3: Table Of Contents
Table of Contents Chapter 1 Product Overview ..........4 Chapter 4 MAC OS X ............25 Key Features / System Requirements ........5 Installing the Driver ..............26 Applications / Network Configuration ........6 Uninstalling the Driver ............ 29 Technical Specifications / Physical Interface ..... 7 Wireless LAN Utility ..............30 Profile .................... 3 0 Chapter 2 WPS Setup .............. 8 Wireless Network Properties Dialog ........ 31 WPS Setup ................... 9 Adding a Profile ................32... -
Page 4: Chapter 1 Product Overview
Chapter 1 Product Overview... -
Page 5: Key Features / System Requirements
• High Speed USB 3.0 Interface • WPS Button for Wireless Easy Setup • Support WEP/WPA and WPA2 Security Encryption Introduction The EnGenius EUB1200AC is a Wireless AC USB 3.0 speed and dual band technology, the EUB1200AC can avoid Adapter for use with desktop or laptop comuters running Wi-Fi signal interference and ensure top Wi-Fi speeds and Window 7, Window 8 or Mac OS X (10.8) operating reliable connections. The incredible speed of the EUB1200AC... -
Page 6: Applications / Network Configuration
Product Overview Applications Ad-hoc (peer-to-peer) Mode EnGenius wireless LAN products are easy to install and This is the simplest network configuration with several easy to use. The following list describes some of the computers equipped with the PC Cards that form a wireless many applications made possible through the EnGenius network whenever they are within range of one another. -
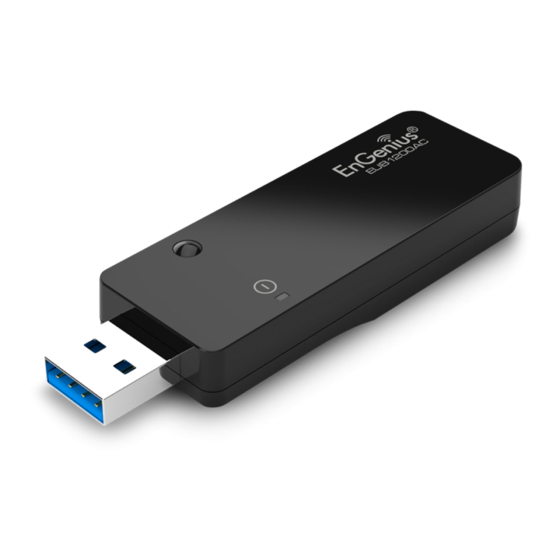
Page 7: Technical Specifications / Physical Interface
Technical Specifications Physical Interface Certifications: Dimensions and Weights FCC Part 15, ETSI 300/328/CE Weight: 0.32Ibs. Width: 5.5” Software Features Length: 5.3” Wireless WEP, WPA/WPA2 (AES/TKIP), WPS, WMM Height: 1.37” Drivers Windows 7/ Vista / XP / 2000 Apple Mac OS 10.7 (Lion supportive) and the older version Physical/Environment Conditions Operating: Temperature: 0°C to 45°C (32°F to 113°F) Humidity (non-condensing): 15% – 95% typical Storage: Temperature: -10°C to 75°C (14°F to 167°F) Humidity (non-condensing): 15% – 95% typical 1 LED Indicator 2 WPS Button — Wi-Fi Protected Setup button. To associate another WPS-enabled client device (computer, wireless media bridge, USB adapter, etc.) press the WPS button for 2 to 5 seconds on the router while also pressing the WPS button on the end device. 3 USB Connector... -
Page 8: Chapter 2 Wps Setup
Chapter 2 WPS Setup... -
Page 9: Wps Setup
WPS Setup 1. Press and hold down the WPS button on your router (check with the User Manual that came with your router for any further instructions if necessary). 2. Within 2 minutes, press and hold down the WPS button on the EUB1200AC for 2 seconds. The LED should start to blink. 3. Wait for 2 minutes. 4. Confirm that the connection was successful by opening a web browser or checking the wireless signal indicator icon. -
Page 10: Chapter 3 Windows
Chapter 3 Windows... -
Page 11: Installing The Driver
Installing and Uninstalling the Driver Installing the Driver Click on Windows Driver to start the install process. Before you can use the EUB1200AC Dual Band USB Adapter you must install the device driver. To install the USB adapter drivers, follow these steps: 1. Insert the CD-ROM that was provided to you in this package. The setup should run automatically. If the setup does not run automatically, then the setup.exe file must be selected manually from the CD-ROM drive. Click on the Next button to begin the driver installation. -
Page 12: Uninstalling The Driver
Uninstalling the Driver Wait until the driver and client utility is installed. If you want to remove the EUB1200AC EUB1200AC Dual Band USB Adapter from your system, use device’s uninstall application or the Windows uninstall process. When installation is complete click on the Finish button to restart your computer. -
Page 13: Wireless Lan Utility
Wireless LAN Utility There are five sections that allow the user to configure and General monitor the device: general, profile, available networks, The General section shows the connection status, speed, status, and Wi-Fi protected setup. type, encryption, SSID, signal strength, and link quality of the AC1200 Dual Band USB Adapter. Additional configuration options located at the bottom of the window that define the behavior of the utility. The available options are as follows: Show Tray Icon: Show/hide the Utility icon in the system tray. -
Page 14: Profile
Profile The Profile section is used to create and modify profiles To create or modify an access point profile, use the that the AC1200 Dual Band USB Adapter uses to connect following buttons: to access points. Add: Manually enter an access point’s configuration settings. Edit: Modify an access point’s configuration settings. Remove: Delete the configuration settings of an access point. Duplicate: Clone an access point’s profile. Set Default: Reset all saved settings. -
Page 15: Wireless Network Properties Dialog
Wireless Network Properties Dialog Ad hoc: Enables the adapter to operate in ad hoc or infrastructure mode. Use the wireless network properties dialog to enter the connection properties for an access point. Profile Name: The name of the access point that is shown in the profile list. -
Page 16: Adding A Profile
Adding a Profile Note: When using the ASCII or PASSPHRASE feature 3. Enter the profile name in Profile Name. the password must be obtained from the router. 4. Enter the SSID in the Network Name (SSID). To add a profile, follow these steps: Note: The list of channels is only available if the ad hoc 1. Click the Add button. checkbox is selected. 2. Select the checkbox to specify an ad hoc network. 5. Select a channel from the Channel list. Available channels are from 1 to 161. Note: If the ad hoc checkbox is selected, Profile Name 6. - Page 17 7. Select the ASCII checkbox 9. Select the key index from the Key index list. to enter a password using 10. Enter the network key value in Network key. ASCII characters. 11. Enter the same network key value again in Confirm network key. 12. Click the OK button to save the profile settings or the Cancel button to discard settings.
-
Page 18: Editing A Profile
Editing a Profile Note: When using the ASCII or PASSPHRASE feature 3. Enter the profile name in Profile Name. the password must be obtained from the router. 4. Enter the SSID in the Network Name (SSID). To edit a profile, follow these steps: Note: The list of channels is only available if the ad hoc 1. Click the Edit button. checkbox is selected. 2. Select the checkbox to specify an ad hoc network. 5. Select a channel from the Channel list. Available channels are from 1 to 161. Note: If the ad hoc checkbox is selected, Profile Name is not available. - Page 19 7. Select the ASCII checkbox 9. Select the key index from the Key index list. to enter a password using 10. Enter the network key value in Network key. ASCII characters. 11. Enter the same network key value again in Confirm network key. 12. Click the OK button to save the profile settings or the Cancel button to discard settings.
-
Page 20: Available Network
Available Network You can find access points that are within the proximity of your adapter by using the device to scan for them. The information returned by the adapter is shown in a list and includes the SSID, channel, encryption type, authentication type and signal strength If you want to view available access points, click the Refresh button. If you want to add an access point to your list of profiles, click on the Add to Profile button. -
Page 21: Status
Status The Status section shows a more detailed view of the The following information is displayed in the section: information about the status of the adapter and the • Manufacturer network connection. • NDIS Driver Version • Short Radio Header • Encryption type • Authenticate type • Channel Set • MAC Address • Data Rate •... -
Page 22: Wi-Fi Protected Setup / Pin Input Config
Wi-Fi Protected Setup PIN Input Config Use the Wi-Fi Protected Setup function to setup a connection Note: You must enter the PIN code in your router’s between the adapter and a WPS enabled router. configuration dialog before establishing a connection. There are two ways to create a WPS connection: pin input config (PIN) or push button config (PBC). 1. Click on the PIN Input Config button to start the PIN code process. - Page 23 2. Select Yes to start scanning for access points The following dialog is shown while the router is accepting the connection. 3. Select the target AP and click the Select button. When the dialog disappears the connection is established.
-
Page 24: Push Button Config
Push Button Config 1. Click on the Push Button Config button to start the 2. Click on the Push Button Config in the following dialog. process. 3. Press the WPS button on the access point. The connection is established within a few seconds. Note: The Push Button Config button and the WPS button on the access point must be pushed within ten seconds of each other. -
Page 25: Chapter 4 Mac Os X
Chapter 4 MAC OS X... -
Page 26: Installing The Driver
Installing and Uninstalling the Driver Installing the Driver Before you can use the EUB1200AC Dual Band USB Adapter 3. Select the zip file for the correct driver of Mac OS X of you must install the device driver. your computer. (The Mac OS X version of the computer can be found by clicking on the Apple logo at the top left To install the USB adapter drivers, follow these steps: of the screen and selecting About This Mac.) Double click 1. Insert the CD-Rom. An icon labeled EUB1200AC should on the zip file to extract the driver installation program appear on the desktop. to the Downloads folder. 2. Click on the icon. Then click on the Drivers folder. - Page 27 4. Click on the newly extracted WLAN_11ac_USB_ 6. Click on the Continue button to configure the next step. MacOS10…folder. 5. Click on the Installer.pkg icon to run the program. 7. Read the Important Information and then click on the Install button.
- Page 28 8. Select a language to read the software license agreement 10. Click on the Install button to begin the installation process and then click on the Continue button to display the or Go Back to return to the previous step. license dialog. 9. Click on the Read License button to read the license 11.
-
Page 29: Uninstalling The Driver
12. Click the Restart button to restart your system Uninstalling the Driver If you want to remove the AC1200 Dual Band USB Adapter Note: The adapter may not function properly if you do from your system, follow these steps: not restart the system. 1. Go to the Applications folder and drag the Wireless-AC Network Utility to the Trash 2. Click on the uninstall.command icon found in the 13. Insert the USB adapter into the USB port. MAC OS X will Wlan_11ac_USB_MacOS… folder containing the installer. -
Page 30: Wireless Lan Utility
Wireless LAN Utility There are six sections that allow the user to configure and Profile monitor the device: link status, profiles, available network, The Profile section is used to create and modify profiles advanced setting, WPS and information. that the AC1200 Dual Band USB Adapter uses to connect to access points. Link Status The Link Status section shows the MAC address, SSID, BSSID, security type, connection status, network type, channel, link speed, and signal strength of the AC1200 Dual Band USB Adapter. -
Page 31: Wireless Network Properties Dialog
Wireless Network Properties Dialog Fill in the following wireless network properties to create an access point profile: Use the wireless network properties dialog to enter the connection properties for an access point. Profile Name: The name of the access point that is shown in the profile list. -
Page 32: Adding A Profile
Adding a Profile Note: When using the ASCII or PASSPHRASE feature 3. Enter the profile name in Profile Name. the password must be obtained from the router. 4. Enter the SSID in SSID. To add a profile, follow these steps: Note: The list of channels is only available if the ad hoc 1. Click the Add button. checkbox is selected. 2. Select the checkbox to specify an ad hoc network. 5. Select a channel from the Channel list. Available channels are from 1 to 11. Note: If the ad hoc checkbox is selected, Profile Name 6. Select a network authentication protocol from the is not available. - Page 33 7. Select the ASCII checkbox to enter a five or thirteen 8. Enter the network key value in Network key. For 64-bit character password using the WEP protocol. key length enter 10 hexadecimal characters. For 128-bit key length enter 26 hexadecimal characters. .9. Enter the same network key value again in Confirm network key. 10. Select the key index from the Key index list. 11. Click the OK button to save the profile settings or the Cancel button to discard settings.
-
Page 34: Editing A Profile
Editing a Profile 3. Enter the profile name in Profile Name. Note: When using the ASCII or Network key feature the 4. Enter the SSID in the SSID. password must be obtained from the router. Note: The list of channels is only available if the ad hoc To edit a profile, follow these steps: checkbox is selected. 1. Click the Add button. 5. Select a channel from the Channel list. Available channels are from 1 to 11. 2. Select the checkbox to specify an ad hoc network. 6. Select a network authentication protocol from the Note: If the ad hoc checkbox is selected, Profile Name Network Authentication protocol list. -
Page 35: Available Network
Available Network 7. Select the ASCII checkbox to enter a five or thirteen You can find access points that are within the proximity of character password using the WEP protocol. your adapter by using the device to scan for them. The information returned by the adapter is shown in a list and includes the SSID, channel, authentication type, encryption type and BSSID (MAC address). 8. Enter the network key value in Network key. For 64-bit key length enter 10 hexadecimal characters. For 128-bit key length enter 26 hexadecimal characters. 9. -
Page 36: Advanced Settings
Advanced Settings 3. Set the PSP gaming mode from the PSP Xlink Mode list. The options are Enabled or Disabled. In the Advanced Settings section you can modify the 802.11b preamble mode, QoS mode, and PSP Xlink mode. 4. Set the Fragment Threshold by moving the slider control or manually entering a value in the text box. The fragment threshold specifies the maximum size of a packet during data transmission. A value too low could lead to low performance. 5. Set the RTS Threshold by moving the slider control or manually entering a value in the text box. If the packet size is smaller than the RTS threshold, the device will not use RTS/CTS to send the data packet. -
Page 37: Wi-Fi Protected Setup / Pin Input Config
Wi-Fi Protected Setup PIN Input Config If you do not want to set up a protected connection Note: You must enter the PIN code in your router’s manually, you can use the Wi-Fi protected setup function. configuration dialog before establishing a connection. There are two ways to create a WPS connection: pin input config (PIN) or push button config (PBC). Before selecting either method, click the SCAN button to locate the access points within the proximity of the adapter. -
Page 38: Push Button Config / Information
Push Button Config Information 1. Select the target access point. The Information tab displays information about the network driver version and date. 2. Click the PBC button Note: The PBC button and the WPS button on the access point must be pushed within ten seconds of each other. 3. Press the WPS button on the access point. When the connection is established the Link Status section will show the connection information. See Link Status for more details. -
Page 39: Appendix
Appendix... -
Page 40: Fcc Interference Statement
Appendix A Federal Communication Commission Interference Statement This device complies with Part 15 of the FCC Rules. Operation is subject to the following two conditions: (1) This device may not cause harmful interference, and (2) this device must accept any interference received, including interference that may cause undesired operation. This equipment has been tested and found to comply with the limits for a Class B digital device, pursuant to Part 15 of the FCC Rules. -
Page 41: Industry Canada Statement
Appendix B Industry Canada Statement This device complies with RSS-210 of the Industry Canada Rules. Operation is subject to the following two conditions: (1) This device may not cause harmful interference, and (2) this device must accept any interference received, including interference that may cause undesired operation. -
Page 42: Radiation Exposure Statement
Radiation Exposure Statement The product comply with the Canada portable RF exposure limit set forth for an uncontrolled environment and are safe for intended operation as described in this manual. The further RF exposure reduction can be achieved if the product can be kept as far as possible from the user body or set the device to lower output power if such function is available. -
Page 43: Europe - Eu Declaration Of Conformity
Appendix C Europe – EU Declaration of Conformity This device complies with the essential requirements of the R&TTE Directive 1999/5/EC. The following test methods have been applied in order to prove presumption of conformity with the essential requirements of the R&TTE Directive 1999/5/EC: EN60950-1 •... - Page 44 This device is a 5GHz wideband transmission system (transceiver), intended for use in all EU member states and EFTA countries, except in France and Italy where restrictive use applies. In Italy the end-user should apply for a license at the national spectrum authorities in order to obtain authorization to use the device for setting up outdoor radio links and/or for supplying public access to telecommunications and/or network services.
- Page 45 Français [French] Par la présente [nom du fabricant] déclare que l’appareil [type d’appareil] est conforme aux exigences essentielles et aux autres dispositions pertinentes de la directive 1999/5/CE. Italiano [Italian] Con la presente [nome del costruttore] dichiara che questo [tipo di apparecchio] è conforme ai requisiti essenziali ed alle altre disposizioni pertinenti stabilite dalla direttiva 1999/5/CE.
Need help?
Do you have a question about the EUB12OOAC and is the answer not in the manual?
Questions and answers