Table of Contents
Advertisement
ssem
y a
Owner's
Manua
O
'INSTRUCTIONAL
VIDEO
Hosted
by _
Champion
Barbecuer
Lloyd Davenport
ASSEMBLER
/ iNSTALLER:
Leave these
instructions
with the consumer.
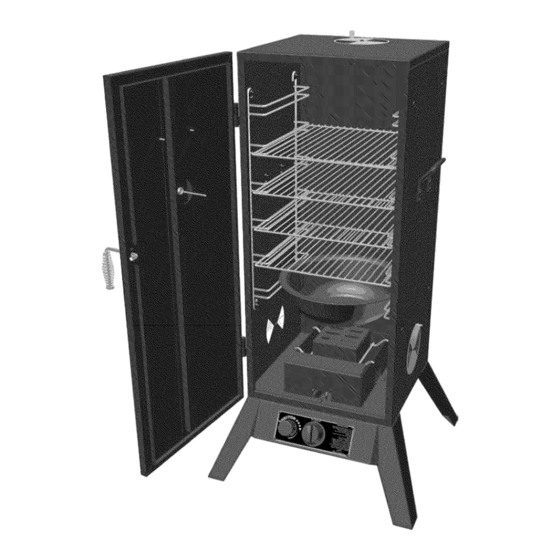
Model 3600G Shown
CONSUMER
/ USER:
Read all of these
instructions
and keep them in a safe place for future
reference.
FOR YOUR SAFETY
if you smell
gas:
1. Shut off gas to the appliance.
2. Extinguish
any open flames.
3. Open door.
4. If odor continues,
immediately
call your gas supplier
or your
fire department.
FOR YOUR SAFETY
1. Do not store
or use gasoline
or other flammable
vapors
and liquids
in the vicinity
of this or any other
appliance.
2. When cooking
with oil/grease,
do not allow the oil/grease
to exceed
350°F (176.5°C).
Do not store or use extra
cooking
oil in the vicinity
of this or any other appliance.
3. An LP cylinder
not connected
for use shall not be stored
in the vicinity
of this or any other appliance.
r,,___ml_--
_
WARNING
1. Do not store spare
LP cylinder
within
10 feet (3.05 m) of this appliance.
2. Do not store or use gasoline
or other flammaMe
liquids
or vapors
within
25 feet (7.62 m)
of this appliance.
3. When cooking
with oil/grease,
do not allow the oillgrease
to get hotter than 350°F (176.5°C).
4. Do not leave oillgrease
unattended.
Advertisement
Table of Contents

Related Manuals for Great Outdoors 3600G


Summary of Contents for Great Outdoors 3600G
- Page 1 10 feet (3.05 m) of this appliance. or other flammaMe liquids do not allow the oillgrease unattended. Model 3600G Shown reference. FOR YOUR SAFETY or other flammable of this or any other with oil/grease, do not allow the oil/grease Do not store or use extra of this or any other appliance.
- Page 2 Statement Congratulations of your new Great Outdoors that you have recognized function, and quality product. We believe market. If or for any reason we have failed to meet you're expectations, to make it right by calling us toll-free: between Eastern Standard time, Monday through...
- Page 3 DO NOT use this smoker in a manner other than its intended purpose. It is NOT intended for commercial use. It is NOT intended to be installed or used in or on a recreational vehicle and/or boats. The smoker is not to be used as a heater.
- Page 4 Do not attempt to use the unit until any gas leaks are fixed and/or the source of the unburned gas odor is accounted for. A Do not use the smoker if the burner fails to light or fails to remain lit. Under such conditions, gas should be shut off and fuel cylinders should be disconnected.
-
Page 5: Parts List
Assembly Step 1 Check your package contents parts are damaged, DO NOT RETURN YOUR SMOKER TO THE RETAILER- CALL US FIRST! 1.800.668.5323 Monday to Friday 9:00am to 5:00pro Eastern Standard Time Hardware Bags: 1/4-20 x 3/8" Bolts (3) 1/4-20 Nuts (3) - Page 6 Identifying Check your package contents parts are damaged, please call our toll-free DO NOT RETURN YOUR SMOKER TO THE RETAILER - CALL US FIRST! 1.800.668.5323 Monday to Friday 9:00am to 5:00pro Eastern Standard Time Burner Chamber Assembly AZ001120 Ignitor Electrode...
- Page 7 Cabinet as shown. Loosely thread on the nuts to hold the assembly in place. At this time, DO NOT tighten the bolts completely. Assem ly Step 2 Cabinet Assembly 1/4-20 Nuts 3 Required your smoker, set upside down Phillips Head Screwdriver...
- Page 8 4 Legs 1/4-20 x 5/8" Bolts 14 Req u ired 1. Leave the cabinet upside down. 2. For each leg, line up the mounting as shown and insert the bolts. Nuts are pre-welded to the cabinet. IMPORTANT: The leg that contains an extra hole on its side must be mounted at the front in the position shown.
- Page 9 Bag A through on the Control Panel and thread them into the mounting 8. Firmly tighten all of the bolts and nuts. 9. Carefully turn the smoker upright onto its legs. Assem ly Step 4 Control Panel Assembly Knob Make page.
- Page 10 Instructions Remaining 2 Mounting Bolts Once all bolts are firmly tightened, carefully turn the smoker upright onto its legs. At this point, your smoker should resemble this illustration y Step 4 - Continued are repeated from the previous page. Figure...
- Page 11 3 Damper Plates 10-24 Nuts 10-24 Lock Washers 3 Required 1. Set one damper plate on top of the cabinet and line it up with the corresponding "butterfly" holes. 2. Insert a bolt from the top through the center hole. 3.
- Page 12 2 Carry Handles 5/16-18 Nuts 5/16 Lock Washers 8 Required 8 Required 1. Line up the carry handle with the corresponding holes on the side of the cabinet as shown. The handles must be positioned upright with the bolt holes on the bottom as shown. 2.
- Page 13 ... ;_i_@_!i_@_i_!_!ii_ii_ii_ii_iiii_ii_i_iiiii_i{_ii_!_i!_!i}_i!_i_i_!_i!_i!_!!_!i_i@_i_@_i_i_iiii_i_i_i_ ii!iiiiiiii{{{{{;iii_!i_ _ , i{iiiiiiii{{iiiii!!!;;ii!!_,_,s_!:iiii!i!iiiiiii!!i{ii_iii!_i_i_i_iiii!i!!i_:_ _@_i!_ii!!i!ii_ii_ii_ii_ii_ii_ii_ii_ii_ii_iiiiiiiiiiiii_iiiiiiiii!i!!!!!i_!i!i!i!i!iiiiiiiiiiiiiiiiiiiiiiii_i_i_i_i_ii!_! !!ii_i!!i!i_!_i_ii_i_i_ii_B_iii_ii_ii_ii_ii!ii_i!!ii!i!!ii!i!_i!_iiiii_ii_i_i_i_iiii_i: Wood Chip Box Lid Wood Chip No tools or hardware are required for this step. 1. Position the Wood Chip Box Stand on top of the Burner Chamber box as shown, There are notches for the stand to rest in.
- Page 14 Water Bowl No tools or hardware are required for this step. 1. Slide the water bowl into the lowest rack position as shown. 2. Insert the cooking grids into any of the remaining rack positions as desired. Do not insert a grid directly over the water bowl - the bowl will restrict heat distribution.
- Page 15 Assem Door Handle Kit Handle Spring, Handle Washer, Mounting Plate ly Step HARDWARE BAG _ 1/4-20 x 3/8" Bolts and 1/4-20 Lock Washers (2 ea) 1. Slide the handle washer onto the end of the door handle, followed by the handle spring as shown.
- Page 16 Indicator Heat 5/16-18 Nut 1 Required 1. Remove the nut from the back of the heat indicator and insert the heat indicator into the door panel as shown. Make sure the indicator numbers are right side up. 2. From the back side of the door panel, thread the nut onto the heat indicator.
- Page 17 Inspect the installation underneath the smoker to ensure that the hose is not rubbing any portion of the burner chamber. Crimp Assembly is now complete! Please follow all instructions and safeguards the LP tank.
- Page 18 1. The knob on the LP tank must be closed. See that the knob is turned clockwise to a full stop. 2. Check that the control knob on the smoker is turned off. 3. Remove the protective cap from the LP tank valve and coupling if present.
- Page 19 Gas Tank outlet must have Type 1 gas connection termination in order to mate with gas hose provided with smoker. The pressure regulator and hose assembly supplied by the manufacturer with the appliance must be used. Replacement pressure regulators and hose assemblies must be those specified by the appliance manufacturer.
- Page 20 However, if paint becomes necessary Care and Maintenance. To season your smoker, simply use it as you normally would; only do not cook any food. You will need to follow all of the operating Using your desired flavoring woods, marinades, (around 125°F) for 45-60 minutes.
- Page 21 It is not recommended remove the wood chip box while the smoker is in operation. CAUTION! : The wood chip box and lid get very hot.
- Page 22 If the burner doesn't light within 3 to 5 seconds, burner control knob off and wait five minutes before repeating the steps again. match lighting the smoker using the instructions below. Once the burner is lit, then close the door to allow heat to accumulate.
- Page 23 Shutting the Smoker Off CAUTION: The smoker can become very hot while in use. Do not touch any portion of the smoker except for the door handle and burner control knob. It may be necessary to use protective gloves. •...
- Page 24 If there is evidence of abrasion, wear, cuts or leaks, the hose must be replaced before the smoker is used. Refer to the "leak test" instructions portion of this manual. Fill the wood chip box with flavoring wood chips and place the box inside the smoker as instructed in the assembly...
- Page 25 Pre-Cooked °F Fish (Cook until opaque and flakes easily) °F are measured with a meat probe thermometer, on the door of the smoker is not an accurate reading, 180 °F 180 °F 170 °F 180 °F 180 °F 160 °F °F...
- Page 26 To clean the inside and outside of the smoker cabinet, simply use a damp cloth. Spray-washing moisture should be wiped away and not allowed to stand inside or on top of the smoker. Once cleaned, you may prefer to lightly coat the interior of the smoker cabinet with cooking oil or cooking spray.
- Page 27 The Great Outdoors ® Smoky Mountain Series _Msmoker is guaranteed against broken or damaged parts at the time of purchase. The cast brass burner is guaranteed warranty except the water bowl, which is guaranteed to be free of defects for 90 days.
- Page 28 Grill Company Smoky Mountain Series, the Smoky Mountain Series logo, and the Great Outdoors Grill Company logo is a trademark of the Great Outdoors Grill Company and not to be used without express permission by the owners and managers of the Great Outdoors Grill Company,...
Need help?
Do you have a question about the 3600G and is the answer not in the manual?
Questions and answers