AEG Electrolux B4101-5 User Manual
Built-in electric oven
Hide thumbs
Also See for B4101-5:
- User manual (60 pages) ,
- Brochure & specs (11 pages) ,
- User manual (44 pages)
Table of Contents
Advertisement
Quick Links
Download this manual
See also:
User Manual
Advertisement
Table of Contents

Related Manuals for AEG Electrolux B4101-5


Summary of Contents for AEG Electrolux B4101-5
- Page 1 B4101-5 User manual Built-In Electric Oven...
-
Page 2: Table Of Contents
Contents Thank you for choosing one of our high-quality products. To ensure optimal and regular performance of your appliance please read this instruc- tion manual carefully. It will enable you to navigate all processes perfectly and most ef- ficiently. To refer to this manual any time you need to, we recommend you to keep it in a safe place. -
Page 3: Operating Instructions
Operating Instructions Operating Instructions Safety instructions Electrical safety • This appliance must be only connected by a registered electrician. • In the event of a fault or damage to the appliance: Take the fuses out or switch off. • Repairs to the appliance must only be carried out by qualified service engineers. Considerable danger may result from improper repairs. -
Page 4: Description Of The Appliance
Description of the Appliance • Do not store any moist foods inside the oven. This could damage the oven enamel. • After switching off the cooling fan, do not keep uncovered dishes in the oven. Mois- ture may condense in the oven interior or on the glass doors and may get into the units. -
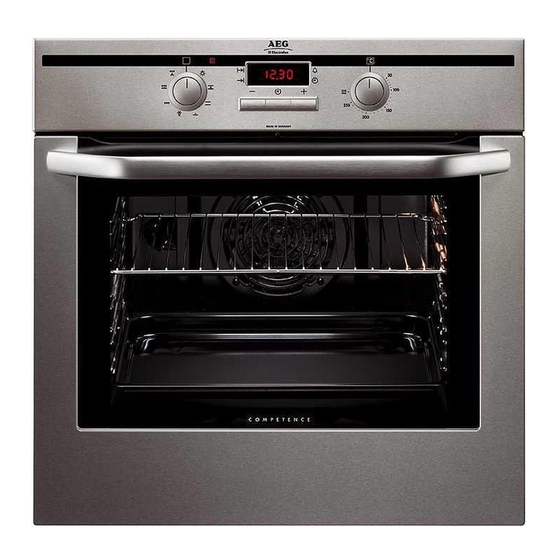
Page 5: Control Panel
Description of the Appliance Control Panel Oven Power Indicator Temperature Pilot Light Time display Clock function buttons Oven Functions Temperature selector Oven Features Top heat and heating elements Oven lighting Shelf positions Fat Filter Fan heating element Bottom Heat Oven shelf runners, removable... -
Page 6: Oven Accessories
Description of the Appliance Inside of door On the inside of the oven door you will find the numbers of the different oven shelves. You will also find some brief information about the oven's functions, recommended shelves and temperatures for cooking the most popular dishes. -
Page 7: Before Using For The First Time
Before Using for the first time Before Using for the first time Setting and changing the time The oven only operates when the time has been set. When the appliance has been connected to the electrical supply or when there has been a pow- er cut, the function indicator Time of day flashes automatically. -
Page 8: Using The Oven
Using the Oven Using the Oven The oven is equipped with retractable buttons for “Oven functions” and “Temperature selection”. To use, press the relevant button. The button then sticks out. Switching the Oven On and Off Temperature Pilot Light Oven Power Indicator Oven Functions Temperature selector 1. -
Page 9: Oven Functions
Using the Oven Oven Functions The oven has the following functions: Oven function Application Light Using this function you can light up the oven interior, e.g. for cleaning. True fan To bake on three oven levels maximum at the same time. Decrease the oven temperatures (20-40 °C) compared with Conventional. -
Page 10: Inserting/Removing The Fat Filter
Using the Oven Inserting the oven shelf: Insert the oven shelf so that the feet point downwards. Push the oven shelf between the guide bars of the selected oven level. The high rim around the oven shelf is an addi- tional device to prevent cookware from slip- ping. -
Page 11: Clock Functions
Using the Oven Clock Functions Function Indicators Time display Function Indicators Button Button Selector Button Minute minder To set a countdown. A signal sounds after the time has elapsed. This function does not affect the functioning of the oven. Duration To set how long the oven is to be in use. -
Page 12: Switching Off The Time Display
Using the Oven Switching Off the Time Display By switching off the time display you can save energy. Switching off the time display Press and hold down any two buttons until the display becomes dark. Switching on the time display Hold down any button until the time reappears in the display. - Page 13 Using the Oven When the time has elapsed, the function indi- cator flashes and an audible signal sounds for 2 minutes. The signal can be stopped by pressing any but- ton. Duration 1. Press the Selection button repeatedly until the function indicator Duration flashes.
- Page 14 Using the Oven When the time has elapsed, the function indi- cator flashes, an audible signal sounds for 2 minutes and the oven switches itself off. 3. The signal and the programme can be stopped by pressing any button. 1. Press the Selection button repeatedly until the function indicator End flashes.
- Page 15 Using the Oven When the time has elapsed, the function indi- cator flashes, an audible signal sounds for 2 minutes and the oven switches itself off. 3. The signal and the programme can be stopped by pressing any button. Duration and End combined Duration...
-
Page 16: Uses, Tables And Tips
Uses, Tables and Tips Uses, Tables and Tips Baking Oven function: True fan or Conventional Baking tins • For Conventional dark metal and non-stick tins are suitable. • For True fan bright metal tins are also suitable. Oven levels • Baking with Conventional is possible on one oven level. -
Page 17: Baking Table
Uses, Tables and Tips When frozen foods are used the trays inserted may distort during cooking. This is due to the large difference in temperature between the freezing temperature and the tempera- ture in the oven. Once the trays have cooled the distortion will disappear again. How to use the baking tables The tables give the required temperature settings, baking times and oven shelf levels for a selection of typical dishes. - Page 18 Uses, Tables and Tips Type of Oven Temperature Time Oven function baking level °C Hr: Mins. Apple pie (2tins Ø20cm, Conventional 1:10-1:30 diagonally off set) Savoury flan (e. g, quiche True fan 160-180 0:30-1:10 lorraine) Cheesecake Conventional 170-190 1:00-1:30 Cakes/pastries/breads on baking trays Plaited bread/bread crown Conventional 170-190...
- Page 19 Uses, Tables and Tips Type of Oven Temperature Time Oven function baking level °C Hr: Mins. Pastries made with egg True fan 80-100 2:00-2:30 white, meringues Macaroons True fan 100-120 0:30-0:60 Biscuits made with yeast True fan 150-160 0:20-0:40 dough Puff pastries True fan 170-180...
-
Page 20: Tips On Baking
Uses, Tables and Tips Tips on Baking Baking results Possible cause Remedy The cake is not browned Wrong oven level Place cake lower enough underneath The cake sinks (becomes Oven temperature too high Use a slightly lower setting soggy, lumpy, streaky) Baking time too short Set a longer baking time Baking times cannot be re-... -
Page 21: Table For Bakes And Gratins
Uses, Tables and Tips Temperature Time Type of baking Shelf position °C Hr: Mins. Flammekuchen (Pizza-like dish 250 - 270 12 - 20 from Alsace) Piroggen (Russian version of 180 - 200 15 - 25 calzone) 1) Pre-heat the oven Table for Bakes and Gratins Shelf Temperature... -
Page 22: Roasting
Uses, Tables and Tips Roasting Oven function: Conventional or Rotitherm Roasting dishes • Any heat-resistant ovenware is suitable to use for roasting (please read the manufac- turer's instructions). • Large roasting joints can be roasted directly in the roasting tray or on the oven shelf with the roasting tray placed below it. -
Page 23: Grill Sizes
Uses, Tables and Tips Tempera- Shelf Time Type of meat Quantity Ovenfunction ture position Hours mins. °C Porkknuckle 750 g-1 kg Rotitherm 150-170 1:30-2:00 (pre-cooked) Veal Roast veal 1 kg Rotitherm 160-180 1:30-2:00 Knuckle of veal 1.5-2 kg Rotitherm 160-180 2:00-2:30 Lamb Leg of lamb, roast lamb... -
Page 24: Defrosting
Uses, Tables and Tips Grilling table Grilling time Food to be grilled Oven level 1st side 2nd side Burgers 8-10 mins. 6-8 mins. Pork fillet 10-12 mins. 6-10 mins. Sausages 8-10 mins. 6-8 mins. Fillet steaks, veal steaks 6-7 mins. 5-6 mins. -
Page 25: Drying
Uses, Tables and Tips Drying Oven function: True fan • Use oven shelves covered with greaseproof paper or baking parchment. • You get a better result if you switch the oven off halfway through the drying time, open the door and leave the oven to cool down overnight. •... -
Page 26: Cleaning And Care
Cleaning and Care Preserves table The times and temperatures for making preserves are for guidance only. Cooking time until Continue to cook Temperature Preserve simmering at 100°C in°C in mins. in mins. Soft fruit Strawberries, blueberries, rasp- 160-170 35-45 berries, ripe gooseberries Unripe gooseberries 160-170 35-45... -
Page 27: Oven Interior
Cleaning and Care Oven interior Clean the appliance after each use. In this way, dirt is easier to clean off and is not al- lowed to burn on. 1. For cleaning, turn the oven light on. 2. After every use, wipe the oven with a solution of washing-up liquid and allow to dry. Clean stubborn dirt with a special oven cleaner. -
Page 28: Oven Lighting
Cleaning and Care Fitting the shelf support rails Important! The rounded ends of the guide rails must be pointing forwards! To re-insert, first hook the rail into place at the back (1) and then insert the front and press into place (2). -
Page 29: Oven Ceiling
Cleaning and Care Oven Ceiling The upper heating element can be folded down to make it easier to clean the oven ceil- ing. Folding down the heating element Warning: Only fold down the heating element when the oven is switched off and there is no risk of being burnt! 1. -
Page 30: Oven Door
Cleaning and Care Oven door For easier cleaning of the oven interior the oven door of your appliance can be taken off its hinges. Removing the oven door from its hinges 1. Open the oven door as far as it will go. 2. - Page 31 Cleaning and Care Hanging the oven door back on its hinges 1. From the handle side take hold of the oven door with a hand on each side and hold at an angle of approx. 45°. Position the recesses on the bottom of the oven door on the hinges on the oven.
-
Page 32: Oven Door Glass
Cleaning and Care Oven door glass The oven door is fitted with three panels of glass mounted one behind the other.The in- ner panels can be removed for cleaning. Important! Rough handling, especially around the edges of the front panel, can cause the glass to break. - Page 33 Cleaning and Care 5. Take hold of the door glass panels on their up- per edge one after the other and take them out of the guide by pulling them upwards.. Cleaning the door glass panels Clean the door glass panels thoroughly with a solution of water and washing up liquid. Then dry them carefully Putting the door glass panels back.
- Page 34 Cleaning and Care On the open side of the door trim (B) there is a guide bar (C). This must be pushed between the outer door panel and the guide corner (D). The clip seal (E) must be snapped in. 3.
-
Page 35: What To Do If
What to do if … What to do if … Problem Possible cause Remedy The oven does not heat up The oven is not switched on Switch the oven on The clock is not set Set the current time on the clock The required settings have not Check the settings... -
Page 36: Disposal
Disposal Disposal Packaging material The packaging materials are environmentally friendly and can be recycled. The plastic components are identified by markings, e.g. >PE<, >PS<, etc. Please dispose of the pack- aging materials in the appropriate container at the community waste disposal facilities. Old appliance The symbol on the product or on its packaging indicates that this product may not... -
Page 37: Service
Service Service In the event of technical faults, please first check whether you can remedy the problem yourself with the help of the operating instructions (section “What to do if…”). If you were not able to remedy the problem yourself, please contact the Customer Care Department or one of our service partners. - Page 40 www.electrolux.com...