Table of Contents
Advertisement
Quick Links
Advertisement
Table of Contents

Related Manuals for GoVideo 525p


Summary of Contents for GoVideo 525p
- Page 1 ������ �������� ��� ������ ������ ����� ���������������...
-
Page 2: Table Of Contents
GoVideo shall not be liable for any errors contained herein or for any damages arising out of or related to this document or the information contained herein, even if GoVideo has been advised of the possibility of such damages. This document is intended for informational and instructional purposes only. -
Page 3: Fcc And Safety Information
PICTURE. IN CASE OF 525 PROGRESSIVE SCAN PICTURE PROBLEMS, IT IS RECOMMENDED THAT THE USER SWITCH THE CONNECTION TO THE ‘STANDARD DEFINITION’ OUTPUT. IF THERE ARE QUESTIONS REGARDING OUR TV SET COMPATIBILITY WITH THIS MODEL 525p DVD PLAYER, PLEASE CONTACT OUR CUSTOMER SERVICE CENTER. -
Page 4: Important Safety Instructions
Important Safety Instructions Important Safety Instructions Read these instructions. Keep these instructions. Heed all warnings. Follow all instructions. Do not use this apparatus near water. Clean only with a damp cloth. Do not block any of the ventilation openings. Install in accordance with the manufacturer’s instructions. -
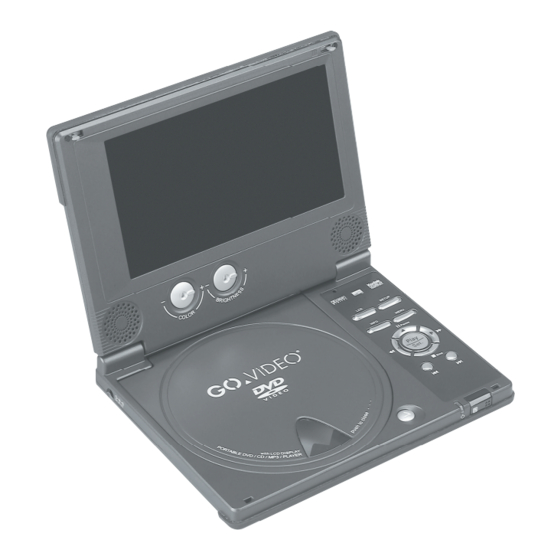
Page 5: Player Overview
Player Overview Player Overview Front View LCD Screen Battery Pack Slot - Insert supplied rechargeable battery here. Color - Adjusts the color saturation of Color Color - Adjusts the color saturation of the on-screen image. Brightness - Adjusts the brightness of the on-screen image. -
Page 6: Side View
Player Overview Player Overview Side View Volume Control - Adjusts the player’s volume. Phones Jack - Connects to headphones or earphones. Coaxial Digital Audio Output - Connects out to a digital amplifi er/receiver with a Dolby Digital or DTS decoder. Audio/Video Output - Connects out to a TV, stereo, or other audio/video device. -
Page 7: Remote Control
Player Overview Player Overview Remote Control Setup Info. Menu Title Play Sel. Inserting Remote Control Batteries 1 Squeeze the release lever and pull the battery tray out of the remote control. 2 Insert the supplied CR2025 3V lithium battery with the positive (+) side of the battery facing up. -
Page 8: Connections
• Turn off the player. The battery pack will NOT charge while the portable DVD player is powered on. • The red “Batt Chrg.” light will glow while the battery pack is charging and will turn green when fully charged. -
Page 9: Amplifi Er/Receiver Connections
Connections Amplifi er/Receiver Connections ������� �� External Equipment Connections Connecting Camcorders, Video Games, etc. • Connect the supplied audio/video cable (mini- plug to RCA) from the AV IN jack to the Audio/ Video Outputs of your external equipment. • Slide the AV OUT/AV IN switch to the AV IN position. -
Page 10: Dvd Playback
Press Menu. The portable DVD player stops playback, and then displays the menu screen. When not in use... When the portable DVD player is not in use, remove the disc and press Power to turn off the player. Then close the display panel. -
Page 11: Forward/Reverse Scan
Press during playback. • When you press the button midway through a chapter, the portable DVD player returns to the beginning of the chapter. The player then skips a chapter each time you press the Pause Press once during playback. -
Page 12: Special Dvd Features
• When you load or remove the disc, the portable DVD player will search for the Audio language selected in the Setup Menu. If your preferred language is not available on the disc, the portable DVD player will playback the disc’s default... -
Page 13: Angle
• ANGLE will only function on discs where different angles have been recorded. Mute To mute the volume on the portable DVD player. Press MUTE during playback. • To resume normal sound, press MUTE repeatedly until “MUTE OFF” appears on the screen. -
Page 14: Other Disc Playback
Other Disc Playback Playing Audio CDs Before You Begin... Connect the portable DVD player to a power outlet and plug in headphones or listen to the built-in speakers. You can also connect the player to external equipment, such as a TV and/or audio system. If you do this, remember to: •... -
Page 15: Playing Kodak Picture Cds
You can play Kodak Picture CDs in your portable DVD player. Basic Playback Load a Kodak Picture CD. • After a few seconds, the portable DVD player starts a slide show of available images. Press Info. to view the current image number and total number of images. -
Page 16: Playing Jpeg Picture Cds
You can play JPEG picture CDs in your portable DVD player. Basic Playback Load a JPEG Picture CD. • After a few seconds, the portable DVD player starts a slide show of available images. Press Info. to view the current image number and total number of images. -
Page 17: Playing Mp3 Cds
/Select. Playing CDs with MP3 and JPEG fi les The portable DVD player will play CDs with MP3 and JPEG fi les. The operations are the same as with standard MP3 and JPEG discs. to select “Program”, then press ... -
Page 18: Language Setup
Language Setup Language Setup On Screen Display (OSD) Language You can select among various languages for the player’s on-screen display (OSD). Press Setup in Stop mode. Press to select “Language Setup”, then press /Select. Press to select “OSD”, then press /Select. -
Page 19: Audio Language [Dvd]
• Select “Original” if you want the default language to always be played fi rst. Press /Select. • If the language selected is not recorded on the disc, the DVD player will playback the disc’s default language. To return to the Setup menu Press To exit the Setup menu Press Setup or select “Exit Setup”... -
Page 20: Screen Setup
Screen Setup TV Type The TV Type feature allows you to set your preferred aspect ratio for DVD movies. Choose from the following: • 4:3 PS (Pan & Scan) - Crops widescreen movies to fi t a standard television. • 4:3 LB (Letterbox) - Shows the full width of widescreen movies on a standard television with black bars above and below the picture. -
Page 21: Screen Saver Tv System
Press Setup or select “Exit Setup” on the Setup Menu screen. Video Output If you are using the S-Video/Progressive Scan video output to connect the portable DVD player to your TV, you must specify which connection you are using (S- Video or P-SCAN). •... -
Page 22: Audio Setup
Audio Setup Digital Audio Output [DVD] The digital audio output jack (labeled “Coaxial”) is used to output the audio signal recorded on DVD discs to an external amplifi er/receiver. The player provides three options for this audio signal: • SPDIF/PCM - Select if you are using a 2-channel digital amplifi... -
Page 23: Custom Setup
Custom Setup Parental Control [DVD] The Parental Control feature enables you to block playback of movies based on their rating. For example, if you set the rating level to PG-13, the player will block playback of movies rated PG-13, R, NC-17 and X unless the correct password is entered. -
Page 24: Angle Mark [Dvd]
Press To exit the Setup menu Press Setup or select “Exit Setup” on the Setup Menu screen. Restore Defaults Select “Default” to restore the portable DVD player to its factory default settings. Press Setup in Stop mode. Press /Select. Press /Select. -
Page 25: Lcd Setup
LCD Setup The LCD button provides a shortcut to three common screen adjustments. Panel Press LCD repeatedly to select Panel. Use the buttons to select from the following: • Normal - Stretches the on-screen image to fi ll the screen. -
Page 26: Troubleshooting
Troubleshooting Troubleshooting Before requesting service for the portable DVD player, check the chart below for a possible cause of the problem you are experiencing. Some simple checkups or a minor adjustment on your part may eliminate the problem and restore proper operation.•... -
Page 27: Disc Handling & Maintenance
Parts & Accessories A number of replacement parts and optional accessories are available for this portable DVD player. To order, please contact the GoVideo Parts department at: • 800-736-7679, option 8 or via e-mail at: parts@govideo.com... -
Page 28: Limited Warranty
This warranty covers internal operating parts and service/labor to repair or replace covered parts in this GoVideo product for 90 days labor, 1 year parts, from the date of purchase, defi ned as follows: (1) Original Consumer Retail Purchase; (2) First Rental Purchase Agreement; or (3) First Lease Purchase Agreement (the “Warranty Period”).
Need help?
Do you have a question about the 525p and is the answer not in the manual?
Questions and answers