Table of Contents
Advertisement
Quick Links
Advertisement
Table of Contents

Related Manuals for F&V F1


Summary of Contents for F&V F1
-
Page 1: User Guide
User Guide Safety tips To prevent damage to your F&V product or injury to yourself or to others.Be sure to read the following safety precautions in their entirety before using this equipment. Keep these safety instructions where all those who use the product will read them. -
Page 2: Trademark Information
Warning This mark indicates warning, before operating the unit. Please read this manual thoroughly ,and retain it for future reference. Notes 1. Do not let any solid object or liquid fall onto or into this equipment, to prevent fire or shock hazard. 2. -
Page 3: Specifications
Observe(Optional) proper precautions when handling batteries Batteries may leak or explode if improperly handled.Observe the following precautions when handling batteries for use in this product. Use only batteries approved for use in this equipment. Do not short or disassemble the battery. Be sure the product power is off before replacing the battery. -
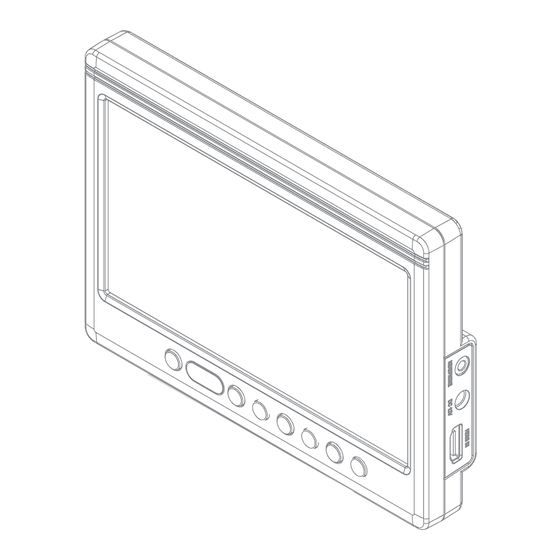
Page 4: Parts Diagram
Parts Diagram TFT LCD Screen Infrared Window Selection Keys 1/4”-20 Female Mount Selection Key Identification Power ON/OFF AV1/AV2/HD-SDI/HDMI or DVI input selections Down-key:Contrast adjustment,menu list selection Up-key:Brightness adjustment,menu list selection Menu:Acticvates OSD menu selections Exit:Color/B&W selectionmodes Aspect Ratio Select:16:9 or 4:3... -
Page 5: Audio Output
AV1 IN AV1 OUT LCD monitor 5.8~16.8V Power Consumption: 0.5Amp(Max)@12V DC (6W Max) Audio Power:1W Max AV2 IN 6-949773-390342 AV2 OUT Operating Temperature: -20 ℃ to 70 ℃ Storage Temperature: -30 ℃ to 80 ℃ 480i/p, 576i/p, 720i/p, 1080i/p AUDIO IN AUDIO OUT Video Input/Output: Supports NTSC/PAL... -
Page 6: Remote Controller
Remote controller: Power ON/OFF AV1/AV2/HD-SDI/HDMI or DVI input selections Left-key:Brightness adjustment,menu list selection Right-key:Brightness adjustment,menu list selection Menu:Acticvates OSD menu selections Exit:Color/B&W selectionmodes Setup The easiest way to ues the 7” LCD Monitor is to mount it directly to a camcorder or DSLR camera.A 1/4”-20 swivel shoe mount is provided for installation and features a lock knob to set the monitor at the desired viewing angle.The supplied battery adapter (For Sony “L”... -
Page 7: Menu Operation
Menu Operation: Press key to access the relevant OSD (on screen display) menu operation, press to select the icons,Color,Adjust,ODS,Function or Sound,and confirm the selection by pressing key. Main menu Color Adjust Icon Function Sound Submenu Signal data Menu interface Color Press the key to access the relevant OSD (on screen display) menu operation. - Page 8 Press the key to access the relevant OSD (on screen display) menu operation. Use the keys to select the OSD icon.Press the key again to confirm the OSD selection, You should now be in the OSD submenu as shown below. Use the keys to select one the following submenu items: Language:简体中文/English...
- Page 9 Function Press the key to access the relevant OSD (on screen display) menu operation. Use the keys to select the Function icon.Press the key again to confirm the Function selection, You should now be in the OSD submenu as shown below. Use the keys to select one the following submenu items: Reset...
- Page 10 Function Press the key to access the relevant OSD (on screen display) menu operation. Use the keys to select the Sound icon.Press the key again to confirm the Sound selection, You should now be in the OSD submenu as shown below. Use the keys to select one the following submenu items: Volume:0—100...
-
Page 11: Troubleshooting
Troubleshooting The 7” LCD Monitor comes with a sun hood (not shown) that helps prevent glare while viewing in certain lighting conditions.To attach the sun hood to the monitor, start by carefully unfolding the sun hood,then align the cable access cut out over the cable ports on the side of the monitor.Peel off the film from the hook-and -loop adhesive tab that is directly under the cut out,and firmly press the adhesive tab to the monitor.Repeat this procedure for the remaining adhesive tabs being careful...
Need help?
Do you have a question about the F1 and is the answer not in the manual?
Questions and answers