Advertisement
Quick Links
Advertisement

Subscribe to Our Youtube Channel
Related Manuals for BT FREEWAY


Summary of Contents for BT FREEWAY
- Page 1 Freeway...
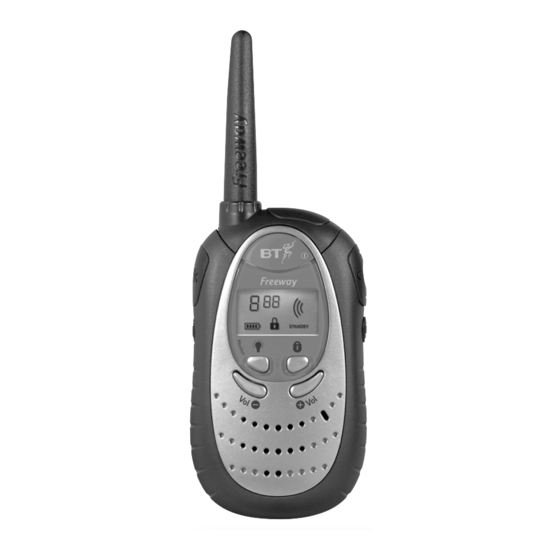
- Page 2 Explanation of the display icons Displays the code for the selected channel or the volume level. Displays the code of the sub channel. Flashes to indicate that the key lock is switched on. Indicates that the handset is receiving a call. Indicates that the handset is transmitting.
- Page 3 Introduction Unpacking If anything is missing, please contact your place of purchase immediately. With each Freeway Walkie Talkie handset you will get: Belt clip (attached to back of handset) 4 x AAA batteries (alkaline) Ni-MH battery pack rechargeable...
- Page 4 For your records Date of purchase: Place of purchase: Serial number: For guarantee purposes proof of purchase is required so please keep your receipt.
-
Page 5: Safety Instructions
Safety instructions General Do not open the handset. Never dispose of batteries in a fire. There is a serious risk of explosion and/or the release of highly toxic chemicals. Radio signals transmitted between handsets may cause interference to hearing aids. Switch off the radio when near medical equipment. - Page 6 Cleaning Simply clean with a damp (not wet) cloth, or an anti-static wipe. Never use household polish as this will damage the product. Never use a dry cloth as this may cause a static shock. Note In the event of an accident this product cannot be used to contact the emergency services.
-
Page 7: Installing The Batteries
To fully charge the battery pack, from a fully discharged state takes around 14 to 16 hours. The lights on the Freeway charger will stay lit even when the battery pack is fully charged. - Page 8 You can purchase Freeway rechargeable battery packs and a Freeway charger by calling Or visit: www.withandwithoutwires.com Freeway charger item code: 003743. Freeway rechargeable battery pack item code: 004194. If the belt clip is attached you will need to remove it first, please see step 2 below.
- Page 9 Battery low indicator When the batteries are fully charged the display will show the icon. When the battery power becomes low the icon will flash to indicate that the batteries need replacing. You should replace all the batteries, do not mix new and old batteries and ensure that you use all the same type of batteries.
- Page 10 To purchase optional Freeway headsets please call or visit www.withandwithoutwires.com Freeway Headset item code: 004191. You must always switch the power OFF before installing or removing the headset. We recommend you set the volume to a LOW level. Open the tab on the top of the handset.
- Page 11 To use the Freeway headset, press the PTT (Press To Talk) switch on the headset to make a call and release it to receive a call.
- Page 12 Using your Freeway handsets Press and hold the button for about 2 seconds. You will hear a tone to indicate that the handset has been switched ON (or OFF). Press the or button to select a channel from to . To keep scrolling...
- Page 13 You can lock the or , buttons to prevent you from accidentally changing the channel or channel settings or from switching the handset off. Press and hold the button for more than 1 second to switch the key lock ON. The key lock icon will appear on the display.
- Page 14 Please note, that to call or talk to others, all radios in your group must be set to the same channel number. Once you have selected a channel, press button to alert the other handset user that you want to communicate with them. (The other handset user will hear a 2 second ringing tone to alert them to your call).
- Page 15 If there are no transmissions for 10 seconds your BT Freeway will automatically switch to battery saver mode. This is indicated by a flashing icon on the display. If any incoming or outgoing calls are made the...
- Page 16 Press the or button to increase or decrease the volume of incoming calls. The volume levels range from You can also press and hold the or button to keep increasing or decreasing the volume until you reach the required level or until you reach the handset’s maximum or minimum level at which point you will hear a double beep.
- Page 17 WARNING If using your Freeway in Southern Ireland you are prohibited from using Code 00 on any channel. To change the code: Press the button. The current code will flash. Press the or button to select your code number between .
- Page 18 Press the button. The display will light up for approximately 10 seconds. Each time you press the or , or , buttons while the display light is switched on, the 10 second timer will reset so that it will stay on for a further 10 seconds. To switch the display light OFF, press the button.
- Page 19 To switch the squelch OFF temporarily: Press and hold the button for about half a second. You will now hear any background noise. Release the button to switch the squelch back ON. To switch the squelch OFF for longer periods of time: Press and hold the button for more than 5 seconds.
-
Page 20: General Information
• The guarantee shall only apply to defects that occur within the 12 month guarantee period. • Proof of purchase is provided. • The equipment is returned to BT or its agent as instructed. • This guarantee does not cover any faults or defects... - Page 21 EN 60950 incorporating amendments 1,2,3,4 (1993) Electrical Safety ETS 300 279 (02/1999) ETS 300 296-2 (03/2000) Radio Spectrum A copy of the original manufacturers Declaration of Conformity can be obtained by calling 01473 605893 or alternatively by e-mail from the following address COMMPROD@btuk02.bt.com...
- Page 22 British Telecommunications plc in the UK. © British Telecommunications plc 2001. Registered Office: 81 Newgate Street, London EC1A 7AJ. Registered in England No. 1800000. BT Freeway PMR user guide Issue 2 (10/01) 2 Designed by The Art & Design Partnership Limited. Printed in China.
Need help?
Do you have a question about the FREEWAY and is the answer not in the manual?
Questions and answers