
Related Manuals for AEG 6530 K


Summary of Contents for AEG 6530 K
- Page 1 6530 K Piano di cottura da incasso Encimera integrable de cocción Built-In Cooking Surface Istruzioni di montaggio e per l’uso Instrucciones para el montaje y para el uso Installation and Operating Instructions...
-
Page 2: Dear Customer
Dear customer, Please read these operating instructions through carefully. Above all please observe the safety instructions on the first few pages of these operating instructions! Please keep these operating instructions for later reference. Pass them on to any subsequent owner of the appli- ance. -
Page 3: Table Of Contents
Appliance Layout 6530 K ........ - Page 4 Contents What to do if ..........94 Rectifying malfunctions .
-
Page 5: Safety Instructions
Please observe this instruction, otherwise the warranty will not cover any damage that may occur. The safety features of AEG electrical appliances comply with accepted technical standards and the German Appliance Safety Law. However, we also consider it our obligation as a manufacturer to make you aware of the following safety information. -
Page 6: Intended Use
Safety Instructions • In the event of a mains power failure lasting more than 1 sec., all set- tings and displays are erased. In this circumstance care must be taken because hot cooking zones will no longer be indicated by the residual heat indicator. -
Page 7: Disposal
• You can obtain information about collection dates or public tips from your local refuse department or council. • You can also take the appliance to your AEG dealer; he will dispose of it for you for a small contribution towards the costs. -
Page 8: The Chief Features Of Your Appliance
The chief features of your appliance The chief features of your appliance • Glass ceramic cooking surface: the appliance has a VITRAMIC® cook- ing surface made of glass ceramic and 4 fast heating cooking zones. The particularly powerful radiant heater elements significantly shorten the amount of time taken for the zones to heat up. - Page 9 The chief features of your appliance • Multipurpose Cooking Zone: the VITRAMIC® cooking surface is equipped with a multipurpose/casserole zone. Depending on the set- ting, it can be used as a round or oval cooking zone, e.g. for oval cas- seroles or for keeping dishes or food warm.
-
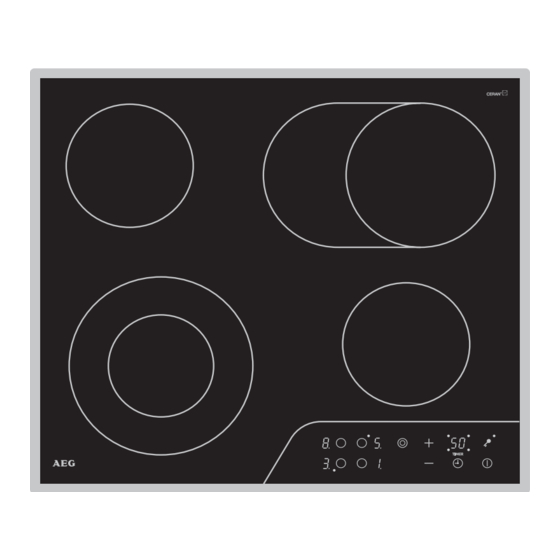
Page 10: Appliance Layout 6530 K
Appliance Layout 6530 K Appliance Layout 6530 K Cooking zone dimensions: rear left: 145 mm rear right: 170/265 mm front left: 120/210 mm front right: 145 mm... -
Page 11: Control Panel 6530 K
Appliance Layout 6530 K Control Panel 6530 K Main "On/Off" button For switching on the entire appliance. The appliance is –switched on when the button is touched for approx. one second, –switched off when the button is touched again for one second. -
Page 12: Heat Setting Selection + And
Appliance Layout 6530 K Heat setting selection For setting or changing the heat setting (! to )) for the selected cooking zone, or when in timer mode, for setting or changing the required cooking time. –The heat setting or the cooking time is increased using the + but- ton and the automatic warm up function activated. -
Page 13: Cooking Zone Safety Switch
Cooking zone safety switch 1 Cooking zone safety switch If, after a certain period of time, one of the rings is not switched off or the heat setting not changed, then the cooking zone switches off auto- matically. j, or h is appears in the displays of all the rings that are switched on. The rings are switched off at: •... -
Page 14: Before Using For The First Time
Before using for the first time Before using for the first time Cleaning for the first time Only wipe the glass ceramic cooking surface with a damp cloth. Important: Do not use any caustic or abrasive cleaners! The surface could be damaged. Operation of the cooking surface TOUCH CONTROL sensor buttons To operate the TOUCH CONTROL sensor buttons, place your finger flat,... -
Page 15: Cooking With The Automatic Warm Up Function
Operation of the cooking surface Cooking with the automatic warm up function All four rings on the cooking surface have nine heat settings and are equipped with an automatic warm up function. –!, lowest heat setting –), highest heat setting –a, automatic warm up function. -
Page 16: Cooking Without The Automatic Warm Up Function
Operation of the cooking surface If you select a higher setting when the automatic function is in opera- tion, e.g. from § to %, the previous warm up time is taken into account. If you select a lower setting, then the automatic warm up function is brought to an immediate end. -
Page 17: Locking/Unlocking The Control Panel
Operation of the cooking surface Locking/unlocking the control panel At any time during the cooking process, the control panel can be locked, with the exception of the "On/Off" button. By this means changes to the settings, e.g. from wiping with a cloth, can be pre- vented. -
Page 18: Setting/Changing The Cooking Time
Operation of the cooking surface Setting/changing the cooking time 1.Select the desired cooking zone using the cooking zone selection but- tons and set the desired heat setting. 2. Press the "Timer" button to activate the timer function for this cooking zone. -
Page 19: Ending The Timer Function Early
Operation of the cooking surface Ending the timer function early There are two ways of switching off the timer early: Switching off the cooking zone and timer simultaneously 1.Select the desired cooking zone using the cooking zone buttons. If the selected cooking zone is in timer mode (TIMER indicator illumi- nated), the remaining cooking time appears in the timer display field. -
Page 20: Tables And Tips
Tables and Tips Tables and Tips Pans The better the pan, the better the results. • You can recognise good quality pans by the base of the pan, and not from the material from which the pan is made. • The base should be thick and as flat as possible. Rough bases (e.g. on cast iron pans) will scratch the cooking surface when slid. -
Page 21: Tips For Cooking With And Without The Automatic Warm Up Function
Tables and Tips You will waste energy if..Pan too small Pan lid not fitted Pan base uneven Pan too large properly (glass ceramic) Tips for cooking with and without the automatic warm up function The automatic warm up function is suitable for: •... - Page 22 Tables and Tips The figures given in the following tables are for guidance. Exactly which heat setting needs to be used depends on the quality of the pans and the type and quantity of the food. Table: Cooking and Frying Automatic warm up Switch...
-
Page 23: Cleaning And Care
Cleaning and Care Cleaning and Care Glass Ceramic Cooking Surface It is important to clean the cooking surface after every use! Important! Never use aggressive cleaners such as, for example, coarse scouring cleaners or pan cleaners that scratch. 1.Always clean the cooking surface when is only a little dirty. Use a damp cloth and a little washing up liquid. -
Page 24: Problem Dirt
Cleaning and Care Problem dirt Residues from food that has boiled over First soften these using a wet cloth and then remove residues using a glass or razor blade scraper. Caution! Take care not hurt yourself! Then clean the cooking surface with the cleaners identified above. - Page 25 Important! If aggressive cleaners or pans with abrasive bases are used, then the decor will take on an abraded appear- ance and dark spots will appear over time. You can obtain suitable cleaners and polishes as well as glass scrapers from AEG Customer Service.
-
Page 26: What To Do If
What to do if ... What to do if ... Rectifying malfunctions A malfunction may be caused by only a minor fault that you can rectify yourself using the following instructions. Do not perform any other work on the appliance if the following information does not provide assistance in your specific case. - Page 27 Check whether –the cooking zone was only used for a short period and is therefore not hot enough. If the cooking zone is hot, call AEG customer service..a cooking zone cannot be switched off? Check whether –the touch switches are partially covered by a damp cloth or liquid.
- Page 28 What to do if ..f is shown in the display? Check whether –a pan that is too small is on the cooking zone. –the cooking zone has been overheated. If a cooking zone button is pressed and the pan on the cooking zone is too small, f (fault) appears in the display.
-
Page 29: Installing And Connecting Up
Installing and connecting up Installing and connecting up Installing Important: Assembly and connection of the new appliance may only be performed by an approved installer. Please observe this instruction, otherwise the warranty will not cover any damage that may occur. The veneer or plastic coverings on kitchen furniture around the appli- ance must be bonded with heat resistant adhesive (100 °C). - Page 30 Installing and connecting up • All cut surfaces are to be sealed with a suitable sealant for protection against moisture. • On tiled work surfaces, the joints in the area where the hob sits on the surface must be completely filled with grout. •...
- Page 31 Installing and connecting up min. 25 mm min. 5 mm...
-
Page 32: Electrical Connection
Only the cable fitted to the cooking surface recess may be used for connecting up the appliance. Replacement cables can only be obtained from AEG Customer Service. A device must be included in the electrical installation that makes it possible to isolate the appliance from the mains supply with a mini- mum contact separation of 3 mm. -
Page 33: Technical Data
Legal stipulations, standards, directives Technical Data Exterior dimensions Height x breadth x depth 5.5 cm x 57 cm x 50 cm Inner dimensions Height x breadth x depth 4.8 cm x 56 cm x 49 cm Legal stipulations, standards, directives This appliance meets the following standards: •... -
Page 34: Service
Legal stipulations, standards, directives SERVICE In the “What to do, if …” section a number of malfunctions are listed that you can rectify yourself. In the event of a malfunction, look there first. Is it a technical malfunction? Then please contact your customer service centre. (You will find addresses and telephone numbers in the "Customer Service Centres"... - Page 35 Hier Typschild aufkleben! (nur für Werk) AEG Hausgeräte GmbH Postfach 1036 D-90327 Nürnberg http://www.aeg.hausgeraete.de © Copyright by AEG ANC 822 947 281 - 05 - 0701...
Need help?
Do you have a question about the 6530 K and is the answer not in the manual?
Questions and answers