Table of Contents
Advertisement
Quick Links
®
Versatronik
COMO OT
OpenTherm
Room Temperature Controller
Installation and Operating Manual
Cautionary Statement
Please observe the safety instructions and
read through this manual carefully before
commissioning the equipment.
This is not a safety control.
IMPORTANT
Read and save these instructions for
future reference
Advertisement
Table of Contents

Related Manuals for KWE Versatronik COMO OT

Summary of Contents for KWE Versatronik COMO OT
- Page 1 ® Versatronik COMO OT OpenTherm Room Temperature Controller Installation and Operating Manual Cautionary Statement Please observe the safety instructions and read through this manual carefully before commissioning the equipment. IMPORTANT Read and save these instructions for This is not a safety control. future reference...
-
Page 2: Table Of Contents
Table of Contents Caution, Warning Trademark Information Section 1 Control Mounting and Installation Section 2 Mounting Wall Base and Room Controller Wiring Room Controller Outdoor temperature Sensor Connections Remote Telephone Switch Wiring Boiler Control Wiring Overview Section 3 Mode Selector Switch Menu Structure Overview Changing the Settings Expert Values... -
Page 3: Caution, Warning Trademark Information
Caution, Warning and Trademark Information About these instructions Take note of all symbols and notations intended to draw attention to potential hazards or important product information. These include “WARNING”, “CAUTION” and “IMPORTANT”. See below. → Warnings draw your attention to WARNING the presence of potential hazards or important product... - Page 4 Caution, Warning and Trademark Information Important Regulatory and Installation Requirements Codes → Please carefully read this manual The installation of this unit must prior to attempting installation. Any warranty is null and void if be in accordance with local these instructions are not codes.
- Page 5 Caution, Warning and Trademark Information Information Warranty Conditions If the system is not installed, commissioned, serviced and repaired properly, it will render the manufacturer's warranty null and void. Important Text Important information is highlighted with an exclamation mark. This attention symbol indicates dangerous situations.
- Page 6 Section 1 This page is intentionally left blank...
-
Page 7: Mounting Wall Base And Room Controller
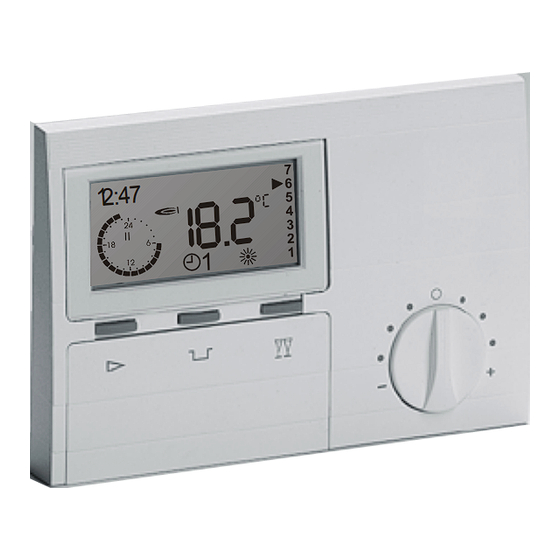
Control Installation Section 2 Control Installation Information Mounting Wall Base and Room Controller Section 2.0 Outdoor temperature Sensor Connections Section 2.1 Wiring Room Controller to: Section 2.2 Viessmann Vitodens 100-W, WB1A Viessmann Vitodens 100-W, WB1B Remote Telephone Switch Wiring Section 2.3... - Page 8 Control Installation Mounting Wall Base and Room Controller Dimensions: 147 mm x 97 mm x 33 mm 5.75 in. x 3.82 in. x 1.3 in. A: Retention holes (for assembly on switch socket) B: Cutout for cable entry C: Connection terminals (PIN 1 is on the left) 1.
-
Page 9: Outdoor Temperature Sensor Connections
4. Locate wiring connections on sub-base of Versatronik COMO OT Room Controller. 5. Wire to terminals 5 and 6 in sub-base of Versatronik COMO OT. Install Versatronik Como OT onto sub-base for programming or adjustments. Important The outdoor temperature sensor should be mounted 2 to 2.5 metres above ground level on... - Page 10 3. Wire into 4 terminal plug to terminals 3 and 4. 4. Field supplied wire between boiler and WARNING Versatronik COMO OT Room Controller. When extending wire there is the possibility of 5. Locate wiring connections in sub-base of exposure to electromagnetic interference. Avoid Versatronik COMO OT Room Controller.
- Page 11 It can be wired to the 6 pole connector from the boiler or directly to the Versatronik Como OT. If wiring to the Como wall mounting plate, connect to terminals 5 and 6.
-
Page 12: Remote Telephone Switch Wiring
Control Installation Remote Telephone Switch Wiring Wiring Steps 1. Wire dry contact (potential free) from switch/ relay/contact. 2. Field supplied wiring between contact and con- troller sub-base. 3. Wire to terminals 3 and 4. Important Ensure the contact is potential free. Do not apply voltage as damage to the controller will occur. -
Page 13: Mode Selector Switch
Control Operation Section 3 Control Operation Overview Operational Overview Section 3.0 Mode Selector Switch Section 3.1 Normal Mode Party Key ECO Key Modifying the set room temperature Changing the Settings Menu Structure Overview Section 3.2 Overview of set value levels menu structure Overview of user values Overview if display messages Changing the Settings... - Page 14 Control Operation Operation Overview The slope adjustment operates in conjunction with The Versatronik COMO OT Room Temperature the normal mode and reduced mode settings. Control is designed to operate with OpenTherm Adjustment of the heating slope is based on enabled boilers to provide efficient operation of providing the heat necessary from the boiler/ the boiler’s burner.
- Page 15 Control Operation Mode selector switch (Hinged control cover closed) Press the key as often as necessary to set the operating mode required. The selected operating mode is represented by a symbol in the display. It takes effect when the selected setting remains unchanged for 5 sec.
- Page 16 Control Operation Party key (heating time extension) to start setting/display / set extension of heating time press => + 1 hour for each actuation press => - 1 hour for each actuation press 3 seconds: Heating circuit heats until the next day. Displays (for approx.
-
Page 17: Changing The Settings
Control Operation Changing the Settings Operating and changing modes are accessed directly by opening the control panel cover. => USER in the display Use the Plus/Minus keys to select the level in which the value to be changed is located =>... - Page 18 Control Operation Menu Structure Overview Main Menu User User: Display T-Room Des1 Time-Date T-Room Des2 HTG-PROG1 HTG-Prog1 Adjust T-Room Des3 HTG-PROG2 T-Reduced HotWProg HTG-Prog2 Adjust T-Absence Holiday Max T-HS Expert Expert HotWProg Max Modulati Heatslope Adaption Return Room-Infl1 I-Control Display: Heat Up Opti T-Outside Max Opt-Time...
-
Page 19: Main Menu
Control Operation Overview of levels menu structure ~ OPEN cover search for level using Main Menu Page Reference Description Selections User Selection of base control settings Display Review of current temperatures Time-Day Programming of time and day HTG Prog 1 Programming of timer programs HTG Prog 2 Programming of timer programs... - Page 20 Control Operation Overview of user values ~ OPEN cover search for level using Ä When USER shown in screen, press Move within User level with keys User Settings Range Default Description Value T-ROOM DES1 C – 40 20C/68F T-ROOM DESIRED1-3 F –...
- Page 21 Control Operation Overview of display messages ~ OPEN cover search for level using Ä When DISPLAY shown in screen, press Move within User level with keys Display Setting Description T-OUTSIDE T-OUTSIDE (only with outdoor sensor connected [Terminals 5+6]) Display of the current outside temperature [°C/°F] Ä...
- Page 22 Control Operation Overview of expert values ~ OPEN cover search for level using Ä When EXPERT shown in screen, press Move within Expert level with keys EXPERT Value Range Description HEATSLOPE 0-3 +> 1.2 Only with outdoor sensor connected [Terminals 5+6]) 1 =>...
-
Page 23: Expert Values
Control Operation Overview of code-protected values * continued from previous page Move within Expert level with keys EXPERT Description …….. Expert values (see Page 23) Enter code no. ——- Entry of code no Enter the correct code number to enable the following values to be changed Code no. - Page 24 Control Operation Enter time and weekday ~ OPEN cover search for level using TIME-DAY Operating and changing modes are accessed directly by opening the control panel cover. => USER in the display 2x Plus key => "TIME-DAY" Ä Press the Prog key => "Time" and " "...
- Page 25 Control Operation Enter heating Timer programs 3 x Plus key => "HTGPROG " | ON Select weekday (Mo-Su) or block (MO-FR => Monday-Friday, SA-SU => Saturday- Sunday, MO-SU => Monday-Sunday) Ä Open weekday/block (see left) => "I ON 20°C/68°F " First switch-on time – | Off set value I = 20°C Set first switch-on time =>...
- Page 26 Control Operation Heating program 1 Factory Setting: Heating time 1 Heating time 2 Heating time 3 Mo. to Fr.: 06:00 to 22.00 Sa. to Su.: 07:00 to 23:00 Heating program 2 Factory Setting: Heating time 1 Heating time 2 Heating time 3 Mo.
- Page 27 Control Operation Enter holiday program Ä OPEN cover change value with For the holiday program, the following are entered Operating and changing modes are accessed directly by opening the in days: control panel cover. the start of the holiday => USER in the display the duration of the holiday HOLIDAY 6x Plus key =>...
- Page 28 Control Operation Heating Curve Selection Heat slope: Relationship between outside Note on setting: temperature and flow temperature (for floor In the case of cold outside temperatures and too heating approx. 0.6) => (only with outdoor sensor low room temperature => Increase the heat slope connected [Terminals 5+6]) setting.
- Page 29 Control Operation Explanation of Settings Room sensor influence Outside temperature delay: In the case of The boiler temperature is increased by the set extremely well insulated walls, a change in the value when the room temperature is 1°C/ 1.8°F outside temperature affects the room temperature below that required.
- Page 30 Control Operation Reset Reset Press carefully using a pointed instrument (straightened paper clip) => Restart the equipment. Ä Press Prog key and Reset button simultaneously, release Reset button and keep Prog key pressed until "EEPROM" appears => All set values are reset to their default values (except heating programs and hot water Restart =>...
-
Page 31: Errors
Control Operation General error list Display Description Display/ Description (please compare to Error no. boiler manual) LOCKOUT No flame development (gas, flame) Outdoor sensor = Check OVERHEATING STB deactivation AIR PRESSURE Pressure cell / Room sensor = Check Exhaust thermostat open WATER PRESS Insufficient water (pressure under 1 bar) -
Page 32: Start-Up And Commissioning
Control Operation Start-up and Commissioning General error list " " Does the symbol appear - in the clock => If not, check the data cable to the boiler Set language OPEN flap "ENGLISH" Ä Select = Change mode Select language "... - Page 33 When the short circuit is cleared, heating resumes according to the set mode of operation or the set heating program. The Versatronik COMO OT Room Temperature Controller can be programmed to allow full time operation in reduced mode. Upon contact closure...
-
Page 34: Technical Data
Control Operation Technical data Supply voltage (OT) 15 V DC with Temperature 5Kohm NTC 1Kohm PTC current limitation -60°C -76°F 698961 (13 mA) -50°C -58°F 333908 Current consumption < 5mA -40°C -40°F 167835 -30°C -22°F 88340 Type of protection IP 40 complying to EN 60529 -20°C -4°F... - Page 35 Control Operation Notes...
- Page 36 KWE Technologies Group 750 McMurray Road Waterloo, Ontario, Canada N2V 2G5 Tel: (519) 747-5042 Fax: (519) 747-4448 www.kwe-tech.com info@kwe-tech.com...
Need help?
Do you have a question about the Versatronik COMO OT and is the answer not in the manual?
Questions and answers