Advertisement
Table of Contents
- 1 Table of Contents
- 2 Introduction
- 3 Things.you.need.to.get.started
- 4 Controller.setup
- 5 Camera.setup
- 6 Battery.guideline
- 7 Camera.operation.setup
- 8 Camera.setup.with.preset.modes
- 9 Dst.(Dual.sensor.technology)
- 10 Camera.mounting
- 11 Custom.camera.setup
- 12 Using.an.external.power.source
- 13 Downloading.images
- 14 Troubleshooting
- Download this manual
Advertisement
Table of Contents

Related Manuals for Leupold RCX

Summary of Contents for Leupold RCX
- Page 1 USER MANUAL...
-
Page 2: Table Of Contents
Contents Introduction......................3 Things.you.need.to.get.started................4 Controller.Setup....................5 Camera.Setup...................... 10 Battery.Guideline....................11 Camera.Operation.Setup..................12 Camera.Setup.with.Preset.Modes............... 13 DST.(Dual.Sensor.Technology)................14 Camera.Mounting....................15 Custom.Camera.Setup..................18 Using.an.External.Power.Source................. 21 Downloading.Images..................22 Troubleshooting....................24... -
Page 3: Introduction
Introduction view the images right there in the field and make any changes to the setup you The RCX Trail Camera System is want. The controller also allows you to designed to support the use of many view photos from other trail cameras cameras and a single controller. -
Page 4: Things.you.need.to.get.started
(Included in RCX Kit. Li-Ion the camera on uneven surfaces.) battery included.) RCX Lockdown Security Plate Optional: 3. 8 AA Batteries (Leupold strongly (Comes installed on RCX-2 only; for use with recommends Energizer Ultimate Lithium Master Lock Python cable or for mounting ® ™... -
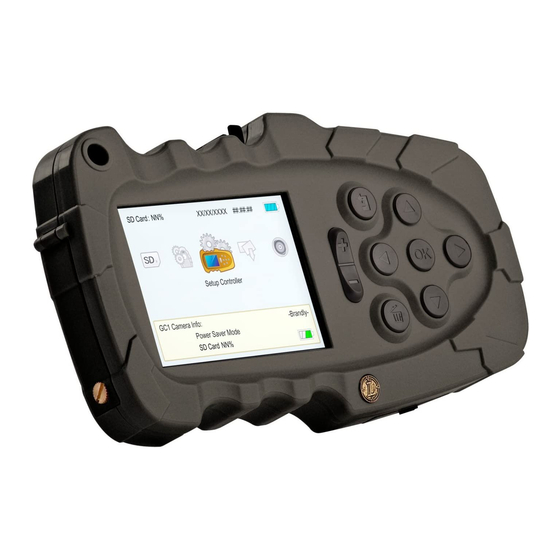
Page 5: Controller.setup
Controller Set-Up Lanyard Hole Mini USB Port Cover Power Button Battery Door Battery Door Screw 3” TFT (Thin Film Transistor) Screen SD Card Slot Door... - Page 6 The Lithium Ion battery is already is necessary to set date and time, and to installed in the controller. The access the features of your RCX Camera. controller battery should be charged Every time a new camera is set up, the for a minimum of 2 hours before use;...
- Page 7 Navigate through the controller menus by arrowing to the desired selection. On menu items with to the right of the text, press the right arrow to access the next level down in the menu . Press to select a menu choice. Delete and zoom are used...
- Page 8 Brightness: The display brightness of the controller can be adjusted. This is recommended when lighting condition change dramatically. Time/Date: Time is in 24-hour time only. The default date format is YYYY/ DD/MM but can be changed to other formats. Temp Unit: Switch between °F or °C. Hemisphere: Set the appropriate hemisphere.
- Page 9 BOTTOM ACCESS DOOR CLOSED 1/4-20 Tripod Stud Mount Cover Retaining USB Port Cover Screw 12V Jack Cover BOTTOM ACCESS DOOR OPEN USB Port Battery Pack SD Card Slot 12V Jack Power Switch Battery Pack Latch...
-
Page 10: Camera.setup
Camera Status Camera Setup 1. Install an SD card. An SD card from 2. Open the access door and remove another device may already contain the AA battery cartridge. files that will reduce the number of 3. Insert 8 batteries with the negative photos you can take. -
Page 11: Battery.guideline
• Do not attempt to use only 4 batteries. 8 batteries are required • Ideally, use only Energizer Ultimate ® for the RCX Cameras to function. Lithium AA batteries or the RCX • Follow the battery manufacturer’s Rechargeable Battery Pack, recommendations for storage, especially for cold weather use and handling and disposal. -
Page 12: Camera.operation.setup
Camera Operation Setup If you are using multiple RCX Cameras, Press to select “Camera Name”, it is recommended to give each camera then press a unique name the first time it is set 5. Select characters from the keyboard up. This will name the folder where... -
Page 13: Camera.setup.with.preset.modes
2. Press want. Press Automatically Selected Settings with Preset Modes *DST only available with RCX-2 Best Picture Mode RCX- 1: 8MP 48 LED Auto RCX-2: 10MP Most Picture Mode 3 photos 48 LED Super High Power Saver Mode... -
Page 14: Dst.(Dual.sensor.technology)
45° select the narrower 10° sensor with a range of 90 feet (for use with a specific landmark or feeder). Both sensors can also be active at the same time by selecting DST. Only the RCX-2 features this ground-breaking technology. -
Page 15: Camera.mounting
2 side-by-side for best exposure results. elements. The Lock-Down Security Plate attached 2. Mount the camera at a distance to the RCX-2 is for use with a Master above the ground at a height similar Lock Python cable to prevent theft. - Page 16 You can verify that the 9. Connect the controller to the camera camera is working properly by with the USB cable. covering the light sensor, which is 10. Select the “Preview Camera” in the small hole above the Leupold...
- Page 17 medallion on the front left side the before securing the door and walking camera. Wave your hand in front away. This uses the 30 second power of the camera and you’ll see the IR buffer to allow time to get out of the LEDs illuminate.
-
Page 18: Custom.camera.setup
If there is no camera connected, RCX-1 or RCX-2 can be chosen on the Video Length: 5* to 30 seconds opening screen. *Lower values are recommended for smaller Video/Picture: Select whether the SD cards and for quick field downloads. - Page 19 In instances where the SD card is The RCX-1 is equipped with only a 45° sensor nearly full, it may make more sense to change cards rather than to Sensitivity download.
- Page 20 where there is a lot of activity that you For ease of operation, some settings don’t want to capture. For example, cannot be customized separately for people and pets in your yard during night shots. the day when you are trying to capture Time Lapse night activity.
-
Page 21: Using.an.external.power.source
Tip: use with multipicture mode to snap a 3. Date/Time couple of pictures to make sure you get a 4. Barometric Pressure (RCX-2 only) good one, then wait for the next animal. Time 5. Temperature Lapse and Event Delay cannot be used at the same time. -
Page 22: Downloading.images
12V jack cover. Be sure to connect the downloading and will show a count red clamp to the positive (+) terminal of how many pictures there are to and the black clamp to the negative (-) download and the percent complete. If terminal. - Page 23 Viewing Images on a TV Plug the USB cable into a TV or any other device with a USB port that supports mass storage devices and use the TV controls to navigate through pictures to view them on the TV. Viewing Pictures on SD Cards from Other Cameras.
-
Page 24: Troubleshooting
Troubleshooting The camera is not taking pictures or is only taking pictures some of the time. 1. Connect the controller to the camera and and look at the camera status window. This shows the camera’s battery status and SD capacity remaining. Replace batteries if needed. - Page 25 The controller does not recognize the camera when the USB cable is plugged in. 1. Verify that the camera is powered on. “I” is the “On” position of the switch. 2. If the batteries are not fresh, replace the batteries. 3.
- Page 26 1. Check the light sensor to and make sure it is unobstructed. The light sensor is located on the front of the camera, on the left side, just above the Leupold medallion. If it is obstructed, the camera will set itself to always take night pictures.
- Page 27 48 LED setting in the RCX-2. 2. When batteries get very low, The RCX Trail Camera is designed to take only day pictures in order to extend the useful life of the batteries. Replace the batteries...
- Page 28 One Year Limited Warranty Leupold RCX Trail Camera is warranted by the Leupold Electronics Warranty, and are protected from defects in materials and workmanship for ONE YEAR from the date of purchase. The warranty is void if damage results from unauthorized repair, alteration, misuse, or battery leakage.
- Page 32 Leupold & Stevens, Inc. 1-800-LEUPOLD » 1-503-646-9171 » www.leupold.com PO Box 688, Beaverton, OR 97075-0688 14400 NW Greenbrier Parkway, Beaverton, OR 97006-5790 USA Part# 112161 Artwork#112163...
Need help?
Do you have a question about the RCX and is the answer not in the manual?
Questions and answers