
Related Manuals for Pioneer DCS-424K


Summary of Contents for Pioneer DCS-424K
- Page 1 DCS-424K DVD surround system / Système home cinema numérique DVD Heimkinosystem / Sistema Surround con lettore DVD DVD surround systeem / Sistema de DVD con sonido surround...
-
Page 2: Safety Information
Safety Information Safety Information Thank you for buying this Pioneer product. Please read through these operating instructions so you will know how to operate your model properly. After you have finished reading the instructions, put them away in a safe place for future reference. -
Page 3: Safety Information 3
When you find it device for the unit, you will need to unplug it from the damaged, ask your nearest PIONEER authorized AC outlet to shut down all power. Therefore, make service center or your dealer for a replacement. -
Page 4: Copyrights
Safety Information Copyrights These symbols are only valid in the European Union. It is forbidden by law to copy, broadcast, show, For countries outside the European Union: broadcast via cable, play in public, or rent If you wish to discard these items, please copyrighted material without permission. - Page 5 Safety Information Notes on Copyrights • Many DVD discs are encoded with copy protection. Because of this, you should only connect your player directly to your TV, not to a VCR. Connecting to a VCR results in a distorted picture from copy-protected discs. • Under the U.S.
-
Page 6: Table Of Contents
Contents Adjust the Initial Settings To display and exit the Initial Safety Information Settings Menu CAUTION Initial Settings Menu Copyrights Digital Audio Out settings Video Output settings Language settings Preparation Display settings Options settings Unique Features Playable Discs Supplied Accessories Operation Playable files Front panel... - Page 7 Contents Deleting all the saved stations Improving poor FM reception Maintenance Seeing information about a radio Notes on Discs station Handling the Unit Audio Settings To display Audio Settings Menu Audio Settings parameters Troubleshooting Video Adjust To display Video Adjust Menu Troubleshooting Video Adjust parameters Advanced Operations...
-
Page 8: Preparation
Preparation Playable Discs • DVD‑Video discs Preparation • DVD‑R/‑RW/‑R DL and DVD-Video DVD+R/+RW/+R DL discs recorded in the Video mode DVD-R/-RW/-R DL discs DVD VR recorded in the VR mode Unique Features Video CDs (including Super Video CD VCDs) • Audio CDs • CD‑R/‑RW/‑ROM discs Portable In CD(R/RW) containing music recorded in... -
Page 9: Supplied Accessories
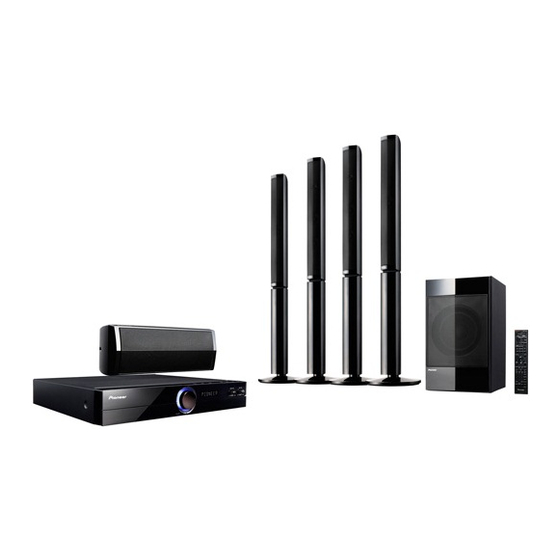
Preparation Supplied Accessories Symbol Used in this Manual NOTE Please check and identify the supplied accessories. Indicates special notes and operating features. CAUTION Indicate cautions for preventing possible damages from abuse. VIDEO cable (1) Remote Control (1) All discs and file listed below MP3 files DVD and finalized DVD+R/+RW/-R/-RW... -
Page 10: Playable Files
Preparation Playable files Displaying external subtitle files • The font sets listed below are available • Only discs recorded in ISO9660 Level 1, for external subtitle files. You can see Level 2 and Joliet can be played. the proper font set on-screen by setting the Subtitle Language on page 26 to • Files protected by DRM (Digital Rights match the subtitle file. - Page 11 Preparation Supported image file formats Compatible USB Devices • MP3 Player : Flash type MP3 player. JPEG • USB Flash Drive : Devices that support Extension: .jpg .jpeg USB 2.0 or USB 1.1. • Resolution: Up to 3 072 x 2 048 pixels • The USB function of this unit does not • This player supports baseline JPEG. support some USB devices. • This player supports Exif Ver.2.2. USB device requirement Supported audio file formats • Devices which require additional • This player does not support VBR program installation connected to a...
-
Page 12: Front Panel
Preparation Front panel 1 Disc Tray 3 ECHO VOL 2 Operation buttons 4 MIC VOL STANDBY/ON 5 MIC 1, 2 Switches the unit ON or OFF. OPEN/CLOSE 6 Remote Sensor FUNCTION 7 PORTABLE IN Changes the input source or function. ... -
Page 13: Rear Panel
Preparation Rear panel 5 6 7 1 AC IN 4 Scart connector Plug into the power source. 5 VIDEO OUTPUT 2 SPEAKERS connectors 6 AUX (L/R) INPUT 3 HDMI OUT (type A) 7 FM ANTENNA connector Connects to TV with HDMI inputs. -
Page 14: Remote Control
TV CONTROL buttons : Controls the TV. Remote control Controlling the TV You can control the sound level, input source, and power switching of Pioneer TVs as well (See page 42 for details). DIRECT FUNCTION buttons : Changes input source or function. - Page 15 Preparation HOME MENU : Press to display/hide HOME • • • • • • • • • • • • 7 • • • • • • • • • • • • MENU. CLEAR : Removes a track number on the RETURN : Moves backwards in the menu or Program List.
-
Page 16: Installation
Installation 2. Attach the non-skid pads to the base of each speaker. Installation Assemble the speakers Speaker Setup 1. Connect the wires to the player. Insert the cables connected to the 3. Mount the front/surround speaker. player to the same colored connector 1 Pass the speaker cable through the on the speaker. -
Page 17: Connecting The Cord
Installation 3 Fix the base to the lower cabinet from CAUTION the underside, using the four screws (M4 x 16). • Be careful not to tighten screws excessively. If excessive force is used to tighten screws, the threads of screw and/or nut may be damaged. Use a middle-sized manual screwdriver during assembly. -
Page 18: Wall Mounting
• If you are unsure of the qualities and strength of the wall, consult a professional Do not attach the subwoofer to a wall or for advice. ceiling. They may fall off and cause injury. • Pioneer is not responsible for any accidents or damage that result from improper installation. 5 mm 10 mm... -
Page 19: Positioning The System
Installation Positioning the System Subwoofer: The position of the subwoofer is not so critical, because low bass The following illustration shows an sounds are not highly directional. But example of positioning the system. it is better to place the subwoofer near the front speakers. -
Page 20: Connections To Your Tv
Installation Connections to Your HDMI OUT Connection If you have a HDMI TV or monitor, you can connect it to this unit using a HDMI cable. Connect the HDMI OUT jack on the unit to the HDMI IN jack on a HDMI compatible Make one of the following connections, TV or monitor. -
Page 21: Video Connection
Installation Video Connection NOTE Connect the VIDEO OUTPUT jack on the • If a connected HDMI device does not accept unit to the video in jack on the TV using a the audio output of the unit, the HDMI video cable. device’s audio sound may be distorted or You can hear the sound through the may not output. -
Page 22: Scart Connection
Installation Scart Connection Connect the Scart jack on the unit to the Scart in jack on the TV using a Scart cable. You can hear the sound through the system’s speakers. Scart Connection... -
Page 23: Optional Equipment Connection
Installation Optional Equipment PORTABLE IN Connection Connection Connect an OUTPUT of portable device (MP3 or PMP etc) to the PORTABLE IN connector. PORTABLE IN Connection AUX IN Connection Connect an Output of auxiliary device to the AUX Input (L/R) Connector. If your TV has only one output for audio (mono), connect it to the left (white) audio jack on the unit. -
Page 24: Usb Connection
Installation USB Connection Antenna Connection Connect the USB port of USB Memory (or Connect the supplied FM antenna for MP3 player, etc.) to the USB port on the listening to the radio. front of the unit. Connect the FM Wire antenna to the FM antenna connector. -
Page 25: Adjust The Initial Settings
Installation Adjust the Initial Initial Settings Menu The factory default settings are indicated Settings in italic . Digital Audio Out settings By using the Initial Settings menu, you can HDMI Out make various adjustments to items such as picture and sound. Select the audio signals to be output from You can also set a language for the the HDMI OUT terminal ( LPCM (2CH) / Auto /... -
Page 26: Language Settings
Installation Language settings Options settings Audio Language Parental Lock Restrict DVD-Video viewing ( Password / Select the language you prefer for the Level Change / Country Code ). audio track when listening to the sound of DVD-Video discs ( English /available languages/ Other Language ). -
Page 27: Operation
Operation Do this During playback, press Operation or to go to the Skipping next chapter/track or to to the next/ return to the beginning of previous the current chapter/track. chapter/ Press twice briefly to track/file step back to the previous Basic Operations chapter/track. -
Page 28: Other Operations
Operation Other Operations Selecting a subtitle language DivX During playback, press SUBTITLE repeatedly to select a desired subtitle Displaying Disc Information language. on-screen DivX You can display various information about Switches Audio the disc loaded on-screen. During playback,press AUDIO to the audio 1. -
Page 29: Last Scene Memory
Operation Last Scene Memory Creating a program list This unit memorizes the last scene from the last disc that is viewed. The last scene This feature lets you program the play remains in memory even if you remove the order of titles/chapters/tracks on a disc. disc from the player or switch off (Stand- 1. -
Page 30: Other Functions Available From The Program Menu
Operation Other functions available from Viewing photo files as a slide the program menu show JPEG This unit can play discs with photo files. There are a number of other options in the 1. Select the DVD/CD or USB function by program menu in addition to Create/Edit. -
Page 31: Radio Operations
Operation Radio Operations Presetting the Radio Stations You can preset 50 stations for FM. Before tuning, make sure that you have Be sure that FM aerial is connected. (Refer turned down the volume. to the page 24) 1. Press FM TUNER or FUNCTION until FM appears in the display window. -
Page 32: Seeing Information About A Radio Station
Operation Seeing information about a radio station The FM tuner is supplied with the RDS (Radio Data System) facility. This shows information about the radio station being listened to. Press DISPLAY (RDS) repeatedly to cycle through the various data types: (Programme Service Name) The name of the channel will appear in the display. -
Page 33: Audio Settings
Operation Audio Settings Surround (Off/5 Speaker Mode1/ 5 Speaker Mode2/Dolby PL II Movie/ Dolby PL II Music) • Select the Surround mode. To display Audio Settings Menu 5 Speaker Mode1: The sound from the front speakers will also be output by the 1. Press HOME MENU to display “HOME rear speakers. -
Page 34: Video Adjust
Operation Video Adjust Video Adjust parameters The factory default settings are indicated in italic . Sharpness (Fine/Standard/Soft) To display Video Adjust Menu • Adjusts the picture’s sharpness. 1. Press DVD/CD or press FUNCTION Brightness (-20 to +20) several times to select “DVD/CD” • Adjusts the picture’s brightness. functions. -
Page 35: Advanced Operations
Operation Advanced Operations Audio Sync Sometimes Digital TV encounters a delay between picture and sound. You can improve it by setting the delay on the Sleep Timer Setting sound. Press SLEEP one or more times to select Press AUDIO SYNC and select delay time delay time between 15 and 60 minutes, using after the unit will turn off. -
Page 36: Setting The Tv System
ENTER . The file copying process will Video CD NTSC DivX appear on the screen. CD (R/RW) NTSC — NTSC NOTE JPEG no disc • Do not operate any buttons during the file copying process. • A folder named “PIONEER” is automatically created on the USB device. The copied files are stored in this folder. -
Page 37: Recording Audio Cd Tracks On To Usb Devices
CD is stopped. 1. Load the audio CD. • When recording is completed, a folder Press STOP to stop playback if it starts named “PIONEER” is automatically created on the USB device. The recorded automatically. tracks are stored in this folder. 2. Press HOME MENU . -
Page 38: Karaoke
Operation Karaoke To adjust the echo Adjust by turning the ECHO VOL on the front panel. • ECHO VOL is effective for both MIC 1 and MIC 2 . Using karaoke To adjust the key Be sure to adjust the volume to the Press either the KEY ... -
Page 39: Extra Functions For Karaoke
Operation Extra functions for karaoke Recording your karaoke tracks on to USB devices Scoring your karaoke You can record your karaoke tracks on to a 1. Display the Karaoke settings screen. USB device through the player. Press KARAOKE . 2. Select “Karaoke Score”. NOTE Use / to select, then press ENTER or • Use this function after adjusting the... -
Page 40: Maintenance
Maintenance Maintenance Notes on Discs Handling the Unit Handling Discs When shipping the unit Please save the original shipping carton and packing materials. If you need to ship the unit, for maximum protection, re-pack the unit as it was originally packed at the factory. -
Page 41: Troubleshooting
Troubleshooting Troubleshooting PROBLEM CAUSE CORRECTION No Picture Select the appropriate video input mode on the TV The TV is not set to receive the DVD signal. so the picture from the DVD Receiver appears on the TV screen. Connect the video cables securely to both the TV The video cables are not connected securely. -
Page 42: Appendix
NOTE • For some models it may not be possible to operate the TV with the player’s remote • The factory default setting is 00 control, even for TVs of brands listed on the (PIONEER). manufacturer code list. • If you make a mistake when inputting the • The setting may be restored to the default code, release TV CONTROL then start after the batteries are replaced. If this over from the beginning. -
Page 43: Tv Preset Code List
Appendix TV Preset code list Manufacturer Code(s) PIONEER 00, 31, 32, 07, 36, GENERAL 29 MCMICHAEL 34 SCHAUB LORENZ 42 42, 51, 22 GENEXXA 31, 41 MEDIATOR 07 SCHNEIDER 07, 41, 47 ACURA 44 GOLDSTAR 10, 23, 21, 02, MEMOREX 44... -
Page 44: Language Codes
Appendix Language Codes Use this list to input your desired language for the following initial settings: Disc Audio, Disc Subtitle, Disc Menu. Language names (codes) an input codes Japanese (ja), 1001 Bhutani (dz), 0426 Kirghiz (ky), 1125 Sinhalese (si), 1909 English (en), 0514 Esperanto (eo), 0515 Latin (la), 1201... -
Page 45: Area Codes
Appendix Area Codes Choose a area code from this list. Country/Area name, Input codes and Country/Area code United States, 2119, us Switzerland, 0308, ch Pakistan, 1611, pk Argentina, 0118, ar Sweden, 1905, se Philippines, 1608, ph Finland, 0609, fi United Kingdom, 0702, gb Spain, 0519, es Italy, 0920, it Thailand, 2008, th... -
Page 46: Trademarks And Licences
Appendix Trademarks and Licences HDMI, the HDMI Logo, and High-Definition Multimedia Interface are trademarks or Manufactured under license under U.S. registered trademarks of HDMI Licensing LLC Patent Nos: 5,956,674; 5,974,380; 6,487,535 in the United States and other countries. & other U.S. and worldwide patents issued &... -
Page 47: Specifications
Net Dimensions (W x H x D): 230 mm x 80 mm x 90 mm Net Weight: 0.7 kg • Subwoofer Type: 1 Way Impedance Rated: 3 Ω Net Dimensions (W x H x D): 200 mm x 340 mm x 270 mm Net Weight: 3.4 kg © 2012 PIONEER CORPORATION. All rights reserved. -
Page 48: Consignes De Sécurit
Consignes de sécurité Consignes de sécurité Nous vous remercions d’avoir acquis un produit Pioneer. Veuillez lire attentivement ce mode d’emploi afin de connaître la manière d’utiliser l’appareil comme il convient. Cela fait, conservez le mode d’emploi de façon à pouvoir vous y référer en cas de nécessité. - Page 49 électrique. Vérifier le câble d’alimentation de temps la prise secteur si vous prévoyez une période en temps. Contacter le service après-vente PIONEER le prolongée de non utilisation (par exemple avant un plus proche ou le revendeur pour un remplacement.
-
Page 50: Droits D'auteur
Consignes de sécurité Droits d’auteur Ces symboles valent uniquement pour l’Union européenne. Il est interdit par la loi de copier, de diffuser, de Pour les pays ne faisant pas partie de l’Union montrer, de diffuser par câble, de reproduire européenne : en public ou de louer des matériaux soumis à... - Page 51 Consignes de sécurité Remarques sur les droits d’auteur • De nombreux DVD sont encodés avec une protection contre la copie. En conséquence, vous devez raccorder votre lecteur directement à votre téléviseur, et non à un magnétoscope. Le raccordement à un magnétoscope génère en effet une image déformée pour les disques protégés contre la copie.
- Page 52 Table des matières Effectuez les réglages de configuration initiale (Initial Settings) Consignes de sécurité Pour afficher et quitter le menu ATTENTION de configuration initiale (Initial Droits d’auteur Settings) Menu de configuration initiale (Initial Settings) Préparation Réglages Digital Audio Out Réglages Video Output Fonctionnalités uniques Réglages Language Disques pouvant être lus...
- Page 53 Table des matières Écoute de musique pendant un Karaoké diaporama Utilisation de la fonction Karaoké Utilisation de la radio Fonctions Karaoké supplémentaires Ecouter la radio Préréglage des stations de radio Suppression de toutes les stations Entretien mémorisées Remarques sur lesdisques Amélioration d’une mauvaise Manipulation de l’appareil réception FM...
-
Page 54: Fonctionnalités Uniques
Préparation Disques pouvant être lus • Disques DVD Vidéo Préparation • Disques DVD-R/-RW/-R DL DVD-Video et DVD+R/+RW/+R DL enregistrés en mode Vidéo Disques DVD-R/-RW/-R DL DVD VR enregistrés en mode VR Fonctionnalités CD-Vidéo (y compris les Super Video CD uniques VCD) • CD audio • Disques CD-R/-RW/-ROM contenant de la musique CD(R/RW) enregistrée dans le format Entrée appareil portable... -
Page 55: Accessoires Fournis
Préparation Accessoires fournis Symboles utilisés dans ce Guide Remarque Votre appareil est fourni avec les accessoires suivants. Indique des remarques et fonctionnalités spéciales. ATTENTION Indique des précautions à prendre pour éviter les dommages éventuels dus à une utilisation inappropriée. Câble vidéo (1) Télécommande (1) Tous les disques et les fichiers listés ci-dessous... -
Page 56: Fichiers Lisibles
Préparation Fichiers lisibles • Ce lecteur prend en charge les groupes de langues suivants : • Seuls les disques enregistrés dans le Groupe 1 Afrikaans (af), Basque (eu), Catalan (ca), format ISO9660 Niveau 1, Niveau 2 et Danois (da), Hollandais (nl), Anglais (en), Féringien (fo), Finnois (fi), Français (fr), Joliet peuvent être lus. German (de), Islandais (is), Irlandais (ga), • Les fichiers protégés par le DRM Italien (it), Norvégien (no), Portugais (pt),... - Page 57 Préparation Formats de fichiers audio pris en charge Impératifs à respecter pour les • Ce lecteur ne prend pas en charge périphériques USB l’encodage VBR (Variable Bit Rate) ni • L es périphériques nécessitant l’encodage sans perte. l’installation d’un programme Windows Media™ Audio (WMA) supplémentaire après la connexion à un Extension : wma ordinateur ne sont pas pris en charge.
-
Page 58: Panneau Avant
Préparation Panneau avant 1 Plateau du disque 3 ECHO VOL 2 Touches de fonction 4 MIC VOL STANDBY/ON 5 MIC 1, 2 ALLUME et ARRETE l’appareil. OPEN/CLOSE 6 Capteur de la télécommande FUNCTION 7 PORTABLE IN Permet de modifier la fonction ou la source d’entrée. -
Page 59: Panneau Arrière
Préparation Panneau arrière 5 6 7 1 AC IN 4 Prise péritel (SCART) Branchez-le dans la source 5 VIDEO OUTPUT d’alimentation. 6 AUX (L/R) INPUT 2 Prises SPEAKERS 7 Prise FM ANTENNA 3 HDMI OUT (type A) : Raccordez cette sortie à un téléviseur doté... - Page 60 Préparation Télécommande • • • • • • • • • • • • 2 • • • • • • • • • • • • Touches de TV CONTROL : Commande le téléviseur. Télécommande Contrôler le téléviseur. Vous pouvez contrôler aussi le niveau du son, la source d’entrée et l’interrupteur d’alimentation d’un téléviseur (Voir page 42 pour plus d’informations)
- Page 61 Préparation RETURN : Pour revenir en arrière dans • • • • • • • • • • • • 7 • • • • • • • • • • • • le menu ou pour quitter le menu de CLEAR : Enlève un numéro de piste de la configuration initiale (Initial Settings).
-
Page 62: Installation
Installation 2. Fixez les tampons anti-dérapage à la base de chaque haut-parleur. Tampon antidérapant Installation Reglage des parametres Configuration des enceintes 1. Branchez les fils sur le lecteur. Raccordez les câbles connectés 3. Montez les enceintes avant/surround. au lecteur aux prises de couleurs identiques sur l’enceinte. -
Page 63: Connexion Du Cordon
Installation 3 Fixez la base sur l'enceinte inférieure, ATTENTION depuis le dessous, à l'aide des quatre vis (M4 x 16). • Veillez à ne pas serrer excessivement les vis. Si vous utilisez une force excessive pour serrer les vis, les filetages de la vis et/ou de l’écrou risquent d’être endommagés. -
Page 64: Fixation Murale
à un professionnel. pas être rangés à proximité du caisson de • Pioneer ne peut pas être tenu pour basse. responsable d’accidents ou de dommage dus à une installation incorrecte. Ne fixez pas le caisson de basse au mur ou au plafond. -
Page 65: Installation Du Système
Installation Installation du système Caisson de basse : la position du caisson de basse n’est pas aussi importante, L’illustration suivante montre un exemple parce que les sons graves ne sont d’installation du système. pas particulièrement directionnels. Néanmoins, il est recommandé de Notez que les illustrations dans ces placer le caisson de basse près des haut- instructions diffèrent de l’unité... -
Page 66: Raccordement À Votre Téléviseur
Installation Raccordement à votre Connexion de la sortie HDMI téléviseur Si vous possédez un moniteur ou un téléviseur HDMI, vous pouvez le raccorder à cet appareil à l’aide d’un câble HDMI. Effectuez l’un des raccordements suivants, Raccordez la prise HDMI OUT de l’appareil en fonction des capacités de votre appareil à... -
Page 67: Connexion Vidéo
Installation Connexion vidéo Remarque Raccordez la prise de sortie vidéo VIDEO • Si un périphérique HDMI raccordé n’accepte OUTPUT de l’appareil à la prise d’entrée pas la sortie audio de l’appareil, le son du vidéo du téléviseur à l’aide d’un câble périphérique HDMI peut être déformé ou vidéo. -
Page 68: Connexion Péritel
Installation Connexion péritel Raccordez la prise péritel (SCART) de l’appareil avec la prise d’entrée péritel du téléviseur, à l’aide d’un câble péritel. Vous pouvez entendre le son à travers les enceintes du système. Connexion péritel... -
Page 69: Raccordement D'appareils Auxiliaires
Installation Raccordement Connexion PORTABLE IN d’appareils auxiliaires Raccordez la sortie d’un périphérique portable (baladeur MP3, lecteur multimédia portatif, etc.) au connecteur d’entrée audio. Connexion AUX IN Connexion PORTABLE IN Raccordez la sortie d’un appareil auxiliaire au connecteur d’entrée audio AUX (L/R). Si votre téléviseur ne comporte qu’une seule sortie pour le son (mono), raccordez- le à... -
Page 70: Connexion Usb
Installation Connexion USB Raccordement de l’antenne Raccordez le port USB de la clé mémoire Raccordez l’antenne FM fournie pour USB (ou baladeur MP3, etc.) au port USB écouter la radio. à l’avant de l’appareil. Raccordez l’antenne filaire FM au connecteur d’antenne FM. Connexion USB Raccordement de l’antenne Retrait du périphérique USB de l’appareil... -
Page 71: Effectuez Les Réglages De Configuration Initiale (Initial Settings)
Installation Effectuez les réglages Menu de configuration initiale (Initial Settings) de configuration Les réglages par défaut sont indiqués en initiale (Initial Settings) italique . Réglages Digital Audio Out Le menu de configuration initiale (Initial HDMI Out Settings) permet de définir et d’ajuster les Sélectionnez les signaux audio devant être paramètres concernant l’image et le son. -
Page 72: 26 Réglages Language
Installation Réglages Language Réglages Options Audio Language Parental Lock Sélectionnez la langue audio souhaitée Restreignez le visionnage de DVD-Vidéo pour les disques DVD-Video ( English / ( Password / Level Change / Country Code ). langues disponibles/ Other Language ). DivX VOD Subtitle Language Affichez le code d’immatriculation requis... -
Page 73: Opération
Opération Opération Action Appuyez sur la touche ou Opération pendant la lecture pour Accès à la piste, accéder à la piste ou au chapitre au fichier ou au suivant ou revenir au début de la chapitre suivant/ piste ou du chapitre en cours. précédent Appuyez deux fois brièvement sur la touche ... -
Page 74: Autres Opérations
Opération Autres opérations Sélectionner une langue pour les sous-titres DivX Pendant la lecture, appuyez plusieurs fois sur SUBTITLE pour sélectionner une langue Affichage des informations du pour les sous-titres. disque à l’écran DivX Changement de flux audio Vous pouvez afficher à l’écran diverses informations sur le disque chargé. -
Page 75: 29 Mémoire De La Dernière Scène
Opération Mémoire de la Dernière Scène Création d'une liste programmée Cet appareil mémorise la dernière scène Cette fonction vous permet de programmer du dernier disque visionné. La dernière l’ordre de lecture des titres/chapitres/ scène reste en mémoire même si vous pistes d’un disque. -
Page 76: Autres Fonctions Disponibles Dans Le Menu De Programmation
Opération Autres fonctions disponibles Affichage de fichiers images dans le menu de programmation sous forme de diaporama JPEG Cet appareil lit les disques contenant des fichiers photo. Outre les options de création/édition, le 1. Sélectionnez la fonction CD/DVD ou USB menu de programmation contient un en appuyant sur la touche FUNCTION . -
Page 77: Utilisation De La Radio
Opération Utilisation de la radio Préréglage des stations de radio Vous pouvez prérégler 50 stations FM. Avant de procéder au réglage, veillez à Vérifiez que les antennes FM soient diminuer le volume. connectées. (Reportez-vous à la page 24.) 1. Appuyez sur la touche FM TUNER ou FUNCTION jusqu’à... -
Page 78: Affichage Des Informations Sur Une Station De Radio
Opération Affichage des informations sur une station de radio Le syntoniseur FM est fourni avec la fonction RDS (Radio Data System). Celle- ci donne des informations concernant la station écoutée. Appuyez plusieurs fois sur DISPLAY (RDS) pour alterner parmi les divers types de données : (Nom du Service Emission) Le nom de la chaîne apparaîtra... -
Page 79: Paramètres Audio (Audio Settings)
Opération Paramètres audio Surround (Off/5 Speaker Mode1/ 5 Speaker Mode2/Dolby PL II Movie/ (Audio Settings) Dolby PL II Music) • Sélectionnez le mode Surround. 5 Speaker Mode1: les signaux audio envoyés sur les enceintes avant sont Pour afficher le menu des aussi envoyés sur les enceintes arrière. paramètres audio (Audio 5 Speaker Mode2: les mêmes signaux audio sont envoyés vers toutes les... -
Page 80: 34 Réglage Vidéo (Video Adjust)
Opération Réglage vidéo Paramètres Video Adjust Les réglages par défaut sont indiqués en (Video Adjust) italique . Sharpness (Fine/Standard/Soft) • Ajuste la netteté de l’image. Pour afficher le menu de Brightness (-20 to +20) réglage vidéo (Video Adjust) • Ajuste la luminosité de l’image. 1. Appuyez sur la touche DVD/CD ou sur la Contrast (-16 to +16) touche FUNCTION à... -
Page 81: Fonctions Avancées
Opération Fonctions avancées Désactivation temporaire du son Appuyez sur la touche MUTE pour mettre l’appareil en sourdine. Vous pouvez mettre l’appareil en sourdine pour répondre Réglage de la veille au téléphone, par exemple. L’indication programmée “MUTE” apparaît alors dans l’afficheur. Appuyez sur la touche SLEEP une ou Synchronisation audio plusieurs fois pour sélectionner le délai... -
Page 82: Configuration Du Standard De Télévision
CD (R/RW) copie des fichiers s’affiche à l’écran. NTSC — NTSC JPEG pas de disque Remarque • N’actionnez aucune touche ni aucun bouton pendant la copie des fichiers. • Un dossier nommé “PIONEER” est automatiquement créé sur le périphérique USB. Les fichiers copiés sont stockés dans ce dossier.. -
Page 83: Enregistrement De Pistes De Cd Audio Sur Un Périphérique Usb
1. Chargez le CD audio. Appuyez sur STOP pour arrêter la lecture • Lorsque l’enregistrement est terminé, un dossier nommé “PIONEER” est si elle démarre automatiquement. automatiquement créé sur le périphérique 2. Appuyez sur la touche HOME MENU . USB. Les pistes enregistrées sont stockées Sélectionnez “CD ->... -
Page 84: Karaoké
Opération Karaoké Réglage de l’écho. Pour ajuster le niveau d’écho, tournez le bouton ECHO VOL sur le panneau avant. • Le bouton ECHO VOL agit sur les deux micros MIC 1 et MIC 2 . Utilisation de la fonction Karaoké Réglage de la tonalité Appuyez sur la touche KEY ... -
Page 85: Fonctions Karaoké Supplémentaires
Opération Fonctions Karaoké Enregistrement de pistes Karaoké sur un périphérique USB supplémentaires Vous pouvez enregistrer vos pistes Karaoké Notez vos performances de karaoké sur un périphérique USB via le lecteur. 1. Affichez l’écran des réglages Karaoké Remarque (Karaoke Settings). Appuyez sur la touche KARAOKE . • Utilisez cette fonction après avoir ajusté le volume du microphone et le niveau d’écho 2. -
Page 86: Entretien
Entretien Manipulation de l’appareil Entretien Conservez le carton et les emballages d’origine Remarques sur Si vous devez transporter l’appareil, pour une protection maximale, emballez-le tel lesdisques que vous l’avez reçu à sa sortie de l’usine. Entretien des surfaces extérieures • N’utilisez pas de liquides volatiles tels Manipulation des disques qu’un insecticide en aérosol à... -
Page 87: Dépannage
Dépannage Dépannage PROBLEME CAUSE CORRECTION Pas image Sélectionnez le mode d’entrée vidéo approprié sur le Le téléviseur n’est pas réglé pour recevoir le téléviseur pour que l’image du Récepteur DVD apparaît signal du DVD. à l’écran. Branchez avec certitude les câbles vidéo au téléviseur Les câbles vidéo ne sont pas bien connectés. -
Page 88: Annexe
à 9) pour saisir le code tout en appuyant être utilisée également pour la commande sur TV CONTROL . du téléviseur. Remarque ATTENTION • Le réglage usine est 00 (PIONEER). En cas d’erreur lors de la saisie • • Il ne sera peut-être pas possible de faire fonctionner certains modèles de téléviseur du code, relâchez TV CONTROL ... - Page 89 Annexe Liste des codes de téléviseurs préréglés Fabricant Code(s) PIONEER 00, 31, 32, 07, 36, GENERAL 29 MCMICHAEL 34 SCHAUB LORENZ 42 42, 51, 22 GENEXXA 31, 41 MEDIATOR 07 SCHNEIDER 07, 41, 47 ACURA 44 GOLDSTAR 10, 23, 21, 02,...
-
Page 90: Codes Langue
Annexe Codes langue Aidez-vous de cette liste pour entrer votre langue préférée pour les paramètres initiaux suivants : Langu. audio, Langu. soustitres, Langu. Menu disque. Noms (codes) de langues et codes numériques Japanese (ja), 1001 Bhutani (dz), 0426 Kirghiz (ky), 1125 Sinhalese (si), 1909 English (en), 0514 Esperanto (eo), 0515... -
Page 91: Codes Régions
Annexe Codes régions Sélectionnez un code de région à partir de la liste suivante. Noms de pays et régions, Codes numériques et Codes de pays et régions États-Unis, 2119, us Suisse, 0308, ch Pakistan, 1611, pk Argentine, 0118, ar Suède, 1905, se Philippines, 1608, ph Finlande, 0609, fi Royaume-uni, 0702, gb... -
Page 92: Marques De Commerce Et Licences
Annexe Marques de commerce et licences HDMI, le logo HDMI et High-Definition Multimedia Interface sont des marques Fabriqué sous licence des brevets américains commerciales ou des marques déposées de suivants : brevets 5,956,674 ; 5,974,380 ; HDMI Licensing, LLC aux États-Unis et dans 6,487,535, et autres brevets américains et d’autres pays. -
Page 93: Spécifications
• Plage de réglage FM : Dimensions nettes 87,5 MHz à 108 MHz (L x H x P) : 200 mm x 340 mm x 270 mm Poids net : 3,4 kg © 2012 PIONEER CORPORATION. Tous droits de reproduction et de traduction réservés. - Page 94 Sicherheitshinweise Sicherheitshinweise Vielen Dank, dass Sie sich für dieses Pioneer-Produkt entschieden haben. Bitte lesen Sie diese Bedienungsanleitung gründlich durch, um sich mit der Bedienung des Geräts vertraut zu machen. Nachdem Sie die Bedienungsanleitung gelesen haben, legen Sie sie griffbereit zum Nachschlagen ab.
- Page 95 Prüfen Sie das Netzkabel von Zeit zu Zeit. Sollte es beschädigt sein, wenden Sie sich an Ihre nächste Keine Quellen offener Flammen (z.B. eine brennende autorisierte PIONEER-Kundendienststelle oder Ihren Kerze) auf dieses Gerät stellen. Händler, um es zu ersetzen. D3-4-2-1-7a_A1_De S002*_A1_De Informationen für Anwender zur Sammlung und Entsorgung von Altgeräten und...
- Page 96 Sicherheitshinweise Urheberrecht Diese Symbole sind ausschließlich in der Europäischen Gemeinschaft gültig. Es ist gesetzlich verboten, urheberrechtlich Länder außerhalb der Europäische geschütztes Material ohne Genehmigung Gemeinschaft: zu kopieren, auszustrahlen, zu zeigen, über Bitte wenden Sie sich zur ordnungsgemäßen Kabel zu senden, öffentlich wiederzugeben Entsorgung von Altgeräten und verbrauchten oder zu verleihen.
- Page 97 Sicherheitshinweise Hinweise zu Copyrights: • Viele DVD-Discs sind mit einem Kopierschutz versehen. Der Player sollte aus diesem Grund stets direkt am Fernseher angeschlossen werden, und nicht über einen Videorekorder. Beim Anschluss über einen Videorekorder kann das Bild kopiergeschützter Discs verzerrt dargestellt werden. • Under the U.S.
- Page 98 Inhalt Führen Sie die Ersteinstellungen (Initial Settings) aus Sicherheitshinweise Anzeige und zur Beendigung des VORSICHT Menüs für Ersteinstellungen (Initial Urheberrecht Settings) Menü Ersteinstellungen (Initial Settings) Vorbereitung Digital Audio Out-Einstellungen Video Output-Einstellungen Einzigartige Funktionen Language-Einstellungen Spielbare Discs Display-Einstellungen Mitgeliefertes Zubehör Options-Einstellungen Abspielbare Dateien Bedienungsfeld Rückseite...
- Page 99 Inhalt Während einer Diaschau Musik hören Wartung Radiobetrieb Hinweise zu Discs Radio hören Umgang mit dem Gerät Speichern von Radiosendern Alle gespeicherten Sender löschen Schlechten UKW-Empfang Fehlersuche verbessern Hinweise über Radiosender Fehlersuche anzeigen Audio-Einstellungen (Audio Settings) Anzeige des Menüs für Audio- Anhang Einstellungen (Audio Settings) Audio Settings-Parameter...
-
Page 100: Einzigartige Funktionen
Vorbereitung Spielbare Discs • DVD Video-Discs Vorbereitung • Im Video-Modus aufgenommene DVD-Video DVD-R/-RW/-R- DL- und DVD+R/+RW/+R-DL-Discs Im VR-Modus aufgenommene Einzigartige DVD VR DVD-R/-RW/-R- DL-Discs Video-CDs (einschließlich Super- Funktionen Video CD VCDs) • Audio-CDs • CD-R/-RW/-ROM-Discs, die im CD(R/RW) CD-DA Format aufgenommene Anschluss für tragbare Geräte Musik enthalten JPEG-Dateien, aufgenommen Wiedergabe von Musik auf Ihrem... -
Page 101: Mitgeliefertes Zubehör
Vorbereitung Mitgeliefertes Zubehör In diesem Handbuch verwendete Symbole Bitte prüfen Sie den Lieferumfang auf Hinweis Vollständigkeit. Weist auf besondere Funktionen des Gerätes hin. VORSICHT Vorsichtshinweise zur Vermeidung möglicher Beschädigungen. VIDEO-Kabel (1) Fernbedienung (1) Alle aufgeführten Discs und Dateien MP3-Dateien DVD und finalisierte DVD+R/+RW/-R/-RW AAA/R03-Batterien (2) UKW-Antenne (1) -
Page 102: Abspielbare Dateien
Vorbereitung Abspielbare Dateien • Dieses Gerät unterstützt die folgenden Sprachgruppen: • Nur mit ISO9660 Level 1, Level 2 und Gruppe 1 Afrikaans (af), Baskisch (eu), Katalanisch (ca), Joliet aufgenommene Discs können Dänisch (da), Niederländisch (nl), Englisch (en), Faröisch (fo), Finnisch (fi), Französisch abgespielt werden. (fr), Deutsch (de), Isländisch (is), Irisch (ga), • Durch DRM (Digital Rights Italienisch (it), Norwegisch (no), Portugiesisch (pt), Räto-Romanisch (rm), Schottisch-Gälisch... - Page 103 Vorbereitung Unterstützte Audiodateiformate Anforderungen an USB-Geräte • Dieser Spieler unterstützt nicht VBR • Geräte, für die zum Anschluss an (Variable Bit-Rate) und die verlustfreie einen Computer eine zusätzliche Kodierung. Softwareinstallation erforderlich ist, werden nicht unterstützt. Windows Media™ Audio (WMA) • Das USB-Gerät niemals während der Dateierweiterung: .wma Dateiübertragung trennen. • Abtastfrequenzen: 32 kHz, 44,1 kHz und • Der Suchlauf kann bei USB-Geräten mit 48 kHz hoher Kapazität etwas länger als eine • Bit-Rate: Bis zu 192 kbps...
-
Page 104: Bedienungsfeld
Vorbereitung Bedienungsfeld 1 Disc-Fach 3 ECHO VOL 2 Bedienungstasten 4 MIC VOL STANDBY/ON 5 MIC 1, 2 Schaltet das Gerät EIN und AUS. OPEN/CLOSE 6 Fernbedienungssensor FUNCTION 7 PORTABLE IN Auswahl einer Eingangsquelle oder Funktion. 8 USB -Anschluss ... - Page 105 Vorbereitung Rückseite 5 6 7 1 AC IN 4 Scart-Anschluss Anschluss an eine Steckdose. 5 VIDEO OUTPUT 2 SPEAKERS -Steckverbinder 6 AUX (L/R) INPUT 3 HDMI OUT (Typ A) für Anschluss an ein 7 FM-ANTENNA -Steckverbinder Fernsehgerät mit HDMI-Eingängen.
-
Page 106: Fernbedienung
Bedienung des Fernsehgerätes. Fernbedienung Bedienung des Fernsehers Über die mitgelieferte Fernbedienung kann die Lautstärke und die Eingangsquelle auch eines nicht-Pioneer Fernsehgerätes bedient und das Gerät ein- und ausgeschaltet werden (Zu Einzelheiten siehe Seite 42). Tasten DIRECT FUNCTION : Ändern die Eingangsquelle oder Eingangs-Funktion. - Page 107 Vorbereitung HOME MENU : Drücken, um das HOME während der Wiedergabe geändert werden. MENU anzuzeigen/auszublenden. • • • • • • • • • • • • 7 • • • • • • • • • • • • RETURN : Bewirkt ein Zurückgehen im Menü...
-
Page 108: Installation
Installation 2. Befestigen Sie die rutschfesten Unterlagen an den Lautsprecherstandfüßen. Rutschfeste Installation Unterlagen Montage der Lautsprecher Lautsprecher-Einrichtung 1. Schließen Sie die Kabel am Player an. Führen Sie die an den Player 3. Montieren Sie den Front-/Surround- angeschlossenen Kabel jeweils in lautsprecher. -
Page 109: Anschließen Der Kabel
Installation 3 Die Basis von der Unterseite her VORSICHT am unteren Gehäuse mit den vier Schrauben (M4 x 16) befestigen. • Ziehen Sie die Schrauben nicht zu stark an. Wenn die Schrauben zu stark angezogen werden, können die Gewinde der Schrauben und/oder der Muttern beschädigt werden. Verwenden Sie einen mittelgroßen Schraubendreher für den Zusammenbau. -
Page 110: Wandmontage
Ihrer Wand nicht einschätzen können, ziehen Videokassetten) sollten ebenfalls nicht Sie einen Fachmann zu Rate. in der Nähe des Subwoofers aufbewahrt • Pioneer übernimmt keine Haftung für Unfälle werden. oder Schäden, die auf eine unsachgemäße Der Subwoofer darf auf keinen Fall an einer Montage zurückzuführen sind. -
Page 111: System Positionieren
Installation System positionieren SubWoofer: Die Position des SubWoofers ist nicht entscheidend, In der folgenden Abbildung wird gezeigt, da niederfrequenten Basstöne nicht wie das System Positioniert werden kann. richtungsabhängig sind. Der SubWoofer sollte dennoch in der Nähe der vorderen Die Abbildungen in dieser Anleitung Lautsprecher aufgestellt werden. -
Page 112: Anschluss An Einen Fernseher
Installation Anschluss an einen HDMI OUT-Ausgangsanschluss Fernseher Ein HDMI-Fernseher oder Monitor kann über ein HDMI-Kabel an dieses Gerät angeschlossen werden. Verbinden Sie die HDMI OUT-Buchse des Gerätes mit der Nehmen Sie, abhängig von den HDMI IN-Buchse eines HDMI-kompatiblen Fähigkeiten Ihrer Geräte, einen der Fernsehers oder Monitors. - Page 113 Installation Hinweis VORSICHT • Falls ein angeschlossenes HDMI-Gerät • Beim Ändern der Auflösung bei den Audioausgang des Gerätes nicht bereits angeschlossenen Gerät können unterstützt, ist der Ton des HDMI-Gerätes u. Fehlfunktionen auftreten. Um diese Störung U. nur verzerrt oder nicht zu hören. zu beheben, schalten Sie das Gerät aus und wieder ein.
-
Page 114: Video-Anschluss
Installation Video-Anschluss Scart-Anschluss Verbinden Sie die VIDEO OUTPUT-Buchse Schließen Sie die Scart-Buchse an der des Gerätes über das Videokabel mit der Einheit mit einem Scart-Kabel an die Scart- Video-Eingangsbuchse des Fernsehers. Buchse des Fernsehers an. Der Ton wird über die Systemlautsprecher Der Ton wird über die Systemlautsprecher ausgegeben. -
Page 115: Anschluss Von Zusatzgeräten
Installation Anschluss von Anschluss PORTABLE IN Zusatzgeräten Verbinden Sie den Ausgang des tragbaren Gerätes (z. B. MP3 oder PMP) mit dem PORTABLE-Eingangsanschluss. AUX IN-Anschluss Anschluss PORTABLE IN Verbinden Sie den Ausgang des Zusatzgerätes mit dem Eingangsanschluss AUX AUDIO (L/R). Falls Ihr Fernseher nur einen Audio- Ausgang (Mono) besitzt, schließen Sie nur den linken (weiß) Audio-Stecker am Gerät AUX IN-Anschluss... -
Page 116: Usb-Anschluss
Installation USB-Anschluss Antennen-anschluss Verbinden Sie den USB-Anschluss Schließen Sie zum Radioempfang die des USB-Speichergerätes (z. B. MP3- enthaltene UKW-Antenne an. Player) mit dem USB-Anschluss auf der Schließen Sie die UKW-Drahtantenne an Vorderseite des Gerätes. den FM-Antennenanschluss an. USB-Anschluss Antennen-anschluss USB-Gerät vom Gerät trennen 1. -
Page 117: (Initial Settings) Aus
Installation Führen Sie die Menü Ersteinstellungen (Initial Settings) Ersteinstellungen Die Standardeinstellungen ab Werk sind in (Initial Settings) aus Kursivschrift angegeben. Digital Audio Out-Einstellungen Mit dem Menü für die Ersteinstellungen HDMI Out (Initial Settings) können Sie verschiedene Einstellungrn für Positionen wie Bild und Wählen Sie die von der HDMI OUT - Ton vornehmen. -
Page 118: Language-Einstellungen
Installation Language-Einstellungen Options-Einstellungen Audio Language Parental Lock Wählen Sie die Sprache, die Sie, wenn Sie Beschränken Sie DVD-Videobetrachtung ( Password / Level Change / Country Code ). sich den Ton der DVD-Video-Discs anhören, für den Audio-Track bevorzugen ( English / verfügbare Sprachen/ Other Language ). -
Page 119: Bedienung
Bedienung Funktion Drücken Um schnell die Drücken Sie während der gewünschte Wiedergabe mehrmals die Taste Bedienung Titelstelle zu oder , um die gewünschte finden, kann Suchlaufgeschwindigkeit zu eine Datei wählen. im schnellen Drücken Sie zur normalen Grundfunktionen Wiedergabe die Taste PLAY. Vorlauf oder Rücklauf wiedergegeben... -
Page 120: Weitere Funktionen
Bedienung Weitere Funktionen Auswahl der Untertitelsprache DivX Drücken Sie während der Wiedergabe mehrmals die Taste SUBTITLE , um die Anzeigen von Disc-Informationen gewünschte Untertitelsprache auszuwählen. auf dem Bildschirm DivX Schaltet Audio um You can display various information about the disc loaded on-screen. Drücken Sie während der Wiedergabe 1. -
Page 121: Merken Der Letzten Szene
Bedienung Merken der letzten Szene Erstellen einer Programmliste Dieses Gerät merkt sich die zuletzt gespielte Szene der letzten Disc. Die Diese Funktion ermöglicht es Ihnen, die letzte Szene wird im Speicher aufbewahrt, Wiedergabe-Reihenfolge dern Titel/Kapitel/ auch wenn die Disc aus dem Player Tracks usw. -
Page 122: Andere Aus Dem Programmmenü Verfügbare Funktionen
Bedienung Andere aus dem Anschauen von Fotodateien als Programmmenü verfügbare Diaschau JPEG Funktionen Mit diesem Gerät können Discs mit Fotodateien wiedergegeben werden. Es gibt zusätzlich zu Create/Edit eine Reihe 1. Drücken Sie zur Auswahl der Funktion von anderen Optionen im Programmmenü. DVD/CD oder USB die Taste FUNCTION . -
Page 123: Radiobetrieb
Bedienung Radiobetrieb Speichern von Radiosendern Es können 50 Sender für UKW gespeichert werden. Vor der Sendersuche sollte die Die UKW-Antenne muss angeschlossen Lautstärke verringert werden. sein. (Siehe Seite 24.) 1. Drücken Sie FM TUNER oder FUNCTION , bis im Anzeigefenster FM erscheint. Radio hören Der zuletzt empfangene Sender wird eingestellt. -
Page 124: Hinweise Über Radiosender Anzeigen
Bedienung Hinweise über Radiosender anzeigen Der UKW-Tuner ist mit der RDS-Funktion (Radio Data System) ausgestattet. Hierbei werden Information über den gerade eingestellten Radiosender angezeigt. Drücken Sie mehrmals die Taste DISPLAY (RDS) , um die verschiedenen Datentypen zu durchlaufen: (Name des Programmdienstes) Der Name des Kanals erscheint in der Anzeige (Programmarterkennung) -
Page 125: Audio-Einstellungen (Audio Settings)
Bedienung Audio-Einstellungen Surround (Off/5 Speaker Mode1/ 5 Speaker Mode2/Dolby PL II Movie/ (Audio Settings) Dolby PL II Music) • Wählen Sie den Surround-Modus (Raumklang-Modus). 5 Speaker Mode1: Der Ton von den Anzeige des Menüs für Audio- Front-Lautsprechern wird auch von den Einstellungen (Audio Settings) hinteren Lautsprechern ausgegeben. -
Page 126: Video-Einstellung (Video Adjust)
Bedienung Video-Einstellung Video Adjust-Parameter Die Standardeinstellungen ab Werk sind in (Video Adjust) Kursivschrift angegeben. Sharpness (Fine/Standard/Soft) • Stellt die Bildschärfe ein Anzeigen des Menüs Video- Brightness (-20 to +20) Einstellung (Video Adjust) • Stellt die Bildhelligkeit ein. 1. Drücken Sie DVD/CD oder drücken Contrast (-16 to +16) Sie mehrere Male FUNCTION , um die • Stellt das Verhältnis der Hellligkeit der Funktionen “DVD/CD”... -
Page 127: Erweiterte Funktionen
Bedienung Erweiterte Funktionen Ton vorübergehend stummschalten Drücken Sie MUTE , um das Gerät stumm zu schalten. Das Gerät kann stumm geschaltet Einstellen des Sleep-Timers werden, falls z. B. das Telefon klingelt. Daraufhin erscheint das Symbol “MUTE” im Drücken Sie einmal oder mehrmals Anzeigefenster. -
Page 128: Einstellen Des Fernseh-Systems
Sie dann ENTER . Auf NTSC dem Bildschirm erscheint der Datei- — NTSC oder Kopiervorgang. JPEG keine Disc Hinweis • Bedienen Sie während des Datei- Kopiervorgangs keine Tasten. • Auf dem USB-Gerät wird automatisch ein Ordner mit dem Namen „PIONEER“ erstellt. In diesem Ordner werden die kopierten Dateien gespeichert. -
Page 129: Aufnehmen Von Audio-Cd-Tracks Auf Usb-Geräten
Audio-CD gestoppt worden ist. 1. Die Audio-CD einlegen. • Wenn die Aufnahme abgeschlossen ist, Drücken Sie STOP , um die Wiedergabe wird auf dem USB-Gerät automatisch ein Verzeichnis mit dem Namen "PIONEER" zu stoppen, wenn sie automatisch erstellt. Die aufgenommenen Tracks beginnt. werden in diesem Verzeichnis gespeichert. -
Page 130: Karaoke
Bedienung Karaoke Einstellen des Echos Stellen Sie das Echo durch Drehen von ECHO VOL auf dem vorderen Bedienfeld ein. • ECHO VOL ist sowohl für MIC 1 als auch Verwendung von Karaoke für MIC 2 wirksam. Achten Sie vor dem Anschließen des Einstellen der Tonart Mikrofons unbedingt darauf, dass die Drücken Sie entweder KEY ... -
Page 131: Sonderfunktionen Bei Karaoke
Bedienung Sonderfunktionen bei Karaoke Aufnehmen Ihrer Karaoke-Tracks auf USB-Geräten Scoring Ihres Karaoke Sie können Ihre Karaoke-Tracks durch den 1. Zeigen Sie den Bildschirm für Karaoke- Player auf einem USB-Gerät aufnehmen. Einstellungen an. Drücken Sie KARAOKE . Hinweis 2. Wählen Sie “Karaoke Score”. Verwenden Sie zur Auswahl / und • Verwenden Sie diese Funktion nach dem Einstellen der Mikrofonlautstärke und... -
Page 132: Wartung
Wartung Wartung Hinweise zu Discs Umgang mit dem Gerät Umgang mit Discs Transport des Gerätes Bitte bewahren Sie die Originalverpackung auf. Um einen ausreichender Schutz beim Transport des Gerätes zu erreichen, verpacken Sie das Gerät in der Originalverpackung. Reinigung der äußeren Oberflächen Keine Etiketten oder Klebeband aufkleben. -
Page 133: Fehlersuche
Fehlersuche Fehlersuche STÖRUNG URSACHE BEHEBUNG Wählen Sie den richtigen Video-Eingangsmodus Kein Bild Der Fernseher ist nicht für den Empfang von DVD- des Fernsehers, so dass das Bild des DVD-Receivers Signalen eingestellt. angezeigt wird. Schließen Sie die Videokabel fest am Fernseher sowie Die Videokabel sind nicht fest angeschlossen. -
Page 134: Anhang
Players bedient werden. CONTROL gedrückt halten. Hinweis VORSICHT • Die werkseitige Standardeinstellung ist 00 • Bei bestimmten Modellen kann das (PIONEER). Fernsehgerät nicht mit der Fernbedienung des Players bedient werden kann, auch • Wenn Sie bei der Eingabe des Codes einen wenn das Fernsehgerät in der Liste der Fehler machen, geben Sie TV CONTROL ... - Page 135 Anhang Liste der TV-Herstellercodes Hersteller Code(s) PIONEER 00, 31, 32, 07, 36, GENERAL 29 MCMICHAEL 34 SCHAUB LORENZ 42 42, 51, 22 GENEXXA 31, 41 MEDIATOR 07 SCHNEIDER 07, 41, 47 ACURA 44 GOLDSTAR 10, 23, 21, 02, MEMOREX 44 SEG 42, 46...
-
Page 136: Sprachcodes
Anhang Sprachcodes Verwenden Sie diese Liste zur Einstellung der gewünschten Sprache für die folgenden Voreinstellungen: Disc-Audio, Disc-Untertitel, Disc-Menü. Sprachbezeichnung (Codes) und Eingabecodes Japanese (ja), 1001 Bhutani (dz), 0426 Kirghiz (ky), 1125 Sinhalese (si), 1909 English (en), 0514 Esperanto (eo), 0515 Latin (la), 1201 Slovak (sk), 1911 French (fr), 0618... - Page 137 Anhang Ländercodes Wählen Sie einen Ländercode aus der Liste. Bezeichnung des Landes/Gebiets, Eingabecode und Länder-/Gebietscode Vereinigte Staaten von Schweiz, 0308, ch Philippinen, 1608, ph Amerika, 2119, us Schweden, 1905, se Finnland, 0609, fi Spanien, 0519, es Mexiko, 1324, mx Argentinien, 0118, ar Großbritannien, 0702, gb Thailand, 2008, th Brasilien, 0218, br...
-
Page 138: Markenzeichen Und Lizenzen
Anhang Markenzeichen und Lizenzen HDMI, das HDMI-Logo und High-Definition Multimedia Interface sind Warenzeichen Hergestell unter Lizenz der Patente Nr. 5 956 oder eingetragene Warenzeichen von HDMI 674, 5 974 380, 6 487 535 und anderer erteilter Licensing, LLC in den USA und anderen und angemeldeter US- und Weltpatente. Ländern. DTS, das Symbol und DTS und das Symbol zusammen sind eingetragene Warenzeichen und DTS Digital Surround und die DTS- Logos sind Handlelmarken von DTS, Inc. -
Page 139: Technische Daten
0,7 kg • Subwoofer Typ: 1-Weg Tuner Nennimpedanz: 3 Ω • UKW(FM)-Empfangsbereich: Gesamtabmessungen 87,5 MHz bis 108,0 MHz (B x H x T): 200 mm x 340 mm x 270 mm Gesamtgewicht 3,4 kg © 2012 PIONEER CORPORATION. Alle Rechte vorbehalten. - Page 140 Informazioni sulla sicurezza Informazioni sulla sicurezza Vi ringraziamo per avere acquistato questo prodotto Pioneer. Vi preghiamo di leggere queste queste istruzioni per l’uso in modo da sapere usare correttamente il proprio modello. Dopo aver letto queste istruzioni, riporle in un luogo sicuro per poterle consultare di nuovo al momento del bisogno.
- Page 141 PIONEER oppure al vostro rivenditore per la non utilizzare l’apparecchio per periodi di tempo sostituzione del filo di alimentazione.
- Page 142 Informazioni sulla sicurezza Copyrights Questi simboli sono validi soltanto nell’Unione Europea. La legge vieta la copia, la trasmissione, la Per i paesi extra-UE: visione, la trasmissione via cavo, la visione Per gettare questi prodotti, contattare l’ente pubblica o il noleggio di materiale protetto locale o il rivenditore e chiedere informazioni sul da copyright senza previo consenso.
- Page 143 Informazioni sulla sicurezza Informazioni sul copyright • Molti dischi DVD sono codificati con la protezione per copia. Per questo motivo collegare il lettore direttamente al televisore e non a un VCR. La riproduzione di dischi protetti per la copia tramite collegamento con VCR provoca immagini distorte.
- Page 144 Indice Collegamento antenna Regolare le impostazioni iniziali Informazioni sulla sicurezza (Initial Settings) IMPORTANTE Visualizzare e uscire dal menù delle Copyrights impostazioni iniziali (Initial Settings) Menù impostazioni iniziali (Initial Settings) Preparazione Impostazione Digital Audio Out Impostazione Video Output Caratteristiche particolari Impostazione Language Dischi riproducibili Impostazioni Display Accessori in dotazioni...
- Page 145 Indice Ascolto di musica durante una presentazione Manutenzione Funzionamento della radio Note sui dischi Ascoltare la RADIO Maneggiamento dell’unità Preimpostazione delle stazioni radio Eliminazione di tutte le stazioni salvate Ricerca guasti Migliorare la ricezione FM Visualizzazione delle informazioni Ricerca guasti su una stazione radio Impostazioni audio (Audio Settings) Visualizzare le impostazioni audio...
-
Page 146: Dischi Riproducibili
Preparazione Dischi riproducibili • Dischi DVD-Video Preparazione • Dischi DVD-R/-RW/-R DL DVD-Video e DVD+R/+RW/+R DL registrati in modalità Video Dischi DVD-R/-RW/-R DL DVD VR registrati in modalità VR Caratteristiche Video CD (inclusi i Super VCD) Video CD particolari • CD Audio • CD-R/-RW/-ROM contenenti CD(R/RW) musica e registrati in formato CD-DA Portable In File JPEG registrati su DVD-R/... -
Page 147: Accessori In Dotazioni
Preparazione Accessori in dotazioni Simboli usati in questo manuale Nota Controllare e identificare gli accessori forniti. Denota note importanti e caratteristiche particolari. ATTENZIONE Indica avvertenze per prevenire danni derivanti da un uso errato. Cavo video (1) Telecomando (1) Tutti i dischi e file elencato sotto File MP3 DVD e finalizzati DVD+R/+RW/-R/-RW... -
Page 148: File Riproducibili
Preparazione File riproducibili Visualizzazione di file esterni di sottotitoli • I set di font elencati di seguito sono • Possono venire riprodotti solo i dischi disponibili per la visualizzazione di file registrati con i metodi ISO9660 Level 1, esterni contenenti sottotitoli. È possibile Level 2 e Joliet. vedere il carattere giusto impostato sullo schermo grazie alle impostazioni • I file protetti col sistema DRM (Digital della Subtitle Language a pagina 26 in... - Page 149 Preparazione Formati dei file di immagini supportati Dispositivi USB compatibili JPEG • Lettori MP3: lettori MP3 di tipo flash Estensione: .jpg .jpeg • Unità flash USB: dispositivi che supportano USB 2.0 o USB 1.1 • Risoluzione: Fino a 3 072 x 2 048 pixel • La funzione USB di questa unità non • Questo lettore supporta i file JPEG supporta alcuni dispositivi USB. baseline. • Questo lettore supporta il formato Exif Requisiti dispositivo USB di Ver. 2.2. • Dispositivi che richiedono l’installazione di ulteriori programmi quando li si Formati dei file audio supportati...
-
Page 150: Pannello Anteriore
Preparazione Pannello anteriore 1 Vassoio del disco 3 ECHO VOL 2 Pulsanti di funzionamento 4 MIC VOL STANDBY/ON 5 MIC 1, 2 Accende e spegne l’unità. OPEN/CLOSE 6 Sensore telecomando FUNCTION 7 PORTABLE IN Modifica la sorgente d’ingresso o la funzione. -
Page 151: Pannello Posteriore
Preparazione Pannello posteriore 5 6 7 1 AC IN 4 Connettore Scart Viene inserito nella fonte di alimentazione 5 VIDEO OUTPUT elettrica. 6 AUX (L/R) INPUT 2 Connettori SPEAKERS 7 Connettore FM ANTENNA 3 HDMI OUT (tipo A) Collega la TV agli ingressi HDMI. - Page 152 Controllo del Televisore È possibile controllare il livello del suono, la sorgente di entrata e gli interruttori di corrente anche delle TV Pioneer (Vedi pagina 42 per i dettagli). Tasti DIRECT FUNCTION : Cambia la fonte di entrata o la funzione.
- Page 153 Preparazione ENTER : Conferma la selezione di menu. ANGLE : Su dischi DVD--Video che contengono angoli multipli, questi ultimi HOME MENU : Premere per visualizzare/ possono essere modificati durante il nascondere HOME MENU. playback. RETURN : Si sposta in senso inverso sul •...
-
Page 154: Impostazione Altoparlante
Installazione 2. Applicare i piedini antiscivolo alla base di ogni altoparlante. Piedini Installazione antiscivolo Regolare le impostazioni di installazione Impostazione Altoparlante 1. Collegare i cavi al lettore. 3. Montare l'altoparlante surround Inserire i cavi connessi al lettore anteriore. nel connettore dello stesso colore 1 Far passare il cavo dell'altoparlante sull’altoparlante. -
Page 155: Collegamento Del Cavo
Installazione 3 Fissare la base alla scatola inferiore ATTENZIONE dalla parte del fondo, usando le quattro viti (M4 x 16). • Non serrare eccessivamente le viti. Se si serrano con forza le viti, le filettature di viti e/o dadi potrebbero danneggiarsi. Per il montaggio, usare un cacciavite manuali di medie dimensioni. - Page 156 (floppy-disk, nastri o videocassette) devono • Se non si è sicuri della qualità e della forza essere conservati lontani dal subwoofer. della parte, consultare un tecnico per eventuali consigli. Non appendere il subwoofer a una parete o al soffitto. Potrebbero cadere provocando • Pioneer non è responsabile di incidenti o danni dovuti all’installazione impropria. ferimenti. 5 mm 10 mm Vite per l’installazione (non in dotazione)
-
Page 157: Posizionamento Del Sistema
Installazione Posizionamento del sistema Subwoofer: la posizione del subwoofer non è così critica, poiché i suoni bassi La figura seguente mostra un esempio di non sono molto direzionali. Tuttavia, posizionamento del sistema. è consigliabile collocare il subwoofer accanto agli altoparlanti frontali. Si noti che le figure in questo manuale di Ruotarlo leggermente verso il centro istruzioni possono essere diverse dall’unità... -
Page 158: Connessioni Alla Propria Tv
Installazione Connessioni alla Connessione HDMI OUT propria TV Se disponete di una TV HDMI o monitor, li potete connettere a questa unità con un cavetto HDMI. Connettere il jack HDMI OUT sull’unità Effettuare uno dei collegamenti che al jack HDMI IN della TV o monitor seguono a seconda delle capacità delle compatibili HDMI. apparecchiature esistenti. -
Page 159: Connessione Video
Installazione Connessione Video Nota Connettere il connettore VIDEO OUTPUT • Se un dispositivo HDMI collegato non del lettore al connettore video sulla TV accetta l’uscita audio dell’unità, il suono può tramite il cavo video. risultare distorto o non essere riprodotto. Potete sentire l’audio attraverso gli • Quando si connette un dispositivo HDMI o altoparlanti del sistema. -
Page 160: Collegamento Scart
Installazione Collegamento Scart Connettere la presa jack Scart dell’unità con la spina jack Scart della TV tramite un cavo Scart. Potete sentire l’audio attraverso gli altoparlanti del sistema. Collegamento Scart... -
Page 161: Connessione Portable In
Installazione Connessione Connessione PORTABLE IN apparecchiature Connettere un’uscita di un dispositivo audio portabile (MP3 o PMP ecc) al opzionale connettore di PORTABLE IN. Connessione PORTABLE IN Connessione AUX IN Connettere un uscita del dispositivo ausiliario al connettore di ingresso AUX AUDIO (L/R). -
Page 162: Connessione Usb
Installazione Connessione USB Collegamento antenna Collegare la porta USB di una unità Per ascoltare la radio connettere l’antenna di memoria USB (oppure lettore MP3, FM fornite in dotazione. etc.) alla porta USB sulla parte anteriore Connettere l’antenna ad anello FM al dell’apparecchio. -
Page 163: Initial Settings
Installazione Regolare le Menù impostazioni iniziali (Initial Settings) impostazioni iniziali Le impostazioni predefinite sono indicate (Initial Settings) in corsivo . Impostazione Digital Audio Out Usando il menù delle impostazioni iniziali (Initial Settings), è possibile HDMI Out eseguire diverse regolazioni di voci, come Scegliere i segnali audio da emettere dal l’immagine e il suono. -
Page 164: Impostazione Language
Installazione Impostazione Language Impostazione Options Audio Language Parental Lock Selezionare la lingua preferita per la Restrizione della visione di DVD-Video ( Password / Level Change / Country Code ). pista audio se si ascoltano dischi DVD- Video ( English /lingue disponibili/ Other Language ). -
Page 165: Funzionamento Di Base
Funzionamento fare questo Durante la riproduzione Funzionamento premere oppure Saltare il per passare alla traccia/ capitolo/ capitolo successivo oppure traccia o per tornare all’inizio della traccia traccia/capitolo corrente. precedente/ Premere due volte Funzionamento di base successivo velocemente per tornare alla traccia/capitolo precedente. -
Page 166: Altre Operazioni
Funzionamento Altre operazioni Selezione della lingua dei sottotitoli DivX Durante la riproduzione, premere ripetutamente SUBTITLE per selezionare la Visualizzazione delle lingua desiderata per i sottotitoli. informazioni disco sullo schermo DivX Interruttori Audio Si possono visualizzare sullo schermo varie informazioni relative al disco caricato. Durante il playback, premere AUDIO sul 1. -
Page 167: Memoria Ultima Scena
Funzionamento Memoria ultima scena Creare una lista di programmi Questo registratore memorizza l’ultima scena dell’ultimo disco visionato. L’ultima Questa caratteristica permette di scena rimane nella memoria anche programmare l’ordine di riproduzione di quando si rimuove il disco dall’unità o titoli/capitoli/piste su un disco. se questa viene spenta (modo stand- 1. -
Page 168: Le Altre Funzioni Disponibili Dal
Funzionamento Le altre funzioni disponibili dal Vedere i file fotografici come menù programmi uno slide show JPEG Questa unità può riprodurre dischi con file foto. Vi sono numerose altre opzioni nel menù 1. Selezionare la funzione DVD/CD o USB programmi, oltre a Crea/Scrivi. premendo FUNCTION . -
Page 169: Ascoltare La Radio
Funzionamento Funzionamento della Preimpostazione delle stazioni radio radio Si possono predefinire 50 stazioni per FM. Prima di sintonizzare, assicurarsi di abbassare il volume. Assicuratevi che le antenne FM siano connesse. (Vedere a pagina 24) 1. Premere FM TUNER or FUNCTION finché appare FM sulla schermata. - Page 170 Funzionamento Visualizzazione delle informazioni su una stazione radio Il sintonizzatore FM è dotato di un servizio Radio Data System (RDS) che visualizza informazioni relativa alla stazione radio che si sta ascoltando Premere DISPLAY (RDS) ripetutamente per scorrere i vari tipi di dati : (Nome del servizio di programma) Il nome del canale viene...
-
Page 171: Parametri Audio Settings
Funzionamento Impostazioni audio Surround (Off/5 Speaker Mode1/ 5 Speaker Mode2/Dolby PL II Movie/ (Audio Settings) Dolby PL II Music) • Selezionare la modalità Surround. 5 Speaker Mode1: Anche il suono dagli altoparlanti frontali verrà emesso da Visualizzare le impostazioni quelli posteriori. audio (Audio Settings) sul 5 Speaker Mode2: Lo stesso suono verrà... -
Page 172: Parametri Video Adjust
Funzionamento Regolazione video Parametri Video Adjust Le impostazioni predefinite sono indicate (Video Adjust) in corsivo . Sharpness (Fine/Standard/Soft) • Regola la nitidezza dell’immagine. Visualizzare il menù di Brightness (-20 to +20) regolazione video (Video • Regola la luminosità dell’immagine. Adjust) Contrast (-16 to +16) 1. Premere DVD/CD o premere FUNCTION • Regola il rapporto fra la luminosità... -
Page 173: Funzionamento Avanzato
Funzionamento Funzionamento Disattiva temporaneamente il sonoro avanzato Premere MUTE per silenziare l’unità. L’unità può essere silenziata ad esempio per rispondere al telefono, l’indicatore “MUTE” viene visualizzato nella finestra del Impostazione SLEEP del timer display. Premere SLEEP una o più volte per selezionare il tempo di ritardo tra 15 e 60 Audio Sync minuti, dopodiché... -
Page 174: Impostare Il Sistema Tv
ENTER . Il processo di copiatura DivX del file apparirà sullo schermo. CD (R/RW) NTSC — NTSC oppure JPEG Nota nessun disco • Non premete alcun tasto durante il processo di copiatura del file. • Una cartella denominata “PIONEER” si crea automaticamente sulla chiave USB. I file copiati saranno salvati in questa cartella. -
Page 175: Registrare Piste Di Cd Audio Su
CD audio è stato arrestato. 1. Caricare il CD audio. • Quando la registrazione è completata, una Premere STOP per arrestare il playback cartella denominata “PIONEER” si crea automaticamente sul dispositivo USB. Le se dovesse avviarsi automaticamente. piste registrate saranno salvate in questa 2. -
Page 176: Usare Il Karaoke
Funzionamento Karaoke Regolare l'eco Regolare ruotando ECHO VOL sul pannello frontale. • ECHO VOL è valido sia per MIC 1 sia per MIC 2 . Usare il Karaoke Regolare la chiave Assicurarsi di regolare il volume al minimo Premere o KEY o KEY sul telecomando. prima di connettere il microfono, altrimenti • I valori della chiave saranno visualizzati si potrebbero verificare disturbi degli... -
Page 177: Funzioni Extra Per Il Karaoke
Funzionamento Funzioni extra per il Karaoke Registrare le vostre piste Karaoke su dispositivi USB Creare un punteggio per il vostro Si possono registrare le vostre piste Karaoke Karaoke sul dispositivo USB tramite il 1. Visualizzare la schermata impostazioni lettore. Karaoke. Premere KARAOKE . -
Page 178: Note Sui Dischi
Manutenzione Manutenzione Note sui dischi Maneggiamento dell’unità Maneggiamento dei dischi Durante la spedizione Conservare la scatola e materiale di imballaggio originali. Se si necessita inviare l’unità, per ottenere la massima protezione, imballare l’unità come imballata originalmente di fabbrica. Non toccare il lato di riproduzione del Per mantenere le superfici esterne pulite disco. -
Page 179: Ricerca Guasti
Ricerca guasti Ricerca guasti PROBLEMA CAUSA CORREZIONE Assenza di Selezionare il modo corretto di ingresso segnale L’apparecchio Tv non è stato impostato per la immagine video sulla TV in modo da poter visualizzare sullo ricezione del segnale DVD. schermo TV il segnale dal ricevitore DVD. Il cavo del segnale video non è... - Page 180 TV CONTROL . ATTENZIONE Nota • Nel caso di alcuni modelli potrebbe non • L’impostazione predefinita è 00 (PIONEER). esser possibile controllare il televisore col telecomando del lettore anche se la marca è • Se si commette un errore nell’immettere il fra quelle della lista. codice, lasciare andare TV CONTROL e riprendere dall’inizio.
- Page 181 Appendice Lista dei codici di controllo del televisore Codici delle marche PIONEER 00, 31, 32, 07, 36, GENERAL 29 MCMICHAEL 34 SCHAUB LORENZ 42 42, 51, 22 GENEXXA 31, 41 MEDIATOR 07 SCHNEIDER 07, 41, 47 ACURA 44 GOLDSTAR 10, 23, 21, 02,...
-
Page 182: Codici Lingua
Appendice Codici lingua Utilizzare questo elenco per inserire la lingua preferita per le seguenti impostazioni iniziali : Audio, Sottotitoli, Menu. Nomi (codici) delle lingue e codici da digitare delle lingue Japanese (ja), 1001 Bhutani (dz), 0426 Kirghiz (ky), 1125 Sinhalese (si), 1909 English (en), 0514 Esperanto (eo), 0515 Latin (la), 1201... -
Page 183: Codici Area
Appendice Codici area Selezionare un codice area dall’elenco. Nome del paese/area, codici da digitare e codice di paese/area Stati Uniti, 2119, us Svizzera, 0308, ch Pakistan, 1611, pk Argentina, 0118, ar Svezia, 1905, se Filippine, 1608, ph Finlandia, 0609, fi Regno Unito, 0702, gb Spagna, 0519, es Italia, 0920, it... -
Page 184: Marchi Registrati E Licenze
Appendice Marchi registrati e licenze Il termine HDMI, il logo HDMI ed il termine High-Definition Multimedia Interface sono Fabbricato in licenza con il Brevetto USA n. marchi di fabbrica o marchi di fabbrica 5,956,674; 5,974,380; 6,487,535 e altri brevetti depositati della HDMI Licensing, LLC negli rilasciati &... -
Page 185: Specifiche Tecniche
• Campo di sintonia di FM: Tipo: 1 via 87,5 MHz a 108,0 MHz Impedenza Rated: 3 Ω Dimensioni nette (L x A x P): 200 mm x 340 mm x 270 mm Peso netto: 3,4 kg © 2012 PIONEER CORPORATION. Tutti i diritti riservati. - Page 186 Veiligheidsinformatie Veiligheidsinformatie Hartelijk dank voor uw aankoop van dit Pioneer product. Lees deze gebruiksaanwijzing aandachtig door om bekend te raken met de juiste bediening van uw apparaat. Na het doorlezen van de gebruiksaanwijzing dient u deze te bewaren op een veilige plaats, voor latere naslag.
- Page 187 Om brand te voorkomen, mag u geen open vuur (zoals een brandende kaars) op de apparatuur zetten. dichtstbijzijnde erkende PIONEER onderhoudscentrum of uw dealer een nieuw snoer te kopen. D3-4-2-1-7a_A1_Nl...
- Page 188 Veiligheidsinformatie Auteursrechten Deze symbolen gelden alleen in de Europese Unie. Het is wettelijk verboden auteursrechtelijk Voor landen buiten de Europese Unie: beschermd materiaal zonder toestemming Als u deze apparaten wilt afdanken, neem te kopiëren, uit te zenden, te vertonen, via de dan contact op met het gemeentehuis van uw kabel uit te zenden, in het openbaar af te spelen woonplaats of de leverancier ervan en vraag...
- Page 189 Veiligheidsinformatie Opmerkingen over auteursrechten (copyrights) • Veel DVD-disks zijn gecodeerd met kopieerbeveiliging. Daarom moet u de speler rechtstreeks op uw TV en niet op een videorecorder aansluiten. Als u de speler op een videorecorder aansluit, wordt het beeld van tegen kopiëren beveiligde disks vervormd. • Volgens de Amerikaanse wetgeving op het auteursrecht en de daarmee vergelijkbare wetgeving van andere landen,...
- Page 190 Inhoudsopgave Pas de Initial Settings aan (Initial Settings) Veiligheidsinformatie Het Initial Settings-menu (Initial BELANGRIJK Settings) weergeven en verlaten Auteursrechten Initial Settings-menu (Initial Settings) Digital Audio Out instellingen Voorbereiding Video Output instellingen Language instellingen Unieke eigenschappen Display instellingen Afspeelbare disks Options instellingen Meegeleverde toebehoren Afspeelbare bestanden Frontpaneel...
- Page 191 Inhoudsopgave Radio bedienen Naar de radio luisteren Onderhoud Radiostations programmeren Wat u over disks moet weten Alle opgeslagen stations Behandeling van het apparaat verwijderen Slechte FM-ontvangst verbeteren Informatie over een radiostation Problemen oplossen bekijken Audio-instellingen (Audio Settings) Problemen oplossen Audio-instellingenmenu tonen (Audio Settings) Audio Settings-parameters Aanhangsel...
-
Page 192: Afspeelbare Disks
Voorbereiding Afspeelbare disks • DVD-Videodiscs Voorbereiding • DVD-R/-RW/-R DL- en DVD+R/+RW/+R DL-discs DVD-Video die in de Videomodus zijn opgenomen DVD-R/-RW/-R DL-discs die in de Unieke DVD VR VR-modus zijn opgenomen eigenschappen Video-CD’s (inclusief Super-VCD’s) Video CD • Audio-CD’s • CD-R/-RW/-ROM-discs met CD(R/RW) muziek die is opgenomen in het CD-DA formaat Portable-ingang JPEG-bestanden die zijn... -
Page 193: Meegeleverde Toebehoren
Voorbereiding Meegeleverde toebehoren Gebruikte symbolen in deze handleiding Controleer de meegeleverde toebehoren en Let op zorg ervoor dat u ze herkent. Maakt u attent op speciale aanwijzingen en bedieningsfuncties. WAARSCHUWING Vestigt uw aandacht op VIDEO-kabel (1) Afstandsbediening (1) voorzorgsmaatregelen die mogelijke schade door verkeerd gebruik kunnen voorkomen. -
Page 194: Afspeelbare Bestanden
Voorbereiding Afspeelbare bestanden • Deze disc-speler biedt de volgende taalgroepen: • Alleen discs die zijn opgenomen volgens Groep 1 Afrikaans (af), Baskisch (eu), Catalaans (ca), de ISO9660 niveau 1, niveau 2 en Joliet- Deens (da), Nederlands (nl), Engels (en), Faeroërs (fo), Fins (fi), Frans (fr), Duits (de), normen kunnen worden afgespeeld. Ijslands (is), Iers (ga), Italiaans (it), Noors (no), • Bestanden met een DRM-beveiliging Portugees (pt), Reto-Romaans (rm), Schots... - Page 195 Voorbereiding Windows Media™ Audio (WMA) • Bij een USB-stick met hoge capaciteit, kan het langer dan een paar minuten Extensie: .wma duren om doorzocht te worden. • Bemonsteringsfrequenties: 32 kHz, 44,1 • Om gegevensverlies te voorkomen moet kHz en 48 kHz u een back-up van alle gegevens maken. • Bitwaarde: Tot 192 kbps • Als u een USB-verlengsnoer of USB- • Deze speler is geschikt voor bestanden hub gebruikt, wordt het USB-apparaat die zijn gecodeerd met Windows Media...
- Page 196 Voorbereiding Frontpaneel 1 Disklade 3 ECHO VOL 2 Bedieningsknoppen 4 MIC VOL STANDBY/ON 5 MIC 1, 2 Schakel het toestel AAN/UIT. OPEN/CLOSE 6 Sensor afstandsbediening FUNCTION 7 PORTABLE IN Hiermee wijzigt u de invoerbron of – functie. 8 USB Poort ...
- Page 197 Voorbereiding Achterzijde 5 6 7 1 AC IN 4 Scart-aansluiting Steek deze kabel in een stopcontact. 5 VIDEO OUTPUT 2 SPEAKERS -connectors 6 AUX (L/R) INPUT 3 HDMI OUT (type A); voor aansluiting op 7 FM ANTENNE -connectors een TV met HDMI-ingangen.
- Page 198 • • • • • • • • • • • • 2 • • • • • • • • • • • • TV bedieningsknoppen : Bestuurt de TV. Afstandsbediening De TV besturen U kunt het geluidsniveau, de bronkeuze en de aan/uit-schakelaar van Pioneer TV’s bedienen (Zie blz. 42 voor meer gegevens). DIRECT FUNCTION-toetsen : Wijzigt de ingangsbron of functie.
- Page 199 Voorbereiding ENTER : Bevestigt menukeuze. ANGLE : Op DVD-Videoschijven met meerdere invalshoeken kan de invalshoek HOME MENU : Indrukken om het HOME tijdens de weergave worden gewijzigd. MENU weer te geven/te verbergen. • • • • • • • • • • • • 7 • • • • • • • • • • • • RETURN : Gaat terug in het menu of verlaat het Initial Settings-menu (Initial Settings).
- Page 200 Installeren 2. Bevestig antislipkussentjes op de onderkant van elke luidspreker. Installeren Antislipkussentjes In elkaar zetten van de speakers luidspreker-opstelling 1. Sluit de luidsprekerkabels op de speler 3. Installeer de voor/surroundluidspreker. aan. Steek de snoeren die op het apparaat 1 Leid de luidsprekerkabel door het zijn aangesloten in de connector met kabelgat aan de zijkant van het dezelfde kleur van de luidspreker.
-
Page 201: Aansluiten Van Het Snoer
Installeren 3 Bevestig het voetstuk met behulp van WAARSCHUWING de vier schroeven (M4 x 16) via de onderzijde aan de onderste kast . • Draai de schroeven niet te strak aan. Doet u dat wel, dan kunnen de schroeven en/ of de moeren beschadigd worden. Gebruik een middelgrote handschroevendraaier voor de montage. - Page 202 • Pioneer is niet aansprakelijk voor ongevallen De subwoofer mag niet aan een wand of of schade als gevolg van een verkeerde plafond worden opgehangen. Door hun installatie.
-
Page 203: Het Systeem Positioneren
Installeren Het systeem positioneren Subwoofer: de positie van de subwoofer is niet cruciaal, omdat lage basgeluiden De volgende illustratie toont een voorbeeld niet duidelijk één kant opgaan. Maar van hoe u het systeem opstelt. het is beter de subwoofer vlakbij de luidsprekers voor te zetten. -
Page 204: Op Uw Tv Aansluiten
Installeren Op uw TV aansluiten HDMI OUT-uitgang Als u een TV of monitor met een HDMI- aansluiting bezit, kunt u deze met een HDMI-kabel op deze speler aansluiten. Maak een van de volgende verbindingen, Sluit het HDMI OUT-aansluitpunt van de afhankelijk van de mogelijkheden van uw speler aan op het HDMI IN-aansluitpunt bestaande apparatuur. - Page 205 Installeren Let op WAARSCHUWING • Wanneer een aangesloten HDMI-apparaat • Als u de resolutie verandert nadat u de geen audio-uitvoer van het apparaat verbinding hebt gemaakt, is er kans op accepteert, is ht mogelijk dat het geluid van storingen. U kunt dit probleem oplossen het HDMI-apparaat wordt vervormd of niet door de speler uit en weer in te schakelen. hoorbaar is.
- Page 206 Installeren Videoaansluiting Scart-aansluiting Sluit de VIDEO OUTPUT-stekkerbus op de Sluit de Scart-connector van het apparaat speler met een videokabel op de video-in met een Scart-kabel aan op de Scart- stekkerbus van de TV aan. aansluiting van de televisie. U kunt het geluid beluisteren via de U kunt het geluid beluisteren via de luidsprekers van het systeem.
- Page 207 Installeren Optionele apparatuur PORTABLE-ingang aansluiten Sluit de uitgang van het draagbare apparaat (MP3, PMP e.d.) aan op de PORTABLE-ingang. AUX-ingang PORTABLE-ingang Sluit de uitgang van een hulpapparaat aan op de AUX AUDIO-ingang (L/R). Als uw TV maar één audio-uitgang (mono) heeft, moet u deze aansluiten op de linkse (witte) audiostekkerbus van het receiversysteem.
-
Page 208: Usb-Apparaten Aansluiten
Installeren USB-apparaten aansluiten Antenne aansluiten Sluit de USB-poort van een USB-geheugen Om radiostations te ontvangen moet u de (of MP3-speler e.d.) aan op de USB-poort meegeleverde FM-antennes aansluiten. aan de voorkant van het receiversysteem. Sluit de FM-draadantenne aan op de aansluiting voor een FM-antenne op het USB-apparaten aansluiten apparaat. -
Page 209: Video Output Instellingen
Installeren Pas de Initial Settings Initial Settings-menu (Initial Settings) aan (Initial Settings) De oorspronkelijke fabrieksinstellingen worden cursief aangegeven. U kunt met het Initial Settings-menu (Initial Digital Audio Out instellingen Settings) verscheidene aanpassingen doen zoals aan het beeld en geluid. HDMI Out U kunt onder andere ook een taal voor de Kies welke audiosignalen u wilt weergeven ondertitels en het Initial Settings-menu... -
Page 210: Language Instellingen
Installeren Language instellingen Options instellingen Audio Language Parental Lock Selecteer de gewenste taal voor de Beperkingen instellen voor het bekijken van DVD-Video’s ( Password / Level Change / geluidstrack als u een DVD-Videoschijf beluistert ( English /beschikbare talen/ Other Country Code ). Language ). - Page 211 Bediening Voor Doe dit Druk tijdens het afspelen Bediening op of om naar Naar het het volgende hoofdstuk of volgende of nummer te gaan of terug vorige hoofdstuk, te gaan naar het begin van nummer het huidige hoofdstuk of of bestand nummer.
-
Page 212: Een Ondertiteltaal Selecteren
Bediening Andere bediening- Een ondertiteltaal selecteren DivX shandelingen Tijdens het afspelen drukt u herhaaldelijk op SUBTITLE om een gewenste ondertiteltaal te selecteren. Informatie over disks op het beeldscherm weergeven Wijzigt de audio DivX U kunt uiteenlopende informatie over Druk tijdens de weergave op AUDIO naar een geladen disk op het beeldscherm de audiostream/het audiokanaal. -
Page 213: Laatste Sc Geheugen
Bediening Laatste Sc geheugen Een programmalijst aanmaken Dit toestel onthoudt de laatste scène van de laatst bekeken schijf. De laatste scène Met deze functie kunt u de afspeelvolgorde blijft in het geheugen, zelfs als u de schijf van de titels/hoofdstukken/tracks op een verwijdert uit het toestel of het toestel schijf instellen. -
Page 214: Andere Functies Die In Het
Bediening Andere functies die in het Fotobestanden als een programmamenu beschikbaar diavoorstelling bekijken JPEG zijn Dit apparaat is geschikt voor het afspelen van disks met fotobestanden. Naast Create/Edit zijn er een aantal andere opties in het programmamenu 1. Selecteer de DVD/CD- of USB-functie beschikbaar. -
Page 215: Radio Bedienen
Bediening Radio bedienen Radiostations programmeren U kunt 50 FM- stations vooraf programmeren. Zorg dat zowel de FM antennes Zet het volume zo laag mogelijk (uit) aangesloten zijn. (Zie pagina 24) voordat u gaat afstemmen. 1. Druk op FM TUNER of FUNCTION totdat Naar de radio luisteren FM in het displayvenster verschijnt. - Page 216 Bediening Informatie over een radiostation bekijken De FM tuner wordt geleverd werd met RDS (Radio Data System). Dit toont informatie over het radiostation waarnaar geluisterd wordt. Door herhaaldelijk op DISPLAY (RDS) om te bladeren door de verschillende gegevenstypes : (Programmaservice naam) De naam van het kanaal wordt op het scherm getoond.
-
Page 217: Audio-Instellingenmenu Tonen
Bediening Audio-instellingen Surround (Off/5 Speaker Mode1/ 5 Speaker Mode2/Dolby PL II Movie/ (Audio Settings) Dolby PL II Music) • Selecteer de Surroundmodus. 5 Speaker Mode1: Het geluid uit de voorste luidsprekers wordt tevens door Audio-instellingenmenu tonen de achterste luidsprekers weergegeven. (Audio Settings) 5 Speaker Mode2: Hetzelfde geluid wordt vanuit de 5 luidsprekers behalve de 1. -
Page 218: Video Adjust-Parameters
Bediening Video bijstellen Video Adjust-parameters De oorspronkelijke fabrieksinstellingen (Video Adjust) worden cursief aangegeven. Sharpness (Fine/Standard/Soft) • Voor scherpteregeling van het beeld. Video Adjust-menu (Video Brightness (-20 to +20) Adjust) weergeven • Voor helderheidsregeling van het beeld. 1. Druk enkele malen op DVD/CD of op Contrast (-16 to +16) FUNCTION om de “DVD/CD”-functies te • Voor bijregelen van de helderheid van tonen. -
Page 219: Luisteren Naar Muziek Van Uw
Bediening Geavanceerde Geluidsweergave tijdelijk uitschakelen bediening- Druk op MUTE om het geluid te smogelijkheden onderdrukken. Zo kunt u het apparaat tijdelijk stilschakelen om bijvoorbeeld de telefoon op te nemen; hierbij knippert de indicatie “MUTE Slaapstand (Sleep Timer) (Stilgeschakeld)” op het beeldscherm. instellen Druk eenmaal of meerdere malen op Audio Sync... -
Page 220: Kopiëren Van Bestanden Op De
CD (R/RW) Het kopieerproces van het bestand NTSC — NTSC verschijnt op het scherm. JPEG geen disc Let op • Tijdens het kopieerproces van het bestand mogen geen toetsen worden bediend. • Een map genaamd “PIONEER” wordt automatisch in het USB-apparaat aangemaakt. De gekopieerde bestanden worden in deze map opgeslagen. - Page 221 Druk op STOP om de weergave stop te • Als de opname is voltooid, wordt automatisch een map genaamd zetten indien deze automatisch start. “PIONEER” aangemaakt in het USB- 2. Druk op HOME MENU . apparaat. De opgenomen tracks worden in Selecteer “CD -> USB Rec” of druk op deze map opgeslagen.
-
Page 222: Karaoke Gebruiken
Bediening Karaoke De echo bijstellen De echo kan worden bijgesteld door ECHO VOL op het voorpaneel te draaien. • ECHO VOL is op zowel MIC 1 als MIC 2 van toepassing. Karaoke gebruiken De toonhoogte bijstellen Zet het volume op het laagste niveau Druk op KEY ... -
Page 223: Extra Functies Voor Karaoke
Bediening Extra functies voor karaoke Opnemen van uw karaoketracks op USB-apparatuur De score van uw karaoke noteren De karaoketracks kunnen via de speler op een USB-apparaat worden opgenomen. 1. Geef het Karaoke-instellingenscherm weer. Let op Druk op KARAOKE . • Gebruik deze functie nadat het volume 2. - Page 224 Onderhoud Onderhoud Wat u over disks moet Behandeling van het weten apparaat Disks hanteren Het apparaat vervoeren Bewaar de originele doos en het verpakkingsmateriaal waarin u het apparaat hebt gekocht, Als u het apparaat veilig wilt versturen, verpak het dan op dezelfde manier waarop het in de fabriek is verpakt.
-
Page 225: Problemen Oplossen
Problemen oplossen Problemen oplossen PROBLEEM OORZAAK CORRECTIE Geen beeld Selecteer de juiste video inputmodus op de TV zodat De TV is niet afgesteld op het ontvangen van het het beeld van de DVD receiver op het TV scherm het DVD signaal. getoond wordt. - Page 226 CONTROL ingedrukt houdt. speler. Let op WAARSCHUWING • De fabrieksinstelling is 00 (PIONEER). • Als u zich vergist bij het invoeren van de • Bij sommige modellen is het mogelijk code, laat u de TV CONTROL toets los en dat u de TV niet kunt bedienen met de begint u weer van voren af aan.
- Page 227 Aanhangsel Lijst met TV voorkeuzecodes Merken codes PIONEER 00, 31, 32, 07, 36, GENERAL 29 MCMICHAEL 34 SCHAUB LORENZ 42 42, 51, 22 GENEXXA 31, 41 MEDIATOR 07 SCHNEIDER 07, 41, 47 ACURA 44 GOLDSTAR 10, 23, 21, 02, MEMOREX 44...
- Page 228 Aanhangsel Taalcodes Gebruik deze lijst om de gewenste taal voor de volgende begininstellingen te selecteren : Schijfaudio, Schijfondertiteling, Schijfmenu. Namen van talen (codeletters) en invoercodes Japanese (ja), 1001 Bhutani (dz), 0426 Kirghiz (ky), 1125 Sinhalese (si), 1909 English (en), 0514 Esperanto (eo), 0515 Latin (la), 1201 Slovak (sk), 1911...
- Page 229 Aanhangsel Regiocodes Kies een regiocode uit de lijst. Naam land/gebied, invoercode en land/gebiedscode Verenigde Staten van Zwitserland, 0308, ch Filippijnen, 1608, ph Amerika, 2119, us Zweden, 1905, se Finland, 0609, fi Spanje, 0519, es Mexico, 1324, mx Argentinië, 0118, ar Groot-Brittannië, 0702, gb Thailand, 2008, th Brazilië, 0218, br...
-
Page 230: Handelsmerken En Licenties
Aanhangsel Handelsmerken en licenties HDMI, het HDMI-logo en High-Definition Multimedia Interface zijn handelsmerken of Vervaardigd onder licentie van de volgende gedeponeerde handelsmerken van HDMI patentnummers in de V.S.: 5,956,674; 5,974,380; Licensing, LLC in de Verenigde Staten en 6,487,535 en overige uitgegeven en nog in andere landen. -
Page 231: Technische Gegevens
• Subwoofer Type: Eenweg • FM Afstellingsbereik : Gewogen impedantie: 3 Ω 87,5 MHz tot 108,0 MHz Netto afmatingen (B x H x D): 200 mm x 340 mm x 270 mm Netto gewicht: 3,4 kg © 2012 PIONEER CORPORATION. Alle rechten voorbehouden. - Page 232 Información de seguridad Información de seguridad Le damos las gracias por la adquisición de este producto Pioneer. Lea a fondo estas instrucciones de utilización para que aprenda a utilizar correctamente su modelo. Después de haber terminado de leer estas instrucciones, guárdelas en un lugar seguro para, en caso de ser necesario, consultarlas en el futuro.
- Page 233 Revise el cable de alimentación está dañado, solicite el reemplazo del mismo al centro de servicio autorizado ADVERTENCIA PIONEER más cercano, o a su distribuidor. Para evitar el peligro de incendio, no ponga nada con S002*_A1_Es fuego encendido (como pueda ser una vela) encima del aparato.
- Page 234 Información de seguridad Copyright Estos símbolos sólo tienen validez en la Unión Europea. La ley prohíbe copiar, difundir, mostrar, emitir Para países fuera de la Unión Europea: por cable, reproducir en público o alquilar Si desea eliminar estos productos, póngase material bajo copyright sin permiso expreso.
- Page 235 Información de seguridad Notas sobre los Copyrights • Muchos discos DVD están codificados con protección anticopia. Por esta razón, debe conectar el reproductor sólo a un televisor, no una grabadora de vídeo. La conexión a una grabadora de vídeo puede producir una imagen distorsionada en discos con protección anticopia.
- Page 236 Contenido Conexión USB Conexión de la antena Información de seguridad Configure los Ajustes Iniciales (Initial IMPORTANTE Settings) Copyright Cómo mostrar y salir del Menú de Ajustes Iniciales (Initial Settings) Menú de Ajustes Iniciales (Initial Preparación Settings) Ajustes Digital Audio Out Características únicas Ajustes Video Output Discos reproducibles...
- Page 237 Contenido Escuchar música durante la Karaoke presentación de diapositivas Cómo utilizar la función de karaoke Funcionamiento de la radio Funciones de Karaoke adicionales Escuchar la radio Configuración de las emisoras de radio Mantenimiento Borrado de todas las emisoras Notas en los discos guardadas Manejo de la unidad Mejorar una mala recepción de FM...
-
Page 238: Preparación
Preparación Discos reproducibles • Discos DVD Video Preparación • Discos DVD-R/-RW/-R DL DVD-Video y DVD+R/+RW/+R DL grabados en el modo Video Discos DVD-R/-RW/-R DL DVD VR grabados en el modo VR Características únicas Video CD (incluyendo Super Video CD VCD) • CD de audio • Discos CD-R/-RW/-ROM Portátil CD(R/RW) con música grabada en el formato CD-DA Escuche música desde su dispositivo Archivos JPEG grabados en... -
Page 239: Accesorios Incluidos
Preparación Accesorios incluidos Símbolos utilizados en este manual Nota Revise e identifique los accesorios facilitados. Indicates special notes and operating features. PRECAUCIÓN Indica precauciones para evitar posibles daños. VIDEO cable (1) Mando a distancia (1) Todos los discos y archivos listados a continuación Archivos MP3 DVD y DVD+R/+RW/-R/-RW... -
Page 240: Archivos Que Pueden Reproducirse
Preparación Archivos que pueden • Este reproductor soporta los grupos de idiomas siguientes: reproducirse Grupo 1 Afrikaans (af), Vascuence (eu), Catalán (ca), Danés (da), Holandés (nl), Inglés (en), Feroe (fo), Finlandés (fi), Francés (fr), Alemán (de), Islandés • Sólo se pueden reproducir los discos (is), Irlandés (ga), Italiano (it), Noruego (no), grabaos en ISO9660 Level 1, Level 2 y Portugués (pt), Rhaeto-Romance (rm), Gaélico Joliet. - Page 241 Preparación Formatos de archivos de audio Requisitos de dispositivo USB soportados • No admite dispositivos que requieran instalación adicional de software al • Este reproductor no soporta VBR conectarlo a un ordenador. (Variable Bit Rate) y codificación sin pérdidas (lossless). • No retire el dispositivo USB durante la operación. Windows Media™ Audio (WMA) • Para un dispositivo USB de mayor Extensión: .wma capacidad, podría tardar más de unos • Frecuencias de muestreo: 32 kHz, 44,1 minutos en examinarlo.
-
Page 242: Panel Frontal
Preparación Panel frontal 1 Bandeja de disco 3 ECHO VOL 2 Botones de operación 4 MIC VOL STANDBY/ON 5 MIC 1, 2 Enciende o apaga la unidad OPEN/CLOSE 6 Sensor de mando a distancia FUNCTION 7 PORTABLE IN Cambia la fuente de entrada o función. -
Page 243: Panel Trasero
Preparación Panel trasero 5 6 7 1 AC IN 4 Conector Scart Conecta la alimentación eléctrica. 5 VIDEO OUTPUT 2 Conectores de los SPEAKERS 6 AUX (L/R) INPUT 3 HDMI OUT (tipo A) Se conecta al 7 Conector de FM ANTENNA televisor con entradas HDMI. -
Page 244: Mando A Distancia
Mando a distancia Control de la TV También puede controlar el nivel de sonido, fuente de entrada y el encendido y apagado de televisores Pioneer (Para una información detallada, consulte la página 42). Botones de DIRECT FUNCTION : Cambian la función o fuente de entrada. - Page 245 Preparación RETURN : Retrocede en el menú o sale de • • • • • • • • • • • • 7 • • • • • • • • • • • • los Ajustes Iniciales (Initial Settings). CLEAR : elimina un número de pista en la lista de Programa.
-
Page 246: Instalación
Instalación 2. Coloque los apoyos antideslizantes en la base de cada altavoz. Apoyos Instalación antideslizantes Monte los altavoces Configuración del altavoz 1. Conecte los cables al reproductor. 3. Monte el altavoz delantero/surround. Introduzca los cables conectados en el 1 Pase el cable del altavoz a través del reproductor en el conector del altavoz orificio para cables que encontrará... -
Page 247: Conexión Del Cable
Instalación 3 Utilice los cuatro tornillos (M4 x 16) PRECAUCIÓN para asegurar la base en la estructura inferior desde abajo. • Tenga cuidado de no apretar excesivamente los tornillos. Si se utiliza demasiada fuerza para apretar los tornillos, la rosca del tornillo y la tuerca podrían dañarse. Utilice un destornillador manual mediano durante el montaje. -
Page 248: Montaje Mural
• Si no está seguro de la calidad y la magnéticos (como discos flexibles y cintas resistencia de una pared, consulte a un o cassettes de vídeo) cerca del subwoofer. profesional. No instale el subwoofer en ninguna pared • Pioneer no se hace responsable de ningún ni techo. Podrían caerse o causar lesiones. accidente o daños resultantes de una instalación inadecuada. 5 mm 10 mm Tornillo de... -
Page 249: Colocación Del Sistema
Instalación Colocación del sistema Subwoofer: La posición del subwoofer no es tan importante, porque los sonidos La ilustración siguiente muestra un graves no son altamente direccionales. ejemplo de colocación del sistema. Pero, es mejor colocar el subwoofer cerca de los altavoces delanteros. Tenga en cuenta que, para una mejor Gírelo ligeramente hacia el centro de la explicación, estas ilustraciones pueden no... -
Page 250: Conexiones A Su Tv
Instalación Conexiones a su TV Conexión [HDMI OUT] (SALIDA HDMI) Si usted tiene un televisor o monitor HDMI, Realice una de las conexiones siguientes, podrá conectarlo a esta unidad utilizando dependiendo de las opciones del propio un cable HDMI. Conecte la toma HDMI equipo. OUT del reproductor a la toma HDMI IN de un televisor o monitor compatible con HDMI. Ponga la fuente del televisor en Nota HDMI (consulteel manual del propietario del televisor). -
Page 251: Conexión Del Vídeo
Instalación Conexión del vídeo Nota Conecte la toma de salida de vídeo (VIDEO • Si un dispositivo HDMI conectado no acepta OUTPUT) en la unidad a la toma de la salida de audio del reproductor, el audio entrada (IN) de vídeo en el TV mediante el del dispositivo HDMI podrá distorsionarse o cable de vídeo. -
Page 252: Conexión Scart
Instalación Conexión Scart Conecte el terminal Scart de la unidad al terminal Scart del televisor mediante un cable Scart. Puede que escuche el sonido a través de los altavoces del sistema. Conexión Scart... -
Page 253: Conexión De Equipo Opcional
Instalación Conexión de equipo Conexión a entrada de audio (Portátil) opcional Conecte una salida del dispositivo portátil (MP3 o PMP , etc.) al conector de entrada de audio. Conexión a entrada auxiliar Conexión a entrada de audio Conecte una salida del dispositivo auxiliar al conector (izquierdo “L”... -
Page 254: Conexión Usb
Instalación Conexión USB Conexión de la antena Conecte el puerto USB de la memoria USB Conecte la antena FM facilitada para (o de un reproductor MP3, etc.) al puerto escuchar la radio. USB, en la parte frontal de la unidad. Conecte la antena de hilo FM al conector de antena FM. -
Page 255: Configure Los Ajustes Iniciales
Instalación Configure los Ajustes Menú de Ajustes Iniciales (Initial Settings) Iniciales (Initial Settings) Los ajustes predeterminados en fábrica se indican en cursiva . Si utiliza el menú de Ajustes Iniciales (Initial Settings), podrá configurar distintas Ajustes Digital Audio Out características, como la imagen y el sonido. -
Page 256: Ajustes Language
Instalación Ajustes Language Ajustes Options Audio Language Parental Lock Limite la visión de DVD-Video ( Password / Cambie el idioma cuando escuche el sonido de los discos DVD-Video ( English / Level Change / Country Code ). idiomas disponibles/ Other Language ). DivX VOD Subtitle Language Visualice el código de registro necesario... -
Page 257: Funcionamiento
Funcionamiento Función Qué hacer Durante la reproducción, Funcionamiento pulse o para ir Saltar al al capítulo/pista siguiente capítulo/ o para volver al inicio del pista/archivo capítulo/pista actual. siguiente/ Pulse dos veces y Funcionamiento básico anterior brevemente para retroceder al capítulo/pista anterior. Localice Durante la reproducción, 1. -
Page 258: Otras Funciones
Funcionamiento Otras funciones Cómo seleccionar un idioma para los subtítulos DivX Durante la reproducción, pulse SUBTITLE varias veces para seleccionar el idioma Mostrar información del disco deseado. en pantalla DivX Alterna el audio Puede mostrar en la pantalla diversa Durante la reproducción, pulse el AUDIO información sobre el disco insertado. -
Page 259: Memoria De Última Escena
Funcionamiento Memoria de última escena Cómo crear una lista de programas Esta unidad memoriza la última escena del último disco reproducido. La última escena Esta característica le permite programar el permanecerá en memoria incluso si extrae orden de reproducción de títulos/capítulos/ el disco del reproductor o apaga la unidad pistas de un disco. -
Page 260: Otras Funciones Disponibles En El Menú De Programas
Funcionamiento Otras funciones disponibles en Cómo ver archivos de fotos como el menú de programas un pase de diapositivas JPEG Esta unidad puede reproducir discos que contengan archivos de fotos. El menú de programas contiene otras 1. Seleccione la función DVD/CD o USB opciones además de Crear/Editar. pulsando FUNCTION . • Playback Start – Inicia la reproducción 2. -
Page 261: Funcionamiento De La Radio
Funcionamiento Funcionamiento de la Configuración de las emisoras de radio radio Puede configurar 50 emisoras en FM. Antes de la sintonización, asegúrese de Asegúrese de que tanto la antena aérea de bajar el volumen. FM están conectadas. (Consulte la página 1. Pulse FM TUNER o FUNCTION hasta que se muestre FM en la ventana del display. -
Page 262: Ver Información Acerca De Una Emisora De Radio
Funcionamiento Ver información acerca de una emisora de radio El sintonizador de FM se incluye con la función RDS (Sistema de datos de radio). Muestra información acerca de la emisora de radio sintonizada. Presione repetidamente DISPLAY (RDS) para alternar entre los distintos tipos de datos : (Nombre del servicio de programa) El nombre del canal aparecerá... -
Page 263: Cómo Mostrar El Menú De Los
Funcionamiento Ajustes de audio Surround (Off/5 Speaker Mode1/ 5 Speaker Mode2/Dolby PL II Movie/ (Audio Settings) Dolby PL II Music) • Seleccione el modo Envolvente. 5 Speaker Mode1: el sonido de los altavoces frontales será generado por los Cómo mostrar el menú de los altavoces posteriores. -
Page 264: Ajuste De Vídeo (Video Adjust)
Funcionamiento Ajuste de vídeo Parámetros Video Adjust Los ajustes predeterminados en fábrica se (Video Adjust) indican en cursiva . Sharpness (Fine/Standard/Soft) • Ajusta la nitidez de la imagen. Para que se muestre el menú de Brightness (-20 to +20) ajustes de vídeo (Video Adjust) • Ajusta el brillo de la imagen. 1. -
Page 265: Funcionamiento Avanzado
Funcionamiento Funcionamiento Desactivar el sonido de forma temporal avanzado Pulse MUTE para desactivar el sonido de la unidad. Puede desactivar el sonido de la unidad Configuración de temporizador para, por ejemplo, responder al teléfono; el indicador de esta función parpadeará en la Pulse SLEEP una o más veces para ventana de la pantalla. -
Page 266: Configuración Del Sistema De Televisión
ENTER . El proceso de copia de DivX archivos aparecerá en la pantalla. CD (R/RW) NTSC — NTSC JPEG Nota no hay disco • No pulse ningún botón durante el proceso de copia. • Se crea automáticamente una carpeta denominada “PIONEER” en el dispositivo USB. Los archivos copiados se guardan en esta carpeta. - Page 267 • Cuando la grabación haya concluido, Pulse STOP para detener la en el dispositivo USB se creará automáticamente una carpeta llamada reproducción si la misma se inicia “PIONEER”. Las pistas grabadas se automáticamente. guardarán en esta carpeta. 2. Pulse HOME MENU . • Los DTS CD y los CD con protección de Seleccione “CD ->...
-
Page 268: Karaoke
Funcionamiento Karaoke Cómo ajustar el eco Ajústelo girando ECHO VOL , en el panel frontal. • ECHO VOL será efectivo tanto para MIC 1 como MIC 2 . Cómo utilizar la función de karaoke Cómo ajustar el tono Pulse KEY o KEY en el mando a Antes de conectar el micrófono, asegúrese distancia. -
Page 269: Funciones De Karaoke Adicionales
Funcionamiento Funciones de Karaoke Cómo grabar pistas de karaoke en dispositivos USB adicionales Puede grabar pistas de karaoke en un Cómo asignar una puntuación al dispositivo USB a través del reproductor. karaoke 1. Abra la pantalla de ajustes de karaoke. Nota Pulse KARAOKE . -
Page 270: Mantenimiento
Mantenimiento Mantenimiento Notas en los discos Manejo de la unidad Manipulación de los discos Envío de la unidad Guarde el embalaje original y los materiales de empaquetado. Si necesita enviar la unidad, para máxima protección, intente que el embalaje sea similar al de salida de fábrica. -
Page 271: Solución De Problemas
Solución de problemas Solución de problemas PROBLEMA CAUSA SOLUCIÓN Seleccione el modo correcto de entrada de vídeo No hay imagen La TV no está configurada para recibir la salida de en la TV para que la imagen del receptor de DVD señal de DVD. -
Page 272: Apéndice
TV CONTROL . PRECAUCIÓN Nota • Para algunos modelos puede que no sea posible controlar el TV con el mando a • El ajuste de fábrica es 00 (PIONEER). distancia del reproductor, incluso con TV cuya marca aparezca en la lista de códigos • Si se equivoca al introducir el código, del fabricante. suelte TV CONTROL y luego empiece de nuevo desde el principio. - Page 273 Apéndice Lista de códigos de preajuste del TV Códigos de Fabricante PIONEER 00, 31, 32, 07, 36, GENERAL 29 MCMICHAEL 34 SCHAUB LORENZ 42 42, 51, 22 GENEXXA 31, 41 MEDIATOR 07 SCHNEIDER 07, 41, 47 ACURA 44 GOLDSTAR 10, 23, 21, 02, MEMOREX 44 SEG 42, 46 ADMIRAL 31 07, 50 METZ 31...
-
Page 274: Códigos De Idioma
Apéndice Códigos de idioma Utilice esta lista para introducir el idioma deseado según los ajustes iniciales siguientes : Disco Audio, Disco Subtítulo, Disco Menú. Nombres (códigos) de idiomas y códigos de entrada Japanese (ja), 1001 Bhutani (dz), 0426 Kirghiz (ky), 1125 Sinhalese (si), 1909 English (en), 0514 Esperanto (eo), 0515... -
Page 275: Códigos De País
Apéndice Códigos de país Elija un código de país de la lista. Nombre de país/área, códigos de entrada y código de país/área Estados Unidos de América, Suiza, 0308, ch Filipinas, 1608, ph 2119, us Suecia, 1905, se Finlandia, 0609, fi España, 0519, es México, 1324, mx Argentina, 0118, ar... -
Page 276: Marcas Comerciales Y Licencias
Apéndice Marcas comerciales y licencias HDMI, el logotipo HDMI y High-Definition Multimedia Interface son marcas comerciales Fabricado con arreglo a la licencia de las o marcas registradas de HDMI Licensing, LLC patentes estadounidenses números 5.956.674; en los Estados Unidos de América y en otros 5.974.380; 6.487.535 y otras patentes países. estadounidenses y mundiales aprobadas y pendientes de aprobar. DTS, el símbolo, y DTS y el símbolo juntos son marcas registradas de DTS Digital Surround, y los logotipos de DTS son marcas registradas de DTS, Inc. -
Page 277: Especificaciones
(An x Al x Pr): 230 mm x 80 mm x 90 mm Peso neto: 0,7 kg Sintonizador • Subwoofer • Rango de sintonización FM: Tipo: 1 altavoces 87,5 MHz a 108,0 MHz Impedancia de régimen: 3 Ω Dimensiones netas (An x Al x Pr): 200 mm x 340 mm x 270 mm Peso neto: 3,4 kg © 2012 PIONEER CORPORATION. Todos los derechos reservados. - Page 280 253 Alexandra Road, #04-01, Singapore 159936 TEL: 65-6472-7555 PIONEER ELECTRONICS AUSTRALIA PTY. LTD. 5 Arco Lane, Heatherton, Victoria, 3202, Australia, TEL: (03) 9586-6300 PIONEER ELECTRONICS DE MEXICO S.A. DE C.V. Blvd.Manuel Avila Camacho 138 10 piso Col.Lomas de Chapultepec, Mexico, D.F. 11000 TEL: 55-9178-4270 K002_B3_En...
Need help?
Do you have a question about the DCS-424K and is the answer not in the manual?
Questions and answers