GE GFWN1000 Owner's Manual & Installation Instructions
General electric washers owner's manual & installation instructions
Hide thumbs
Also See for GFWN1000:
- Owner's manual and installation instructions (52 pages) ,
- Owner's manual & installation instructions (52 pages) ,
- Owner’s manual & installation instruction (53 pages)
Table of Contents
Advertisement
Available languages
Available languages
GEAppliances.com
Safety Instructions
. . . . . . . . . . . . . 2, 3
Operating Instructions
Control Panels . . . . . . . . . . . . . . . . . . . . . . 4, 5
Control Settings . . . . . . . . . . . . . . . . . . . . .6, 7
Features . . . . . . . . . . . . . . . . . . . . . . . . . . .8-10
Loading and Using the Washer . . . .10, 11
Cleaning the Washer . . . . . . . . . . . . .12-14
Preparing to Install Your Washer . . . . . .15
Rough-In Dimensions . . . . . . . . . . . . . . . . .16
Location of Your Washer . . . . . . . . . . . . .16
Unpacking Your Washer . . . . . . . . . . . . . .17
Drain Requirements . . . . . . . . . . . . . . . . . .18
Electrical Requirements . . . . . . . . . . . . . . .18
Water Supply Requirements . . . . . . . . . .18
Installing the Washer . . . . . . . . . . . . .19, 20
Replacement Parts . . . . . . . . . . . . . . . . . . .20
Warranty . . . . . . . . . . . . . . . . . . . . . . . . . . . . 25
Service Telephone Numbers . . . . . . . . . . 26
As an E
S
partner,
®
nErgy
tar
GE has determined that this
product meets the E
S
nErgy
tar
guidelines for energy efficiency.
Write the model and serial
numbers here:
Model # __________________
Serial # __________________
You can find them on a label on the
side of the washer.
. . . . .15-20
. . . . . . . . .21-24
®
Owner's Manual &
Installation Instructions
GFWN1000
WBVH5200
WBVH5300
WCVH6400
WCVH6800
WHDVH680
49-90392 12/08/09 GE
Advertisement
Chapters
Table of Contents

Related Manuals for GE GFWN1000


Summary of Contents for GE GFWN1000
-
Page 1: Table Of Contents
Rough-In Dimensions ....16 Location of Your Washer ... . .16 Unpacking Your Washer ....17 Drain Requirements . -
Page 2: Important Safety Information
Since the gas is flammable, do not smoke or use an open flame or appliance during this process. ProPEr InSTaLLaTIon This washer must be properly installed and located in accordance with the Installation Instructions before it is used. Install or store where it will not be exposed... -
Page 3: Save These Instructions
Turn off water faucets to relieve pressure on hoses and valves and to minimize leakage if a break or rupture should occur. Check the condition of the fill hoses; GE recommends changing the hoses every 5 years. Before discarding a washer, or removing it from service, remove the washer door to prevent children from hiding inside. -
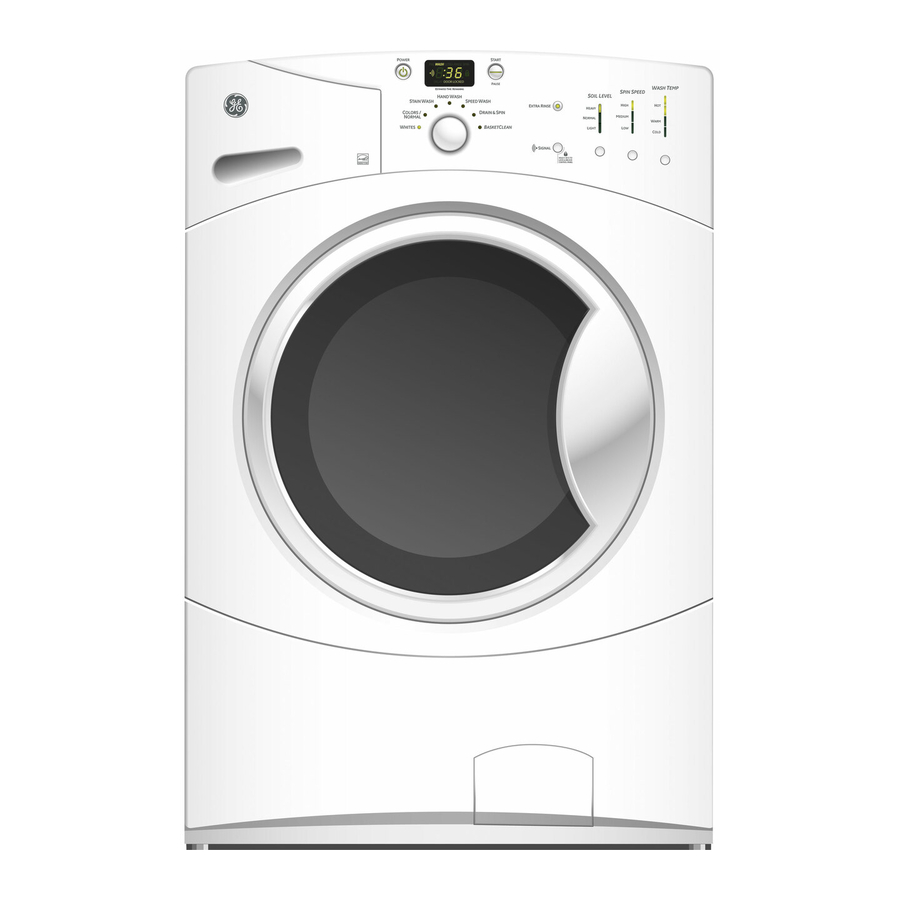
Page 4: About The Washer Control Panel
About the washer control panel. Find the illustration that closely matches your model and see the cycle descriptions starting on page 6 for details. - Page 5 GEAppliances.com...
-
Page 6: About The Washer Control Panel
About the washer control panel. Power Press to “wake up” the display. If the display is active, press to put the washer into standby mode. NOTE: Pressing POWER does not disconnect the appliance from the power supply. Wash Cycles The wash cycles are optimized for specific types of wash loads. The chart below will help you match the wash setting with the loads. - Page 7 START/PAUSE Press to start a wash cycle. If the washer is running, pressing it once will pause the washer and unlock the door. Press again to restart the wash cycle. NOTE: If the washer is paused and the cycle is not restarted within 2 hours, the current wash cycle will be cancelled.
-
Page 8: Features
About the washer features. noTE: Features may not be available on all washer models. YCLE TORE Cycle Signal Use the SIGNAL button to change the volume of the end of cycle signal. Prewash (on some models) Prewash is an extra wash before the main wash. -
Page 9: The Dispenser Drawer
Detergent usage may need to be adjusted for water temperature, water hardness, size and soil level of the load. Avoid using too much detergent in your washer as it can lead to over sudsing and detergent residue being left on the clothes. -
Page 10: Features
“FABRIC SOFTENER.” Use only liquid fabric softener in the dispenser. Loading and using the washer. always follow fabric manufacturer’s care label when laundering. Sorting Wash Loads Sort laundry into loads that can be washed together. -
Page 11: Loading The Washer
To add items after washer has started, press START/PAUSE and wait until the door is unlatched. The washer may take up to 30 seconds to unlock the door after pressing START/PAUSE depending on the machine conditions. Do not try to force open the door when it is locked. -
Page 12: Cleaning The Washer
Moving and Storage: Ask the service technician to remove water from drain pump and hoses. Do not store the washer where it will be exposed to the weather. When moving the washer, the tub should be kept stationary by using the shipping bolts removed during installation. -
Page 13: Cleaning The Pump Filter
Due to the nature of the front-load washer, it is sometimes possible for small articles to pass to the pump. The washer has a filter to capture lost items so they are not dumped to the drain. To retrieve lost items, clean out the pump filter. -
Page 14: Cleaning The Washer
Cleaning the washer. Dispenser Drawer Area: Detergent and fabric softener may build up in the dispenser drawer. Residue should be removed once or twice a month. Remove the drawer by first pulling it out until it stops. Then reach back into the left rear corner of the drawer cavity and press down firmly on the lock tab, pulling out the drawer. -
Page 15: Installation Instructions
Installation Instructions If you have any questions, call 800.GE.carES (800.432.2737) BEFOrE yOU BEgIn read these instructions completely and carefully. IMPOrtant – • Save these instructions for local inspector’s use. IMPOrtant – • Observe all governing codes and ordinances. note to Installer –... -
Page 16: Rough-In Dimensions
3. On carpet. The floor MUSt be a hard surface with a maximum slope of 1/2 per foot (1.27 cm per 30 cm). To make sure the washer does not vibrate or move, you may have to reinforce the floor. -
Page 17: Unpacking The Washer
1. Cut and remove the top and bottom packaging straps. 2. While it is in the carton, carefully lay the washer on its side. DO NOT lay the washer on its front or back. 3. Turn down the bottom flaps—remove all base packaging, including the cardboard, styrofoam base and styrofoam tub support (inserted in center of base). -
Page 18: Electrical Requirements
WatEr SUPPLy rEQUIrEMEntS Hot and cold water faucets MUSt be installed within 42 inches (107 cm) of your washer’s water inlet. The faucets MUSt be 3/4 (1.9 cm) garden hose-type so inlet hoses can be connected. Water pressure MUSt be between 10 and 120 pounds per square inch. -
Page 19: Installing The Washer
To reduce vibration, ensure that all four rubber leveling legs are firmly touching the floor. Push and pull on the back right and then back left of your washer. nOtE: Do not use the dispenser drawer or door to lift the washer. -
Page 20: Installing The Washer
13. If your washer does not operate, please review the Before You call For Service section before calling for service. 14. Place these instructions in a location near the washer for future reference. rEPLaCEMEnt PartS If replacement parts are needed for your washer, they can be ordered in the United States by visiting our Website at GEAppliances.com or by calling... -
Page 21: Troubleshooting Tips
• Increase load size if washing small load containing heavy and light items. • See page 13 on how to clean the Pump Filter. • Straighten drain hose and make sure washer is not sitting on it. • Check household plumbing. You may need to call a plumber. -
Page 22: Before You Call For Service
This movement is normal. • Push and pull on the back right and then back left of your washer to check if it is level. If the washer is uneven, adjust the rubber leveling legs so they are all firmly touching the floor and locked in place. - Page 23 • Turn on both hot and cold faucets fully. • Turn off the water source and remove the water connection hoses from the upper back of the washer. Use a brush or toothpick to clean the screens in the machine. Reconnect the hoses and turn the water back on.
- Page 24 Before you call for service… Problem Possible Cause Detergent leak Incorrect placement of detergent insert this is normal Improper dispensing of Dispenser clogged softener or bleach Softener or bleach is filled above • Make sure to have the correct amount of softener or bleach. the max line Softener or bleach cap issue What To Do...
- Page 25 This warranty is extended to the original purchaser and any succeeding owner for products purchased for home use within the uSa. If the product is located in an area where service by a GE authorized Servicer is not available, you may be responsible for a trip charge or you may be required to bring the product to an authorized GE Service location for service.
-
Page 26: Parts And Accessories
Caution must be exercised, since improper servicing may cause unsafe operation. contact us If you are not satisfied with the service you receive from GE, contact us on our Website with all the details including your phone number, or write to: register Your appliance register your new appliance on-line—at your convenience! Timely product registration will allow for enhanced... -
Page 27: Instrucciones De Funcionamiento
Escriba aquí los números de modelo y serie: N.º de modelo ____________ N.º de serie ______________ Puede encontrarlos en una etiqueta situada en el costado de la lavadora. Manual del propietario e instalación GFWN1000 WBVH5200 WBVH5300 WCVH6400 WCVH6800 WHDVH680 49-90392 12/08/09 GE... -
Page 28: Seguridad Del Calentador De Agua
INFORMACIÓN DE SEGURIDAD IMPORTANTE. LEA TODAS LAS INSTRUCCIONES ANTES DEL USO. ¡ADVERTENCIA! SEGUrIdad dEl CalEnTador dE aGUa En determinadas condiciones, en un calentador de agua que no se haya utilizado durante un mínimo de dos semanas se puede producir gas hidrógeno. El gas hidrógeno puede resultar explosivo en determinadas circunstancias. -
Page 29: De Seguridad
Verifique el estado de las mangueras de llenado; GE recomienda cambiar las mangueras cada 5 años. Antes de deshacerse de una lavadora o de desecharla, quite la puerta de la lavadora para evitar que los niños se escondan en su interior. - Page 30 El panel de control de la lavadora. Busque la ilustración que más se ajusta a su modelo y para más detalles vea las descripciones de ciclo que comienzan en la página 6.
- Page 31 GEAppliances.com...
-
Page 32: Ciclos De Lavado
El panel de control de la lavadora. Encendido/apagado Pulse este botón para “activar” la pantalla. Si la pantalla está activa, púlselo para poner la lavadora en modo de espera. NOTA: al pulsar el botón de ENCENDIDO/APAGADO no se desconecta la lavadora de la corriente. Ciclos de lavado Los ciclos de lavado se han optimizado para tipos específicos de cargas de lavado. - Page 33 Nivel de suciedad Al cambiar el NIVEL DE SUCIEDAD, aumenta o disminuye el tiempo de lavado con el fin de eliminar las distintas cantidades de suciedad. Para cambiar el NIVEL DE SUCIEDAD, pulse el botón SOIL LEVEL (Nivel de suciedad) hasta obtener el valor deseado.
- Page 34 Acerca de las funciones de la lavadora. noTa: Puede que estas funciones no estén disponibles en todos los modelos de la lavadora. YCLE TORE Cycle Signal (Señal de ciclo) Utilice el botón SIGNAL (Señal) para cambiar el volumen de la señal de final del ciclo. Pre Wash (Prelavado) (en algunos modelos) El prelavado es un lavado adicional que...
- Page 35 Depósito de detergente Abra lentamente el depósito de detergente tirando de él hasta que se detenga. Tras añadir los productos de lavado, ciérrelo despacio. Si cierra el depósito demasiado rápido, puede provocar que la lejía, el suavizante o el detergente se administren antes de tiempo.
-
Page 36: Carga Y Uso De La Lavadora
Acerca de las funciones de la lavadora. Compartimento para el suavizante IMPORTANTE: La posición del compartimento del suavizante varía con cada modelo. Asegúrese de identificar el compartimento correcto para suavizante antes del uso. Si lo desea, vierta la cantidad recomendada de suavizante líquido en el compartimento con la etiqueta “Fabric Softener”... -
Page 37: Carga De La Lavadora
Carga de la lavadora Puede que el tambor de la lavadora esté totalmente lleno con prendas sueltas que se añadan. No lave tejidos que contengan materiales inflamables (ceras, líquidos de limpieza, etc.). Tamaños de carga máximos* Ropa Ropa de tRabajo de cama 4 Jeans 2 toallones... -
Page 38: Cuidado Y Limpieza
Consulte las Instrucciones de instalación en este manual. Si estas piezas no están disponibles, se pueden solicitar a través del sitio Web www.GEAppliances.com o llamando al 800.GE.CARES. Largas vacaciones: Asegúrese de cortar el agua de todas las llaves de paso. Vacíe todas las tuberías de agua si la temperatura va a encontrarse por debajo de cero grados. - Page 39 Cómo limpiar el filtro de la bomba Debido a la naturaleza de la lavadora de carga frontal, es posible que a veces pasen partículas pequeñas a la bomba. La lavadora cuenta con un filtro para capturar los elementos perdidos para que no caigan en el drenaje.
- Page 40 Limpieza de la lavadora. Zona del depósito de detergente: El detergente y el suavizante pueden acumularse en el depósito de detergente. Los residuos deben eliminarse una o dos veces al mes. n Saque el depósito tirando de él hasta que se detenga. En la esquina trasera izquierda de la cavidad del cajón, presione firmemente en la pestaña de bloqueo y tire a la vez del depósito.
-
Page 41: Antes De Comenzar
Si tiene alguna pregunta, llame a 800.GE.CarES (1.800.432.2737) antes de comenzaR Lea detenidamente todas las instrucciones. impoRtante – • Guarde estas instrucciones para uso del inspector local. impoRtante – • Cumpla todos los códigos y ordenanzas regulatorias. -
Page 42: Dimensiones Aproximadas
instrucciones de instalación ubicaciÓn de La LavadoRa no instale la lavadora: 1. En un área expuesta a goteras o a las condiciones del exterior. La temperatura ambiente no debe ser nunca inferior a 60°F (15,6°C) para que la lavadora funcione correctamente. 2. -
Page 43: Desembalaje De La Lavadora
Guarde dichas piezas en la bolsa de plástico que se incluye. si pierde los pernos de embalaje, existen reemplazos disponibles a un costo adicional. pueden solicitarse en los estados unidos visitando nuestro sitio Web en geappliances.com o llamando a 800.ge.caRes. solicite el kit #Wh49X10039. -
Page 44: Requisitos De Desagüe
instrucciones de instalación ReQuisitos eLÉctRicos Lea detenidamente todas las instrucciones. adveRtencia— eL Riesgo de incendio, descaRga eLÉctRica o Lesiones peRsonaLes: • no use un enchufe adaptadoR o un cabLe de eXtensiÓn con este eLectRodomÉstico. La lavadora debe ser conectado a tierra de acuerdo con todos los códigos y ordenanzas locales o, a falta de normativa local, con el código eléctrico nacional (national electrical code) ansi/nfpa no. -
Page 45: Instalación De La Lavadora
instrucciones de instalación instaLaciÓn de La LavadoRa 1. Deje correr un poco de agua de los grifos de agua caliente y fría para purgar las tuberías de agua y eliminar las partículas que puedan obstruir los filtros de la válvula de agua. 2. -
Page 46: Piezas De Repuesto
14. Coloque las instrucciones en un lugar próximo a la lavadora para futuras consultas. piezas de Repuesto Si se necesitan piezas de repuesto para la lavadora, se pueden solicitar en Estados Unidos a través del sitio Web GEAppliances.com o llamando a 800.GE.CARES. -
Page 47: Consejos Para La Solución De Problemas
Retire el cajón y limpie tanto el interior del cajón como de la caja de suministro. Lea el capítulo de Limpieza de la Lavadora (Cleaning Washer). • Utilice detergente de alta eficacia y la cantidad correcta de detergente. - Page 48 Antes de llamar al servicio de asistencia técnica… Problema Causa posible Las prendas están La carga se encuentra demasiado mojadas desbalanceada obstrucción de la bomba sobrecarga La tubería de desagüe está torcida • Enderece la tubería de desagüe y asegúrese de que o no se ha conectado correctamente puede que la tubería de desagüe •...
- Page 49 Problema Causa posible No hay suministro La lavadora está desconectada eléctrico/la lavadora no está en funcionamiento el suministro de agua está cerrado • Abra por completo las llaves de paso de agua fría y caliente. el interruptor/fusible se ha quemado/saltado Revisiones automáticas del sistema Enganchones, agujeros,...
- Page 50 Antes de llamar al servicio de asistencia técnica… Problema Causa posible Prendas oscurecidas o no hay suficiente detergente amarillentas no se utiliza detergente de alta eficacia agua dura el agua no está suficientemente caliente el detergente no se disuelve tinte Manchas de color uso incorrecto del suavizante tinte...
- Page 51 Estados Unidos. Si el producto está situado en un área que no dispone de servicio por parte de un proveedor de servicio autorizado de GE, podría tener que hacerse cargo de los costes de envío o bien podría solicitársele que lleve el producto a una centro de servicio de GE autorizado para realizar la reparación.
-
Page 52: Servicio Al Consumidor
Solicite una reparación El servicio de expertos GE está a tan sólo un paso de su puerta. ¡Entre en línea y solicite su reparación cuando le venga cualquier día del año! O llame al 800.GE.CARES (800.432.2737) durante horas normales de oficina.
Need help?
Do you have a question about the GFWN1000 and is the answer not in the manual?
Questions and answers