Table of Contents

Related Manuals for Celestron 44340


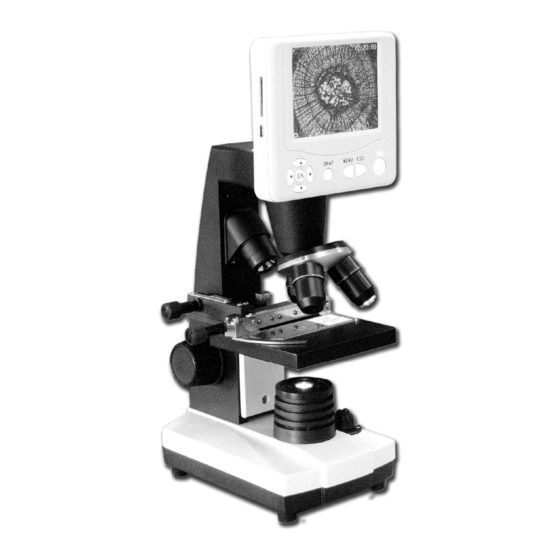
Summary of Contents for Celestron 44340
- Page 2 Introduction Thank you for purchasing the Celestron LCD Digital Microscope with a 3.5” monitor. Your microscope is a precision optical instrument, made of the highest quality materials to ensure durability and long life. It is designed to give you a lifetime of pleasure with a minimal amount of maintenance.
-
Page 3: Specifications
40x Objective Lens Dust Cover Top & Bottom Illuminators Carrying Case SD Card Slot Specifications Model # 44340 Specifications Stage Mechanical Stage 3.5” x 3.5” (88mm x 88mm) 2MP CMOS; 10x Magnification in lieu of an Eyepiece; 1600x Digital Camera 1200 pixel array 3.5”... -
Page 4: Microscope Operation
Setting Up Your Microscope 1. Take the carrying case out of the cardboard carton. 2. Carefully remove the microscope and other parts from the carrying case and set them on a table, desk, or other flat surface. 3. Remove the dust cover from the microscope. Socket AC Adapter w/ USA Plug... -
Page 5: Adjusting The Lighting
Illumination To get the sharpest and best views, the proper illumination (lighting) must be chosen. 1. To turn the illuminator(s) on, see Figure 4 below which shows the following four positions on the Illuminator Switch -- - OFF, I (Bottom Illuminator), II (Top Illuminator), and III (Both Bottom & Top Illuminators). The top illuminator (11) is normally for solid objects (not specimen slides) so light shines down onto the object. -
Page 6: Using Filters
4. Use the objective nosepiece (12) to rotate the objective lenses (11) until the 4x objective lens is directly over the specimen and clicks into place. Always start with the lowest power objective (4x with this microscope) which gives you 40 power and work your way up to higher powers. At 40 power you will have the widest field of view and the brightest image. -
Page 7: Taking Images
D. Date Label – if you desire to have the time and or date stamped on your images you can select the information to include under “Setting” and then choose “Yes”, or you can choose to have no label (default setting). E. -
Page 8: Troubleshooting
(see Figure 5). Care, Maintenance, and Warranty Your Celestron microscope is a precision optical instrument and should be treated with care at all times. Follow these care and maintenance suggestions and your microscope will need very little maintenance throughout its lifetime. - Page 10 Einführung Wir danken Ihnen für den Kauf eines Celestron LCD-Digitalmikroskops mit einem 3,5-Zoll-Monitor. Ihr Mikroskop ist ein optisches Präzisionsinstrument, das aus Materialien von höchster Qualität hergestellt ist, um Haltbarkeit und eine lange Lebensdauer des Produkts zu gewährleisten. Es wurde entwickelt, um Ihnen mit minimalen Wartungsanforderungen viele Jahre Freude zu bereiten.
-
Page 11: Technische Daten
5 vorbereitete Objektträger 40x-Objektivlinse Staubschutz Obere und untere Beleuchtungen Tragetasche SD-Kartensteckplatz Technische Daten Modell 44340 Technische Daten Objekttisch Mechanischer Objekttisch 88 mm x 88 mm (3,5” x 3,5” ) 2 MP CMOS; 10x-Vergrößerung anstelle von Okular; 1600x Digitalkamera 1200 Pixel-Array 3,5”... - Page 12 Aufbau des Mikroskops 1. Nehmen Sie die Tragetasche aus dem Karton. 2. Nehmen Sie das Mikroskop und die anderen Teile vorsichtig aus der Tragetasche und stellen Sie sie auf einen Tisch, Schreibtisch oder eine andere flache Oberfläche. 3. Entfernen Sie den Staubschutz vom Mikroskop. Buchse Wechselstromadapter mit US-Stecker UK-Stecker...
- Page 13 Beleuchtung Um Ansichten von optimaler Schärfe und Qualität zu erhalten, muss die richtige Beleuchtung gewählt werden. Abb. 4 unten zeigt, wie die Beleuchtungen eingeschaltet werden. Abgebildet sind die folgenden vier Positionen auf dem Beleuchtungsschalter: OFF (Aus), I (untere Beleuchtung), II (obere Beleuchtung) und III (sowohl obere als auch untere Beleuchtung). 2.
- Page 14 6. Mit der 4x Objektivlinse können Sie auch die Vergrößerungsleistung im Bereich von 40x bis 160 x unter Verwendung des Digital-Zooms des LCD-Moduls variieren. Verwenden Sie die Richtungstasten (links/rechts) auf dem LCD-Modul zur Verwendung des Digital-Zooms. Unten rechts auf dem Bildschirms sehen Sie dann ein Symbol eines Vergrößerungsglases, das Ihre jeweilige Digital-Zoom-Einstellung angibt.
- Page 15 D. Date Label (Datumstempel) – Wenn Sie die Uhrzeit und/oder das Datum auf Ihre Bilder gestempelt haben möchten, wählen Sie die aufzunehmenden Informationen unter „Setting“ (Einstellung) und dann „Yes“ (Ja). Sie können sich auch für keinen Stempel (Standardeinstellung) entscheiden. E. DV Record (DV-Aufnahme) – Wenn Sie Videos aufnehmen möchten, drücken Sie die OK-Taste. Daraufhin erscheint die Auflösung oben links im Bildschirm.
-
Page 16: Fehlersuche
Objekttisch fest angezogen sind, insbesondere die beiden sehr kleinen Schrauben links vom langen Objekttischknopf (siehe Abb. 5). Pflege, Wartung und Garantie Ihr Celestron-Mikroskop ist ein optisches Präzisionsinstrument, das stets mit der erforderlichen Sorgfalt behandelt werden sollte. Wenn Sie diese Empfehlungen zur Pflege und Wartung befolgen, erfordert Ihr Mikroskop während seiner Lebensdauer nur sehr wenig Wartung. - Page 18 Introducción Le damos las gracias por la compra de su microscopio digital con monitor de 3,5 pulgadas LCD de Celestron. Este microscopio es un instrumento óptico de precisión, fabricado con materiales de la más alta calidad para garantizar su larga durabilidad.
-
Page 19: Especificaciones
Cubierta protectora para el polvo Iluminadores superior e inferior Estuche Ranura de tarjeta SD Especificaciones Modelo Nº 44340 Especificaciones Platina Platina mecánica – 88 mm x 88 mm (3,5 x 3,5 pulg.) 2MP CMOS; lupa de 10x en lugar de un ocular; 1600x Cámara digital... - Page 20 Instalación del microscopio Extraiga el estuche de la caja de cartón. Extraiga con cuidado el microscopio y otras piezas del estuche y póngalos sobre una mesa, escritorio u otra superficie plana. Retire del microscopio cubierta protectora para el polvo. Enchufe Adaptador de AC con enchufe de EE.UU.
- Page 21 Iluminación Para obtener las mejores y más nítidas imágenes, debe elegirse la iluminación adecuada. Para encender el iluminador o los iluminadores, vea la figura 4 a continuación que muestra las siguientes cuatro posiciones del interruptor del iluminador: OFF (apagado), I (iluminador inferior), II (iluminador superior) y III (iluminadores superior e inferior). El iluminador superior (11) normalmente es para objetos sólidos (no para portaobjetos de muestras) de forma que la luz ilumina el objeto.
- Page 22 Mire la pantalla LCD mientras gira el mando de enfoque (6) hasta que pueda ver la muestra. Puede que tenga que ajustar los mandos de movimiento de la platina (figura 5) ligeramente para centrar la muestra en el campo de visión. Con el objetivo 4x, también puede variar la potencia de 40x a 160x usando el zoom digital del módulo LCD.
- Page 23 E. DV record (grabar DV): si desea hacer un vídeo, pulse el botón OK (aceptar) y la resolución aparecerá en la parte superior izquierda de la pantalla. La resolución cambia automáticamente a baja resolución para el vídeo. La frecuencia es de 25 fps. El tiempo transcurrido para el vídeo se muestra en la parte inferior izquierda de la pantalla. Para iniciar el vídeo, pulse el botón SNAP (instantánea) y finalice el vídeo pulsando el botón SNAP de nuevo.
-
Page 24: Solución De Problemas
Cuidado, mantenimiento y garantía Su microscopio Celestron es un instrumento óptico de precisión y debe tratarse siempre con cuidado. Siga estas sugerencias de cuidado y mantenimiento y su reproductor de imágenes necesitará muy poco mantenimiento durante toda su vida útil. - Page 25 ’ ’ é é è ° è °...
- Page 26 Votre Nous vous remercions d'avoir fait l'acquisition d'un microscope numérique à moniteur LCD Celestron avec moniteur de 3,5 po. microscope est un instrument de précision optique fabriqué à partir de matériaux de la meilleure qualité pour lui assurer une grande durabilité...
-
Page 27: Spécifications
Housse de protection Illuminateur supérieur et inférieur Mallette de transport Fente de carte SD Spécifications Modèle n° 44340 Spécifications Platine Platine mécanique 88 mm x 88 mm (3,5 po x 3,5 po) Appareil photo 2MP CMOS ; grossissement 10x à la place d’un oculaire ; 1600x1200 numérique... - Page 28 Installation de votre microscope 1. Sortez la mallette de transport de son carton. 2. Retirez délicatement le microscope et les autres pièces de la mallette, puis installez-les sur une table, un bureau ou toute autre surface plane. 3. Retirez la housse protégeant le microscope. Prise Adaptateur c.a.
- Page 29 Éclairage Pour obtenir des images d’une excellente qualité et d’une netteté optimale, il est nécessaire de choisir l’illumination (éclairage) la plus adaptée. Pour allumer le ou les illuminateurs, référez-vous à la Figure 4 ci-dessous où sont indiquées les quatre positions de l’interrupteur de l’illuminateur --- OFF (arrêt), I (Illuminateur inférieur), II (Illuminateur supérieur), et III (Illuminateur inférieur et supérieur).
-
Page 30: Utilisation De Filtres
Regardez l’écran LCD en tournant le bouton de mise au point (6) jusqu’à ce que l’échantillon soit visible. Il peut être nécessaire d’ajuster légèrement les boutons de déplacement de la platine (Figure 5) pour centrer l’échantillon dans le champ de vision. Avec l’objectif 4x, vous pouvez également varier le grossissement de 40x à... -
Page 31: Pour Prendre Des Photos
E. DV record (Enregistrement vidéo) – si vous souhaitez filmer des vidéos, appuyez sur la touche OK. La résolution apparaît alors . La résolution change automatiquement sur une basse résolution pour la vidéo. dans l’angle supérieur gauche de l’écran débit est de 25 fps. La durée écoulée de la vidéo s’affiche dans l’angle inférieur gauche de l’écran. Pour commencer une vidéo, appuyez sur le bouton «... -
Page 32: Dépannage
Entretien, nettoyage et garantie Votre microscope Celestron est un instrument de précision optique qu’il convient de toujours manipuler avec soin. Si vous respectez ces conseils de nettoyage et d’entretien, votre imageur ne nécessitera qu'un entretien minimum pendant toute sa durée de vie. - Page 34 Introduzione Grazie per aver acquistato il Microscopio digitale LCD (LDM) Celestron con monitor da 3,5 pollici. Il microscopio è uno strumento ottico di precisione, realizzato con materiali della più alta qualità per assicurarne robustezza e lunga durata. È stato progettato perché duri una vita intera, con una minima manutenzione.
-
Page 35: Dati Tecnici
Coperchio antipolvere Illuminatori superiore e inferiore Custodia di trasporto Slot per scheda SD Dati tecnici Modello n. 44340 Dati tecnici Portaoggetti Portaoggetti meccanico – 88 mm x 88 mm (3,5 pollici x 3,5 pollici) Fotocamera/telecamera CMOS da 2 MP; ingrandimento 10x senza oculare;... - Page 36 Approntamento del microscopio 1. Estrarre la custodia di trasporto dal contenitore in cartone. 2. Estrarre con cautela il microscopio e le altre parti dalla custodia di trasporto e disporli su un tavolo, una scrivania o un’altra superficie piana. 3. Togliere il coperchio antipolvere dal microscopio. Presa Adattatore c.a.
- Page 37 Illuminazione Per ottenere le visualizzazioni migliori e più nitide, occorre scegliere l’illuminazione adeguata. Per accendere l’illuminatore (o gli illuminatori), vedere la Figura 4 sotto, che illustra le seguenti quattro posizioni dell’interruttore degli illuminatori --- OFF (spento), I (illuminatore inferiore), II (illuminatore superiore), e III (illuminatore inferiore e superiore). 2.
- Page 38 5. Ruotare la manopola di messa a fuoco (6) mentre si guarda lo schermo LCD fino a visualizzare il preparato. Potrebbe essere necessario regolare leggermente le manopole di regolazione del portaoggetti (Figura 5) per centrare il preparato nel campo visivo. 6.
-
Page 39: Acquisizione Di Immagini
E. DV Record (Registrazione video digitale) – Se si vogliono acquisire filmati, premere il tasto OK e la risoluzione appare in alto a sinistra sullo schermo. La risoluzione passa automaticamente al valore basso per i filmati. La velocità è di 25 fotogrammi al secondo. -
Page 40: Individuazione E Risoluzione Dei Problemi
Cura, manutenzione e garanzia Il microscopio Celestron è uno strumento ottico di precisione e va trattato sempre con cura. Seguire questi suggerimenti per la cura e la manutenzione per assicurare che il microscopio richieda pochissima manutenzione nel corso della sua durata utile.
Need help?
Do you have a question about the 44340 and is the answer not in the manual?
Questions and answers