Advertisement
Table of Contents
- 1 Table of Contents
- 2 Name of Parts
- 3 Importantsafetyinstructions
- 4 Installation
- 5 Wallmounting Instructions
- 6 Wall Mounting Instructions
- 7 Rack Fitting Instructions
- 8 Rack Fitting Instructions
- 9 How to Operate the Dryer
- 10 Control Panel
- 11 Drying Methods
- 12 Cleaning and Maintenance
- 13 Trouble Shooting
- 14 Specifications
- 15 Wiring Circuit
- 16 Program Descriptions
- Download this manual
See also:
Service Manual
Advertisement
Table of Contents

Subscribe to Our Youtube Channel
Related Manuals for Whirlpool AWD60A


Summary of Contents for Whirlpool AWD60A
- Page 1 OPERATION MANUAL TUMBLE DRYER AWD60A TumbleDryer_AWD60A-4.indd 1 5/8/08 4:25:42 PM...
-
Page 2: Table Of Contents
TABLE OF CONTENTS BEFORE USING THE DRYER Name of Parts Important Safety Instructions INSTALLATION Wall Mounting Instructions 6 - 8 Rack Fitting Instructions 9 - 10 HOW TO OPERATE THE DRYER Control Panel Drying Methods Cleaning and maintenance Trouble shooting Specifications Wiring circuit PROGRAM DESCRIPTIONS... -
Page 3: Name Of Parts
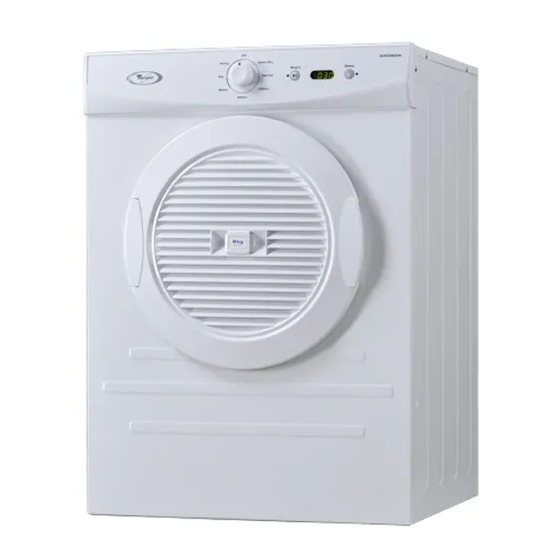
NAME OF PARTS Control panel Program selector Adjustable outlet Door grill and lint filter Power supply cord Back plate Model number Air intake grill and Serial number Warning Read all instructions before using this dryer. Operating, care and installations instructions have been provided. -
Page 4: Importantsafetyinstructions
IMPORTANTSAFETYINSTRUCTIONS petrol, kerosene, spot removers, turpentine, To reduce the risk waxes and wax removers, etc. Do not store or Warning of fire, electrical use these items on or in the vicinity of the dryer. shock or injury to Do not place items exposed to cooking oils in persons when using this dryer, please follow basic your dryer.Items contaminated with cooking oils precautions and read the following:... -
Page 5: Installation
INSTALLATION Dimensions A = 825 mm B = 560 mm C = 595 mm Weight = 30 kg Remove the transport packaging and the tape before starting dryer. Packing accessories Check list of the accessories and materials provided with the machine: Name Operation Wall... -
Page 6: Wallmounting Instructions
WALLMOUNTING INSTRUCTIONS The dryer can be mounted to a wall by following these instructions. Firstly select whether to mount the dryer vertically, with the control panel at the top - or invent the dryer so the control panel is at the botom(see figure 4) this allows easier access to the controls. - Page 7 WALL MOUNTING INSTRUCTIONS 2 screws 2 corks FIG. 2. Hooks Spacers FIG. 3. TumbleDryer_AWD60A-4.indd 7 5/8/08 4:25:51 PM...
-
Page 8: Wall Mounting Instructions
WALLMOUNTING INSTRUCTIONS FIG. 4. nverted dryer is supplied. To fit this film, pull off the knob then clean surface of old film with a cloth. Peel the release paper from the back of inverted film then place new control panel film on the surface so that writing is the correct way around. -
Page 9: Rack Fitting Instructions
RACK FITTING INSTRUCTIONS DRYER FREESTANDING OR WALL MOUNTED(UPRIGHT). For ease of access, the rack is to be mounted near the dryer. Firstly, hold the rack horizontally with the two end projections pointing upwards and away from yourself.Position the rack near the top of the dryer and place the end of the DRYER UPRIGHT Rack in operating... -
Page 10: Rack Fitting Instructions
RACK FITTING INSTRUCTIONS To hold the drying rack out of the way when not in use, it will be necessary to attach the retaining clip to the base of your dryer. To do this, firstly remove the screw located Remove screw 4cm from the right corner of the inverted dryer (Fig. -
Page 11: How To Operate The Dryer
OPERATION 1. Before operation, clean off any dust or dirt from inside the dryer drum with a damp towel. 2. Clean off any build up on the filter screen and in the duct to increase drying efficiency. Before turning on the power for the dryer, check: into the dryer. -
Page 12: Control Panel
CONTROL PANEL Turn this knob to choose the drying program you desire. This dryer has 7 program options available for you to choose. After turning on the power, select the drying program you desire. Gently touch Start/Pause button to start the dryer. To Pause a program gently touch this button Press the Start/Pause button again and the program will continue to operate. -
Page 13: Drying Methods
DRYING METHODS Insert the power plug into an appropriate socket to turn on the power. Operating power supply: (220-240)V/50Hz. Open the door and place the treated laundry into the drum of the dryer. To save energy and achieve a better drying result, please spin the laundry as dry as possible. Place the laundry evenly into the drum after shaking them loose. -
Page 14: Cleaning And Maintenance
CLEANING AND MAINTENANCE Warning Wipe off dust and dirt on the body of the dryer and the surface of the main control panel . NOTE: Do not use excessive water, just a damp cloth. Do not use solvents. Do not use spray cleaners when cleaning the interior. Do not use harsh or abrasive cleaners. -
Page 15: Trouble Shooting
Did the amount of the loaded laundry exceed the rated load? Was the loaded laundry spun dry? Did the laundry become twisted whilst drying? SPECIFICATIONS SPECIFICATIONS ITEM (TYPE) AWD60A Power supply (220-240)V /50Hz Max operating current (A) Rated load (kg) Drying programs... -
Page 16: Program Descriptions
30 minute drying cycle, the last 10 minutes in cool down mode. Manually set drying cycle from 20 minutes to 240 minutes, the last 10 minutes in cool down mode. 30 minute cool air cycle. No heat applied. TUMBLE DRYER AWD60A TumbleDryer_AWD60A-4.indd 16 5/8/08 4:26:06 PM... - Page 17 AWD60A TumbleDryer_AWD60A-4.indd 1 5/8/08 4:25:42 PM...
- Page 18 6 - 8 9 - 10 TumbleDryer_AWD60A-4.indd 2 5/8/08 4:25:42 PM...
- Page 19 TumbleDryer_AWD60A-4.indd 3 5/8/08 4:25:43 PM...
- Page 20 TumbleDryer_AWD60A-4.indd 4 5/8/08 4:25:44 PM...
- Page 21 A = 825 mm B = 560 mm C = 595 mm = 30 kg • • • • • 10°C. 35°C. 50mm TumbleDryer_AWD60A-4.indd 5 5/8/08 4:25:45 PM...
- Page 22 50mm ,12g x 50mm 553mm 553mm ,12g x 50mm TumbleDryer_AWD60A-4.indd 6 5/8/08 4:25:46 PM...
- Page 23 TumbleDryer_AWD60A-4.indd 7 5/8/08 4:25:51 PM...
- Page 24 Start Pause Start Pause TumbleDryer_AWD60A-4.indd 8 5/8/08 4:25:54 PM...
- Page 25 TumbleDryer_AWD60A-4.indd 9 5/8/08 4:25:58 PM...
- Page 26 Retaining clip Drying rack 1 kg TumbleDryer_AWD60A-4.indd 10 5/8/08 4:26:01 PM...
- Page 27 6 kg 3 kg 950g 800g 300g 800g 3000g 800g 800g 200g 300g TumbleDryer_AWD60A-4.indd 11 5/8/08 4:26:02 PM...
- Page 28 B. Start Pause C. LED Start Pause 1 40 Delay 4 00 Delay Start Pause 0 20 Start Pause Start Pause TumbleDryer_AWD60A-4.indd 12 5/8/08 4:26:02 PM...
- Page 29 (220-240)V /50Hz Start Pause 60min TumbleDryer_AWD60A-4.indd 13 5/8/08 4:26:02 PM...
- Page 30 TumbleDryer_AWD60A-4.indd 14 5/8/08 4:26:05 PM...
- Page 31 Start Pause AWD60A (220-240)V /50Hz (kg) 2100 (HxDxW) mm 825 x 560 x 595 (kg) IPX4 Th - Tf - TumbleDryer_AWD60A-4.indd 15 5/8/08 4:26:06 PM...
- Page 32 1. EXTRA DRY 2.NORMAL DRYER 3.100 min 4.60 min 5.30 min 6.SET 7.COLD AWD60A TumbleDryer_AWD60A-4.indd 16 5/8/08 4:26:06 PM...
Need help?
Do you have a question about the AWD60A and is the answer not in the manual?
Questions and answers