Table of Contents
Advertisement
Quick Links
Advertisement
Table of Contents

Related Manuals for Brother P-Touch PT-H500LI


Summary of Contents for Brother P-Touch PT-H500LI
- Page 1 PT-H500LI Read this guide before using your P-touch labeler. Keep this guide in a handy place for future reference. Please visit us at http://solutions.brother.com/ where you can get product support and answers to frequently asked questions (FAQs).
- Page 2 • The enclosed interface cable should be used in order to ensure compliance with the limits for a Class B digital device. • Changes or modifications not expressly approved by Brother Industries, Ltd. could void the user's authority to operate the equipment.
- Page 3 The contents of this manual and the specifications of this product are subject to change without notice. If new versions of the PT-H500LI software become available, this manual may not reflect the updated features. Therefore, you may find that the software and the contents in this manual are different.
- Page 4 (collectively referred to in this warranty as "this Product"). • If you purchased a product from someone other than an authorized Brother reseller in the United States or if the product was used (including but not limited to floor models or refurbished product), prior to your purchase you are not the Original Purchaser and the product that you purchased is not covered by this warranty.
- Page 5 Machine that Brother agreed to replace. You are then expected to pack the Machine that Brother agreed to replace in the package from the replacement Machine and return it to Brother using the pre- paid freight bill supplied by Brother in accordance with the instructions provided by Brother.
- Page 6 MERCHANTABILITY AND FITNESS FOR A PARTICULAR PURPOSE, ARE HEREBY DISCLAIMED. • This Limited Warranty is the only warranty that Brother is giving for the machine. It is the final expression and the exclusive and only statement of Brother's obligations to you.
-
Page 7: Important Information
Important Information Should you have questions, or need information about your Brother Product, we have a variety of support options for you to choose from: USA-Customer Service: Customer Service 1-877-BROTHER (877-276-8437) Customer Service 1-901-379-1210 (fax) World Wide Web www.brother-usa.com Supplies / Accessories www.brothermall.com... -
Page 8: Table Of Contents
INTRODUCTION Contents Safety Precautions ......................9 General Precautions ....................16 Symbols Used in this Guide ..................17 How to use the P-touch labeler ..................18 GETTING STARTED................20 Unpacking Your P-touch labeler ..................20 General Description .....................21 LCD Display & Keyboard .....................22 LCD Display ......................22 Key Names and Functions..................23 Power Supply .......................25 Battery ........................25... -
Page 9: Safety Precautions
Safety Precautions To prevent injury and damage, important notes are explained using various symbols. The symbols and their meanings are as follows: Indicates an imminently hazardous situation which, if the DANGER product is handled without following the warnings and instructions, will result in death or serious injuries. WARNING Indicates a potentially hazardous situation which, if not avoided, could result in death or serious injuries. - Page 10 INTRODUCTION DANGER Rechargeable Li-ion Battery Carefully observe the following precautions for the rechargeable Li-ion battery (hereafter referred to as "rechargeable battery"), If these precautions are not followed, overheating, leaking, or cracks in the battery may result in an electrical short, explosion, smoke, fire, electric shock, injury to yourself or others, or damage to the product or other property.
- Page 11 DANGER Rechargeable Li-ion Battery Liquid (electrolyte) leaking from the DO NOT disassemble, modify, or P-touch labeler or rechargeable battery attempt to repair the rechargeable may indicate that the rechargeable battery. battery is damaged. If the rechargeable DO NOT dispose of the rechargeable battery leaks, immediately stop using battery in fire or intentionally overheat.
- Page 12 INTRODUCTION WARNING P-touch Labeler Follow these guidelines to avoid fire, electric shock, the risk of injury to yourself or others, and/or damage to the P-touch labeler or other property. DO NOT disassemble the P-touch labeler. For inspection, adjustment, and repair of the P-touch labeler, contact the retail outlet where the P-touch labeler was purchased or your local authorized...
- Page 13 DO NOT place heavy objects on, damage to the P-touch labeler or damage, or modify the adapter cord or other property. Brother does not plug. Do not forcibly bend or pull the assume, any responsibility for any adapter cord.
- Page 14 INTRODUCTION CAUTION Alkaline batteries/Ni-MH rechargeable batteries Follow these guidelines to avoid liquid leakage, overheating or rupture of the battery. DO NOT use a battery other than the Before using Ni-MH rechargeable one specified for use with your batteries, carefully read the P-touch labeler.
- Page 15 CAUTION P-touch Labeler Follow these guidelines to avoid minor personal injury and damage to the P-touch labeler. Store the P-touch labeler on a flat, DO NOT use the P-touch labeler in stable surface such as a desk or in a places with moisture or high humidity, drawer.
-
Page 16: General Precautions
• Depending on the environmental conditions and the applied settings, some characters or symbols may be difficult to read. • Use only Brother TZe tapes with P-touch labeler. Do not use tapes that do not have the mark. • DO NOT pull or apply pressure to the tape in the cassette. Otherwise the tape cassette or P-touch labeler may be damaged. -
Page 17: Symbols Used In This Guide
• The printed label may differ from the image that appears on the LCD. • Note that Brother Industries, Ltd. does not assume responsibility for any damage or injury arising from the failure to follow the precautions listed in this manual. -
Page 18: How To Use The P-Touch Labeler
INTRODUCTION How to use the P-touch labeler Create a label with the P-touch labeler GETTING STARTED • Prepare the P-touch labeler. P. 20 CREATING A LABEL • Entering and Editing text. In addition to entering text, the P-touch • Entering Symbols and Icons. labeler has a large range of formatting options. -
Page 19: Getting Started
Create a label by connecting your P-touch labeler to a computer GETTING STARTED Your P-touch labeler can be used as a stand alone handheld labeler, or it can be connected to a PC or Mac and used with the included P-touch Editor software to create more elaborate labels. -
Page 20: Getting Started
GETTING STARTED Unpacking Your P-touch labeler Check that the package contains the following before using your P-touch labeler: PT-H500LI P-touch labeler AC adapter USB cable The plug may differ by countries. Li-ion Battery Strap Starter Tape Cassette CD-ROM Quick Setup Guide... -
Page 21: General Description
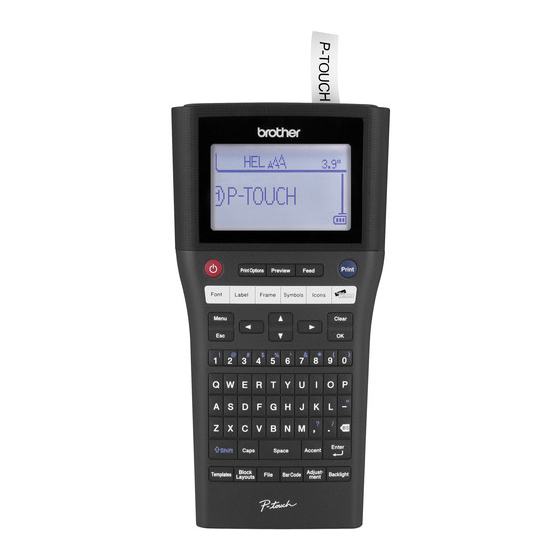
General Description 1. Cover latch 6. Tape cutter 2. Tape exit slot 7. Tape cassette compartment 3. LCD display 8. Release lever 4. Mini-USB port 9. Print head 5. Keyboard When shipped from the factory, the LCD display is covered with a protective sheet to prevent damage. -
Page 22: Lcd Display & Keyboard
GETTING STARTED LCD Display & Keyboard LCD Display 5. Block Separator Line Indicates the end of a block. 13 14 15 6. Cursor Characters are entered to the left of the cursor. Indicates the current data input position. 7. Return mark Indicates the end of a line of text. -
Page 23: Key Names And Functions
Key Names and Functions The default language is "English". 1. Power 7. Label Turns the P-touch labeler on and off. Enables label attributes for the label to be set. 2. Print Options Enables Numbering or Mirror to be 8. Frame selected and printed. - Page 24 GETTING STARTED 13. Esc (Escape) 25. Block Layout Cancels the current command and Use this key to select a layout from the returns the display to the data entry block layout. screen or the previous step. 26. File 14. Clear Enables frequently used labels in the file Clears all text entered, or all text and memory to be printed, opened, saved, or...
-
Page 25: Power Supply
Users of Ni-MH rechargeable batteries Always replace all six batteries at the same time with fully charged ones. Visit us at http://solutions.brother.com/ for the latest information about the recommended batteries. Attach the rear cover by inserting the three hooks at the bottom into the slots on the P-touch labeler, then pushing down firmly until it snaps into place. -
Page 26: Ac Adapter
GETTING STARTED AC Adapter Use AD-E001 (AC adapter) for the P-touch labeler. AD-18 or AD-24ES cannot be used. Connect the AC adapter directly to the P-touch labeler. Insert the plug on the AC adapter cord into the connector marked DC IN 12V on the P-touch labeler. - Page 27 Confirm that the hooks on the edge of the rear cover are inserted correctly, and then reattach the cover. If you cannot attach the rear cover, check to ensure the white lever is in the up position. If not, lift the lever, and then attach the cover. Removing the Rechargeable Li-ion Battery Remove the battery cover and the rechargeable Li-ion battery, and then reattach the battery cover.
- Page 28 GETTING STARTED Rechargeable Li-ion Battery Characteristics Understanding the properties of the rechargeable Li-ion battery will allow you to optimize its usage. • Using or storing the rechargeable Li-ion battery in a location exposed to high or low temperatures may accelerate its deterioration. In particular, using a rechargeable Li- ion battery with a high charge (charged 90% or more) in a location exposed to high temperatures will considerably accelerate battery deterioration.
-
Page 29: Inserting A Tape Cassette
Inserting a Tape Cassette Tape cassettes of 0.13", 0.23", 0.35", 0.47", 0.70" or 0.94" (3.5mm, 6mm, 9mm, 12mm, 18mm or 24mm) width can be used in your P-touch labeler. Use only Brother tape cassettes with the mark. If the new tape cassette has a cardboard stopper, be sure to remove the stopper before inserting the cassette. -
Page 30: Turning Power On/Off
GETTING STARTED Close the rear cover. If you cannot attach the rear cover, check to ensure the white lever is in the up position. If not, lift the lever, and then attach the cover. • Do not pull the label coming out of the tape exit slot. Doing so will cause the ink ribbon to be discharged with the tape. -
Page 31: Feeding Tape
Auto Power-Off Time Attribute Value Attribute Value AC Adapter Li-ion Battery 10min. 10min. 20min. 20min. 30min. 30min. 40min. 40min. 50min. 50min. 1hr. 1hr. 2hr. 4hr. 8hr. 12hr. • If you connect the AC adapter to the P-touch labeler after you specified “Auto Power Off”, the setting for “AC Adapter”... -
Page 32: Feed Only
GETTING STARTED Feed Only This function will advance the tape approximately 0.96" (24.5mm) resulting in a blank label sticking out of the tape cassette. This action is recommended when using Fabric tapes, which should be cut using scissors. Press the Feed & Cut key. "Feed &... -
Page 33: Setting Language And Unit
When you use Windows , install P-touch Editor, the printer driver and P-touch Update Software from the enclosed CD-ROM. When you use Macintosh, you can download the driver, software and manuals by visiting the Brother Solutions Center at http://solutions.brother.com/. Setting Language and Unit... -
Page 34: Features
Others Installing the Software and Printer Driver The procedure for installing the software varies depending on the OS of the computer. To download the latest driver and software, please visit the Brother Solutions Center website: http://solutions.brother.com For details on how to update the software, please refer to the User's Guide. - Page 35 2. User’s Guides Displays or installs the User's Guide. 3. Custom Installation Allows P-touch Editor, the printer driver, P-touch Update Software to be individually selected for installation. 4. Brother Support Displays the support website (Brother Solutions Center). Using P-touch Software...
- Page 36 GETTING STARTED Follow the on-screen instructions to complete setup. The P-touch Update Software can be used to check for updates. If [OK to use P-touch Update Software to update the software to the newest version? (An Internet connection is required to update.)] appears, click [Yes] or [No]. To check for new versions of the software and to update them, click [Yes], and then go to step 5.
-
Page 37: Uninstalling The Printer Driver
(Power) button to turn it off. Click - [Control Panel] - [Hardware and Sound] - [Printers]. Select [Brother xx-xxxx] and click [Delete this printer], or right-click the icon and click [Delete]. Right-click the [Printers] window, and then click [Run as administrator] - [Server Properties...]. - Page 38 Click [Control Panel] in [Apps] screen - [Hardware and Sound] - [Devices and Printers]. Select [Brother xx-xxxx] and click [Remove device], or right-click the icon and click [Remove device]. If a User Account Control message appears, type in the password, and then click [Yes].
-
Page 39: Uninstalling The Software
Click [Apple menu] - [System Preferences], and click [Print & Fax] (Mac OS X v10.6.8) / [Print & Scan] (OS X v10.7.x / OS X v10.8.x). Choose [Brother xx-xxxx], and click [-]. Close the [Print & Fax] (Mac OS X v10.6.8) / [Print & Scan] (OS X v10.7.x / OS X v10.8.x) window. - Page 40 Contact Information (For USA Only) Service Center Locations If you need a local service center, please go to www.brother-usa.com/service/ or call 1-877-BROTHER (1-877-276-8437) to locate the authorized service center closest to you. Note: Be sure to call the Service Center before your visit.
- Page 41 Printed in China LAD925001...
Need help?
Do you have a question about the P-Touch PT-H500LI and is the answer not in the manual?
Questions and answers