Table of Contents
Advertisement
Advertisement
Table of Contents

Related Manuals for InFocus LiteShow II


Summary of Contents for InFocus LiteShow II
- Page 1 User’s Guide *010-0643-00* 010-0643-01...
- Page 2 Windows are trademarks or registered trademarks of Microsoft Corporation. InFocus, LiteShow, ASK, and LP are trademarks or registered trademarks of InFocus Corporation. User’s Guide Travel Restrictions You must keep this User’s Guide with your LiteShow II adapter at all times when traveling in countries other than the United States of America. FCC Warning Note: This equipment has been tested and found to comply with the limits for a Class B digital device, pursuant to part 15 of the FCC Rules.
- Page 3 IMPORTANT NOTE: FCC Radiation Exposure Statement: This equipment complies with FCC radiation exposure limits set forth for an uncontrolled environment. This equipment should be installed and operated with a minimum distance of 2.5cm between the equipment and your body. Proper operation of this radio according to the instructions found in this user's guide will result in user exposure that is substantially below the FCC recommended limits. •...
-
Page 4: Table Of Contents
Requirements 5 Connecting the LiteShow II Adapter 6 Required connections 6 Optional connections 7 Installing LiteShow II Manager Software on your Computer 8 Connecting to the Main network/Internet 8 Running LiteShow II Manager Software 9 Display modes 12 Options 13... -
Page 5: Introduction
Congratulations. You have chosen to step into the future of wireless projection by using the InFocus LiteShow II cable-free digital projection system. The system consists of the LiteShow II wireless adapter and the LiteShow Manager software. It is a powerful and secure wireless projection system which allows you to send sharp images from a computer to any VGA compatible projector or display device. -
Page 6: Requirements
Requirements Display device compatibility: Analog VESA, 640x480, 720x480, 720x576, 800x600, 1024x768, 1280x720, 24 and 32 bits per pixel, 60 and 75Hz refresh rates Hardware The minimum hardware requirements are: CPU: Pentium 4 or M > 1.5GHz (Dual-Core Processor is recommended) Memory: 512 MB Available disk space: 10 MB Software... -
Page 7: Connecting The Liteshow Ii Adapter
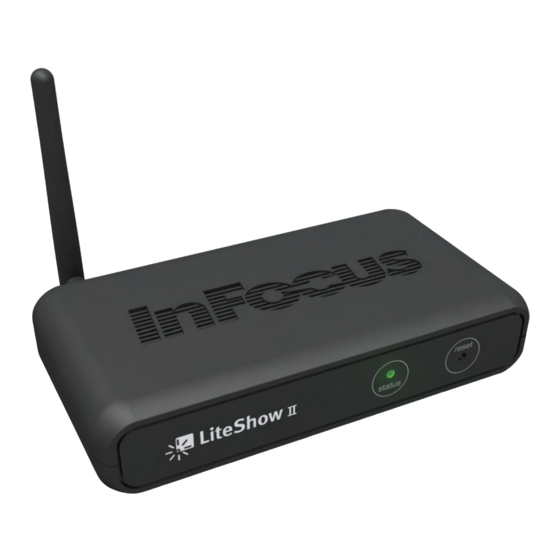
Required connections Connect the included VGA cable from the VGA OUT port on the LiteShow II adapter to the VGA in port on your projector. Connect the AC Power adapter to a power outlet, then connect it to the Power In connector on the adapter. The LED on the front of the adapter lights steady red while the adapter is booting up and steady green when the adapter is initialized and ready. -
Page 8: Optional Connections
Optional connections If you want to be able to access the main network through the LiteShow II adapter, either connect an Ethernet cable from the LAN port on the LiteShow II adapter to the main network, or connect the adapter to the main network wirelessly. See page 8 for details. If you are using Enterprise mode, you must connect the adapter to the main network with an Ethernet cable. -
Page 9: Installing Liteshow Ii Manager Software On Your Computer
Installing LiteShow II Manager Software on your Computer You can install this application from the included LiteShow Manager CD or download it from the LiteShow II adapter or from our website. It is easier to install it directly from the CD. -
Page 10: Running Liteshow Ii Manager Software
Running LiteShow II Manager Software On your computer, either choose LiteShow II Manager from the InFocus menu or double-click the LiteShow II Manager shortcut on your desktop. Adjust the angle of the antenna on the back of the adapter to maximize the wireless signal strength. - Page 11 Connect to Projector Select the projector, then click Connect: Other projector not listed here <xxx> <xxx> <xxx> <xxx> Set Default <xxx> Clear Default <xxx> <xxx> <xxx> If you have connected to a projector in the past, you can click the Start Projecting button to immediately start displaying your desktop to the projector. To make meetings more collaborative, you do not have to exit the entire application to hand over access to the projector to another user, you can simply click Stop Projecting.
- Page 12 Connect to Other Projector This dialog box allows you to connect to other projectors not listed in the Connect to Projector dialog. You can access this directly by holding down the Alt key while clicking Connect to Projector. Host name shortcuts saved here appear in the Connect to Projector dialog. The 3rd radio button option will only be visible if your com- puter’s built in Wifi wasn’t detected.
-
Page 13: Display Modes
Display modes You can select among three different display modes: Presenting/General Use (non-video, the default setting), Windowed Video, and Full Screen Video (this option will only be active when a video is detected that can be displayed in full screen). You can also select Custom settings by selecting a resolution (640x480, 800x600, 1024x768, 1280x720, or 1280x800) and by specifying your Desktop appearance (Duplicated or Extended). -
Page 14: Options
Options There are 2 tabs in Options. Screen Resize allows you to control how LiteShow II manager adjusts the image if the projection resolution is lower than the computer’s res- olution. You can choose to resize, to not resize, or to be asked the next time you start to project. - Page 15 The Performance tab controls how often the projected image is updated when the display mode is Presenting/General Use (this setting does not affect the speed of Video Playback display modes). Higher speeds use more of your computer’s processing power, which may slow it down. For best results, choose the highest speed that doesn’t impact the performance of Windows or other programs.
-
Page 16: Advanced Settings
Advanced settings Advanced settings are for adapters, are per-adapter, and are only accessible when you are connected to an adapter. The advanced settings button is disabled if you aren't connected to an adapter. You can select password settings, network and security types, and access codes. You can set a password up to restrict access to advanced set- tings. -
Page 17: Password Setup
Password Setup Click Settings Password to create or change the password, up to 32 characters. This password prevents unauthorized users from accessing Advanced settings. Users will be prompted for the password when they click the Advanced Settings button on the Main window. The password is adapter-specific, so if you want to protect multiple adapters, you must connect to each one individually and set the password. -
Page 18: Access Code
Turn the following 3 options on by checking their checkboxes. Access Code This causes the adapter to display a 4-digit code on the projection screen that must be entered by the user before the desktop is displayed. Use this to prevent users from using projectors that are not at their location (users must be in the same location as the projector to see the access code). -
Page 19: Firmware Update
Firmware Update Click to open a dialog box to access the InFocus website to download the latest firmware versions (you must be connected to the Internet). The current firmware version appears in the lower-right corner of the Splash screen. You may need to update the LiteShow Manager software before updating the firmware. -
Page 20: Factory Reset
Factory Reset Click this button to return all settings to factory default. You can also do this by holding down the adapter’s Reset button for 5 seconds. Device name/SSID The default name appears. You can modify this to help identify which projector the adapter is connected to by typing text in the box, but the prefix IFS- and the existing suffix must remain. -
Page 21: Network Types
Peer-to-Peer This is the simplest mode. In this mode, one computer projects to the LiteShow II adapter at a time using a direct wireless connection. If you click Stop Projecting, another computer can connect to that adapter. While the adapter is in use, the computer's wireless connection cannot be used to access the main network/Internet. -
Page 22: Wireless Security For Peer-To-Peer
Wireless Security for Peer-to-Peer You can choose to encrypt your data using an open WEP key (64 or 128 bit) or a WPA-personal with TKIP encryption. The valid keys length/type are as follows: WEP 64 - 5 letters/digits or 10 hexadecimal WEP 128 - 13 letters/digits or 26 hexadecimal WPA - Personal and WPA2-Personal (PSK) - 8-63 ASCII characters Enter the key, then click OK. -
Page 23: Access Point + Specific Advanced Settings
Access Point + specific Advanced settings Adapter connection to main network Choose Wired or Wireless. If Wireless, the Wireless Network & Security button becomes active. -
Page 24: Wireless Network And Security
Wireless Network and Security You can specify the type of security your network uses, and the adapter will use the same settings. Enter the SSID and channel of your main network, or click Detect to show all detected networks on all channels. Select the Security type from among WEP 64 bit, WEP 128 bit, WPA-personal with TKIP encryption, and WPA2-Personal (PSK) then fill in the appropriate Key. -
Page 25: 802.1X
802.1x This feature allows your LiteShow adapter to integrate into a secure wired corporate network. Contact your IT department if this feature is needed. If your network requires 802.1x authentication, enter your information here. -
Page 26: Enterprise Specific Advanced Settings
Enterprise specific Advanced settings The Guest feature of Enterprise mode allows guests (people not registered on the main network) to project wirelessly to the LiteShow adapter without being granted access to the main network. - Page 27 Guests By default, Allow guests is checked, meaning guests are allowed. To prevent guests from projecting, uncheck this box. Select what type of security applies to guests, if any.
-
Page 28: Troubleshooting And Maintenance
Connecting The LiteShow II device I want to con- Verify that the projector and the LiteShow II device are both turned on, and that the LiteShow II splash nect to is not showing up in my Lite- screen is displaying. - Page 29 Wait one minute. The device may simply be warming up. Peer-to-Peer: If it still displays solid red after 2 minutes, perform a hard reset. If it still displays solid red after a reset and 2 minutes have passed, the LiteShow II device will need to be replaced.
- Page 30 Access Point: Check to see how many people are currently using the LiteShow II device as an access point. The signal may become too weak to display the computer image through the projector because of excess users.
- Page 31 Image The LiteShow II image keeps freezing Verify the computer meets or exceed basic LiteShow II requirements. The LiteShow II image is suffering from Slow down the graphics/video update rate, which will free up more processing power for other tasks.
- Page 32 Show II AUDIO OUT port. Note: Disable the computer microphone in order to avoid feedback. Access Point: Plug an audio cable from the computer audio out port into the projector's audio in port. Wireless audio is not available when using the LiteShow II as an access point. Audio...
- Page 33 Password The Advanced Properties window Your IT administrator has set a password up for this LiteShow II device. Check with your IT adminis- requires a password trator for assistance. Note: The password is adapter specific.
- Page 34 Macintosh I can’t project my Macintosh At this time, the Macintosh Operating System is not supported. Compatibility through LiteShow II Enterprise mode-specific troubleshooting Connection Host name feature not working; can’t The DHCP server needs to be configured to deliver the WINS server IP address.
-
Page 35: Adapter Mounting Template
Line up the mounting holes on the bottom of the LiteShow II with the screw heads and insert the screw heads into the bottom of the LiteShow II. Slide the LiteShow II either to the front or the back, locking the screw heads into place. - Page 36 All exchanged parts and Products replaced under this Limited Warranty will become property of InFocus. InFocus' sole obligation is to supply (or pay for) all labor neces- sary to repair the Product found to be defective within the Limited Warranty period and to repair or replace defective parts with new parts or, at the option of InFocus, serviceable used parts that are equivalent or superior to new parts performance.
- Page 37 InFocus Customer Service – 1-503-685-8888 or visit www.infocus.com/service For Warranty service, the purchaser will be advised to return or deliver the defective Product freight and all fees prepaid, to an InFocus Service Center or to a service facility authorized by InFocus. When returning Product to InFocus, a Service Request Number (SR #) is required and must be clearly displayed on the outside of the ship- ping carton or a similar package affording an equal degree of protection.
- Page 38 Notwithstanding the foregoing, InFocus warrants the media on which the InFocus Software is recorded and delivered by InFocus to be free from defects in materials and workmanship under normal use for a period of ninety (90) days from the date of original purchase. Your exclusive remedy under this Section shall be, at InFocus’s option, a refund of the purchase price of the prod- uct containing the InFocus Software or replacement of the InFocus Software which is returned to InFocus or an InFocus authorized representative with a copy of the receipt.
Need help?
Do you have a question about the LiteShow II and is the answer not in the manual?
Questions and answers